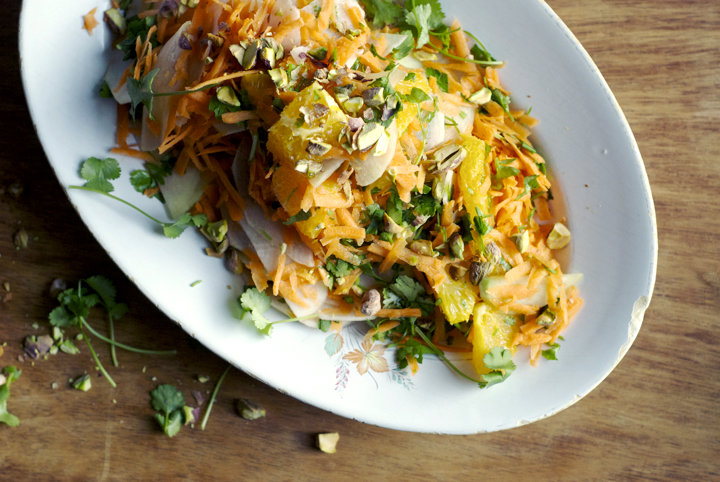
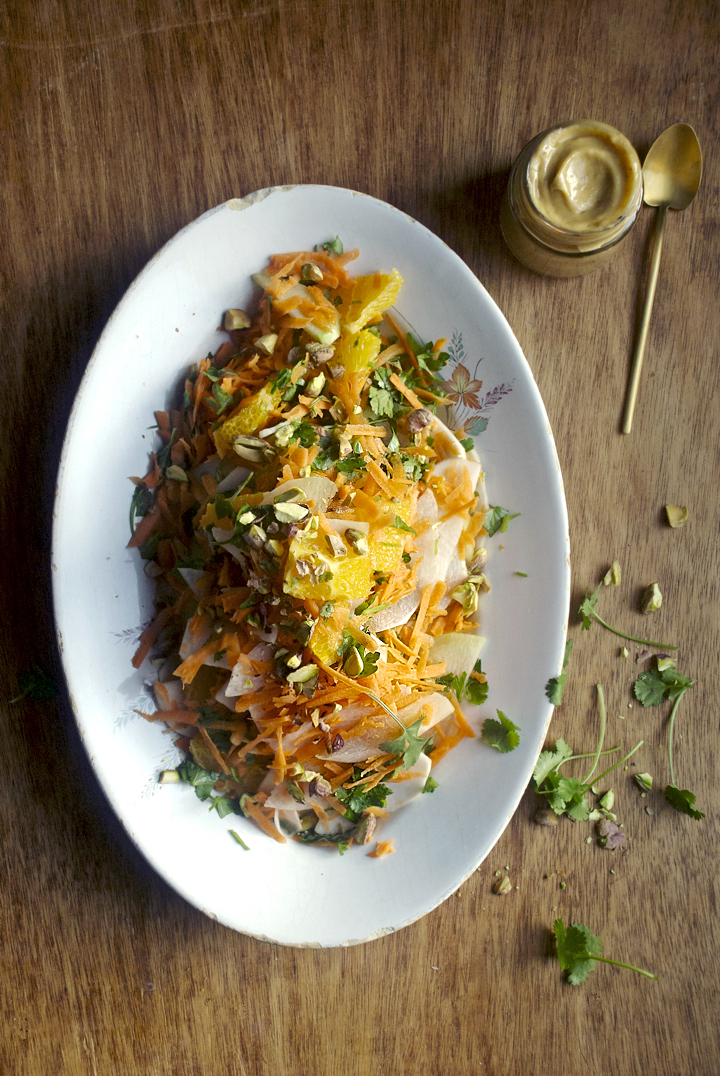
Farmers’ Market Salad with Apricot-Cumin Dressing
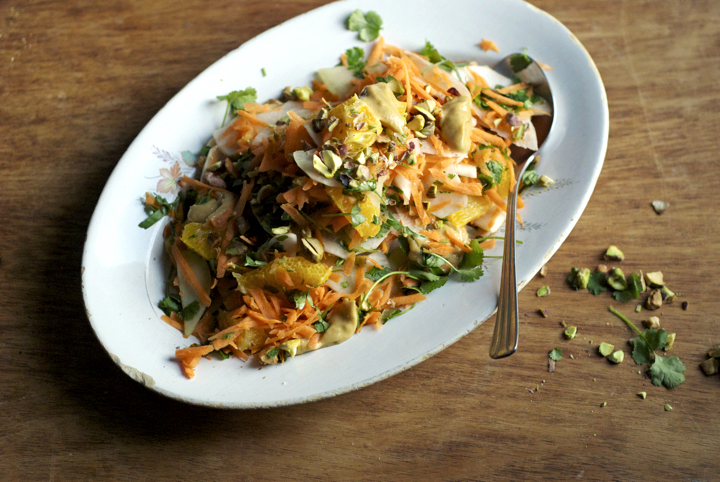
It’s that time of the year when the weather is getting warmer and I start craving raw and cold salads again. This week, at the farmers’ market, I brought home lots of kohlrabi and turnips with the main intention to eat them raw (which is how I like them better anyway).
I know that a lot of people aren’t particularly excited about turnips, and even though I used to share the same opinion, I’ve been rediscovering this vegetable and absolutely loving its versatility. I’ve been enjoying thinly sliced turnips with just a dash of salt and black pepper as a light snack these days – there’s something about its light and yet slightly bitter flavour that I really love.
Anyway, this salad is pretty much like a coleslaw, with lots of crispiness and different textures. I felt I needed to balance that with a smooth dressing, and that’s how I ended up making an apricot-based one. I was really pleased with how it turned out – it’s sweet and tangy at the same time, with just a hint of cumin to make it more complex and intense.
Farmers’ Market Salad with Apricot-Cumin Dressing
Serves 4
For the salad:
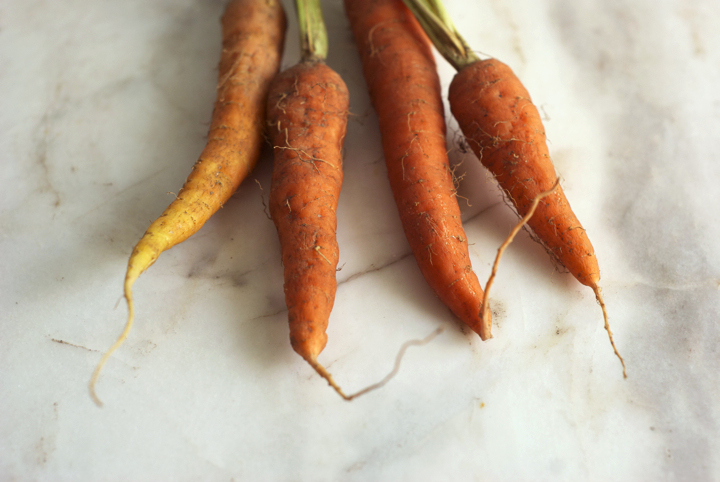
220 g /5 medium sized carrots, grated
140 g /1 large kohlrabi, thinly sliced
120 g /1 large turnip, thinly sliced
200 g /1 large orange, sliced into half-moons
15 g / half a bunch of parsley, finely chopped
15 g / half a bunch of coriander, finely chopped
60 g /1/2 cup pistachios, coarsely chopped, toasted and lightly salted
For the apricot-cumin dressing:
65 g /6 dried unsulphured apricots, roughly chopped
6 Tablespoons olive oil
6 Tablespoons lemon juice
3 Tablespoons water
1 ¼ teaspoons cumin seeds, toasted and ground in a mortar and pestle
¼ teaspoon sea salt
black pepper to taste
Combine all the ingredients for the salad in a large bowl.
Put the apricots in a small bowl. Pour 1 cup of boiling water over them, cover the bowl, and let stand for at least 10 minutes, or until the apricots are very soft.
In a blender, combine the drained apricots with all the other ingredients for the dressing. Blend until you get a very smooth mixture.
Pour the dressing over the salad (you might not need all of it, use just enough to coat the vegetables), mix with a wooden spoon or with your hands and serve immediately.
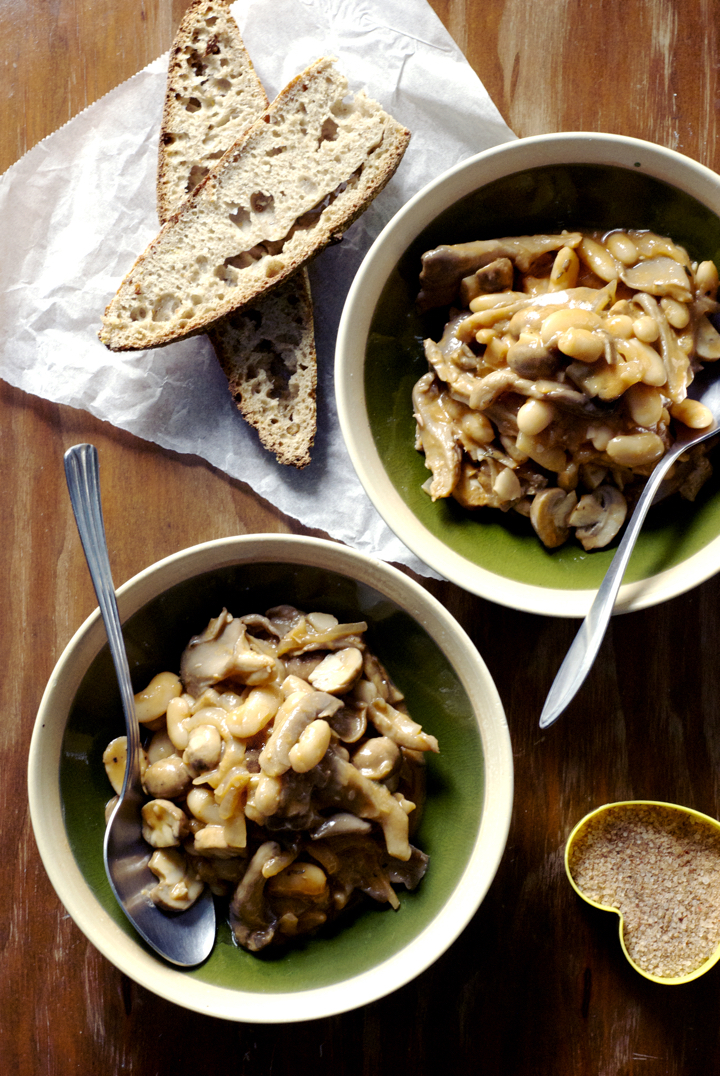
White Bean & Mushroom Stew with Thyme
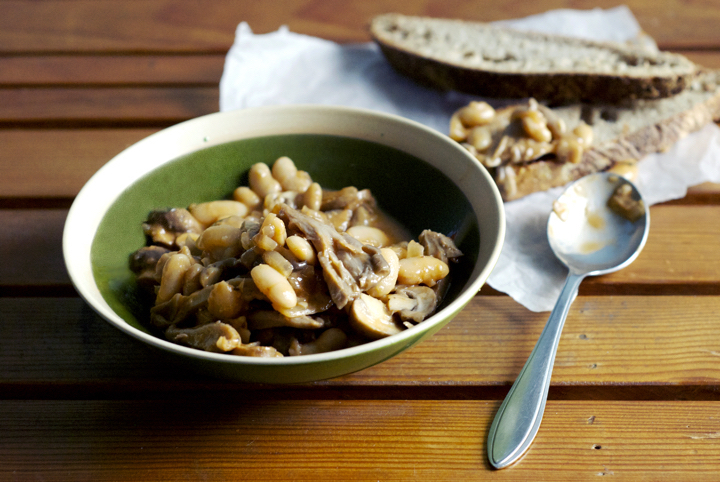
People often ask me how long it takes me to make a blog post. The short answer is: it depends. Some dishes take longer to prepare than others. Some foods look naturally good (like fruits and vegetables), while others need a little help (and time) to look appetizing (such as beans or tempeh, for instance). Sometimes, I know straight away what I want to do when it comes to photograph the dishes I prepare – I kind of have the pictures I want to take in mind –; other times, I have no clue of what I’m going to do.
Having said all this, I think stews such as the one I’m sharing with you today are the hardest meals to photograph. I love this kind of food, but stews in general look like an indiscernible (but incredibly tasty) mess of ingredients and are usually brown-ish in colour. This particular one demanded a lot of work. I cooked and shoot the recipe in the morning, but then, in the early afternoon, I looked at the images and wasn’t pleased. I ended up starting all over again, only to get images that I’m just relatively happy with.
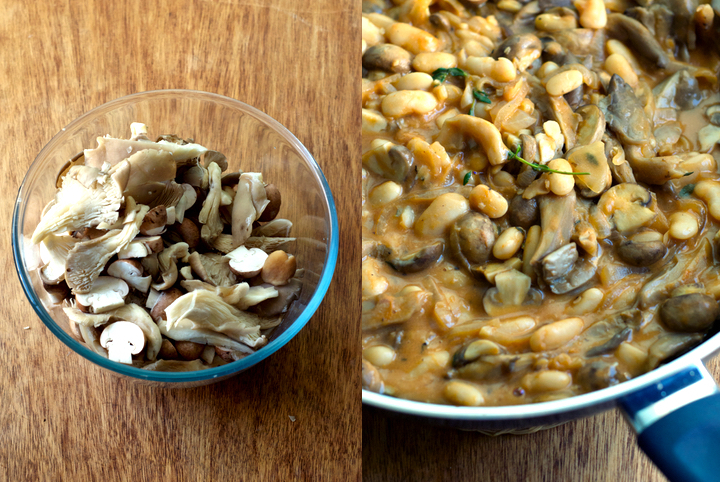
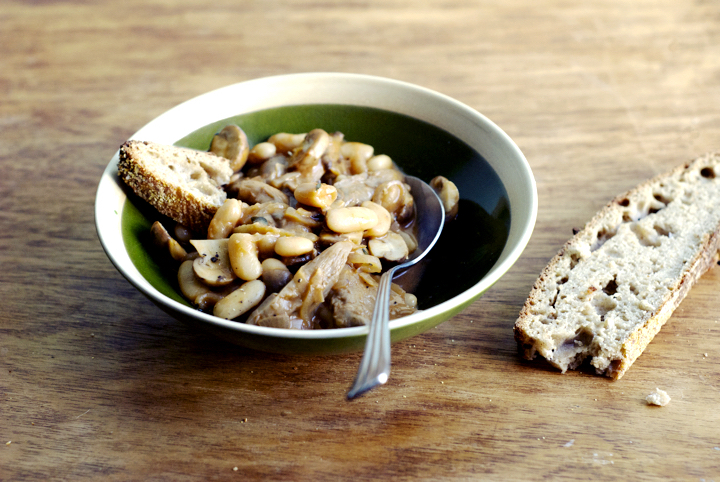
But when it comes to how the dish tastes though, that’s a whole different story. I actually make this kind of mushroom and bean stew very often because of how easy, quick and tasty it is. The addition of brewer’s yeast (you could use nutritional yeast instead) gives it complexity and complements the mushrooms’ earthy flavour beautifully. You don’t have to stick to the varieties I used here – shiitakes or the regular white button mushrooms work well too.
White Bean & Mushroom Stew with Thyme
serves 3, as a main
1 Tablespoon olive oil
1 large / 180 g onion, thinly sliced
4 garlic cloves, minced
300 g baby Portobello mushrooms, sliced
285 g pleurothus mushrooms, roughly chopped
6 thyme sprigs
255 g / 1 ½ cups cooked white beans
310 ml / 1 ¼ cups water
2 Tablespoons brewer’s yeast
2 Tablespoons lemon juice
3 Tablespoons tomato puree
½ teaspoon salt
2 teaspoons cassava starch (or corn starch)
Heat the oil in a large skillet over medium heat. Add the onion and garlic and cook until the onion is soft (about 5 minutes). Add the mushrooms and thyme sprigs and cook, stirring often, for additional 10 minutes, or until the mushrooms shrink considerably.
In a medium sized bowl, combine the water, brewer’s yeast, lemon juice and tomato puree. In another bowl, gradually mix the cassava starch with ¼ cup of the brewer’s yeast and tomato sauce. Add the cassava mixture back to the bowl with the sauce and whisk until thoroughly combined.
Add the beans and the sauce to the skillet with the mushrooms and let it boil for 5 minutes or until the sauce thickens and reduces a bit. Remove the thyme sprigs and serve immediately with crusty bread on the side.
Lentils with Carrot Purée, Caramelized Onions and Hazelnut Mustard Dressing
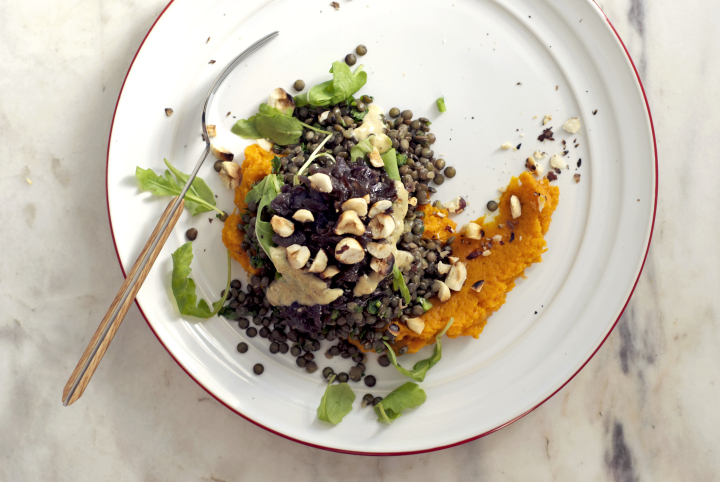
I know a lot of people who find lentils boring and bland in flavour, and most of the time is because they’ve eaten them overcooked and without exciting accompaniments. I can eat a lot of lentils – typically 2 or 3 times a week – and the reason I’m a huge fan of them (both flavour and nutrition-wise) is because there are so many possibilities when it comes to incorporate them in a dish.
The other day I made a big batch of carrot purée because I needed some to bake a cake. I ended up eating the leftovers – properly seasoned with garlic and olive oil – for dinner along with (also leftovers) lentils and some quickly sautéed onions. I thought the three components got along pretty well, and decided to further explore the idea in order to come up with a recipe worth sharing here on the blog.
This dish might seem like it has a lot of elements but they actually come together pretty quickly and require ingredients you most likely already have in your pantry. What I like about it is that not only it tastes really good but also makes a nutritionally balance main course, which sometimes, for people new to vegan or vegetarian ventures, is hard to achieve with plant-based ingredients.
Hope you like the lentils, enjoy the last days of summer and warmth and fully embrace the next season. Fall is my favourite of all four seasons, and I love the flavours and produce that comes with it. No wonder it’s the time I’m the most inspired to cook and bake, and hopefully I’ll come up with some new creations that will delight your eyes and palate. See you all soon! (: J
Lentils with Carrot Purée, Caramelized Onions and Hazelnut Mustard Dressing
(serves4)
1 ½ cups french lentils, such as Puy
½ teaspoon salt
1 big handful parsley (22 g), finely chopped
for the carrot purée:
510 g (8 to 10) medium sized carrots, cubed
¼ teaspoon salt
1/8 teaspoon ground cinnamon
½ teaspoon freshly ground black pepper
squeeze of lemon juice
for the caramelized onions:
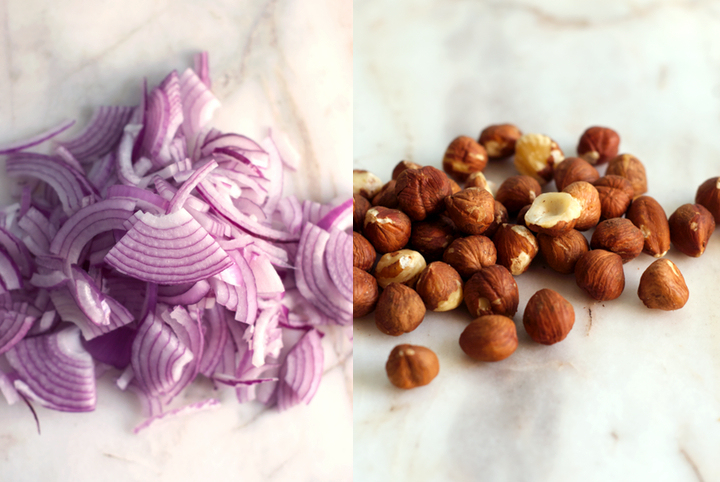
600 g (4 large) onions, finely sliced into rings
½ teaspoon salt
2 tablespoons olive oil
for the hazelnut-dijon dressing:
47 g / 1/3 cup hazelnuts
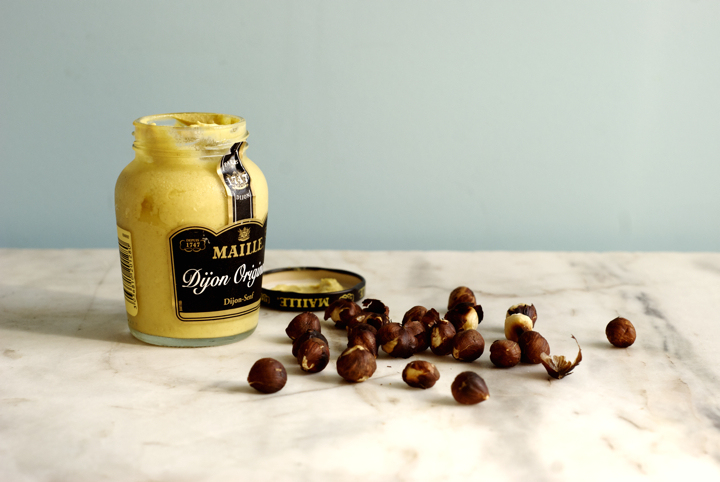
1 tablespoon Dijon mustard
2 teaspoons brown rice syrup
¼ teaspoon salt
4 tablespoons olive oil
4 tablespoons red wine vinegar
2 tablespoons water
arugula leaves, micro herbs etc., to serve
Carrot purée: Using a steamer, steam the carrots for 8-10 minutes or until they’re cooked through. When they’re cool enough to handle, add them to a food processor with the remaining ingredients for the purée and blend until it reaches a smooth consistency. Adjust the seasoning, adding more salt if necessary. If the mixture seems too thick and you’re having trouble mixing it all together, add up to 6 tablespoons of the water you used for steaming the carrots.
In the meantime, bring a medium sized pan filled with 4 cups of water to a boil. Add the lentils, reduce the heat to medium and cook for approximately 12-14 minutes, or until they’re cooked through but still have some bite. Add the salt, drain the lentils and rinse under cold water. Transfer the lentils to a bowl and mix in the chopped parsley.
Caramelized onions: Heat a large non stick skillet over medium heat and add the olive oil, onions and salt. Cook, stirring often, for about 15 to 20 minutes, or until the onions are really soft. In the last minutes of cooking, turn the heat up to high and cook for additional 3 to 4 minutes, or until they crisp up a little.
Hazelnut mustard dressing: In a skillet over medium-high heat, toast the hazelnuts until they’re golden brown (4 to 5 minutes). When they’re still hot, transfer to a clean kitchen towel and rub them against it to remove as much of its skin as possible. Transfer the hazelnuts to a food processor and process until smooth with the remaining dressing ingredients.
To serve, put a few tablespoons of carrot purée on 4 different plates, topping with the lentils, followed by the caramelized onions and a gentle drizzle of the hazelnut dressing. Add a few arugula leaves, if desired, and serve.
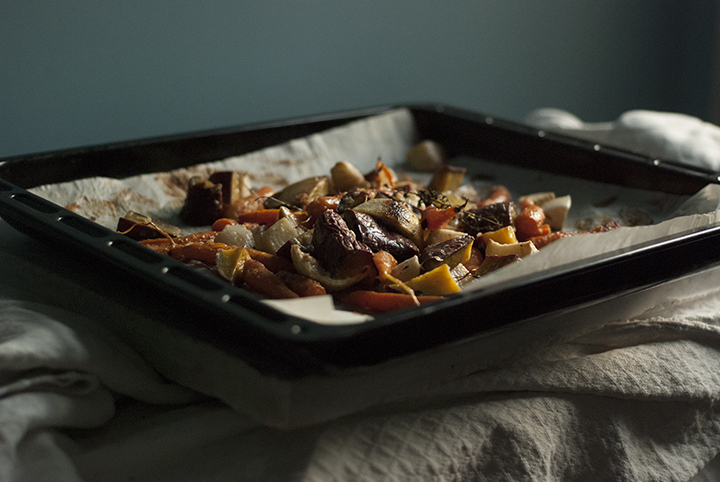
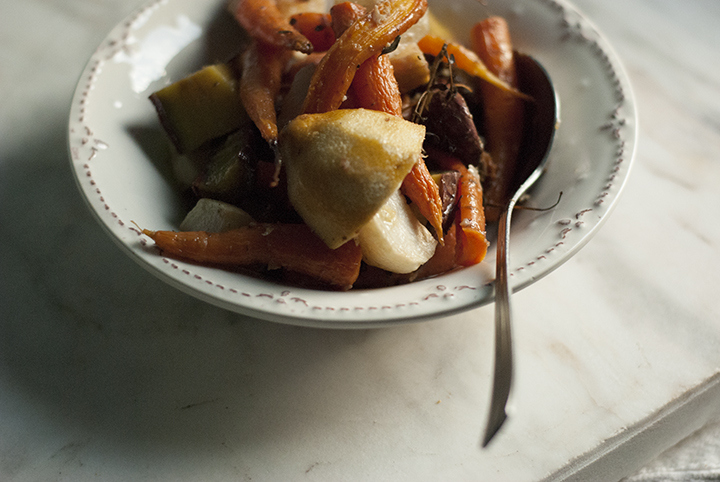
Lemon Roasted Vegetables
Hello guys! Sorry for my absence on the past few weeks. I’m getting used to a new working routine and, as a consequence, the blog has been a bit neglected (I’m slowly getting back into posting more regularly). But before we get into today’s post, I thought we could talk, briefly, about some of the recipes I’ve been making these days –most of them from around the web. I’ve cooked Ottolenghi’s mejadra twice now, only cutting on the oil, and even my grandmother liked it (despite its spiciness). This stew has been in high rotation around here as well, because it’s getting cold and because I love beets (and you do have to like them to truly enjoy this dish). Martha Stewart’s nori rolls are also worth trying – they’re perfect for lunch boxes –, even though the recipe takes a bit of time and you might struggle wrapping up the nori (at least I did, but probably because I was in a rush when I made them). Finally, I’m not a tea person, but I’ve been drinking this one twice a day for the last two weeks (it is that good).
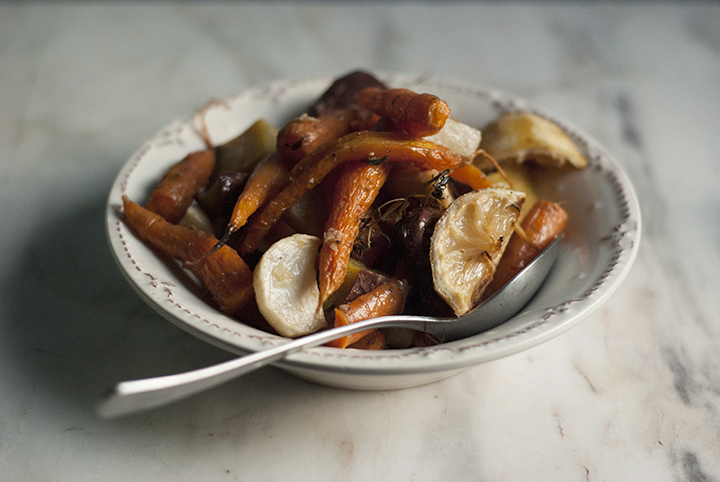
Now, let’s talk roasted vegetables. Around this time of the year, there’s already a great variety of roots in the markets – carrots, turnips, beets… – and they’re perfect for roasting. It might take a bit of time – although not active time – but, in the end, you’ll have a baking tray full of tender and sweet vegetables with slightly brown bits and notes of lemon. They pair incredibly well with simply cooked whole grains and/or puy lentils, for a more complete meal. I guess nothing speaks better of autumn than that.
Lemon Roasted Vegetables
(serves 4 to 6, as a side)
380 g small carrots, halved
315 g / 3 medium sized turnips, cut into 5 -6 cm pieces
450 g / 4 medium sized sweet potatoes, cut into 5-6 cm pieces
5 garlic cloves, peeled
one lemon
½ teaspoon salt
¼ teaspoon black pepper
2 tablespoons olive oil
2 teaspoons brown rice syrup
2 sprigs lemon thyme
Pre-heat the oven to 200C. Line a large rimmed baking tray with greaseproof or parchment paper.
Zest the lemon and cut the pulp into quarters. Combine all the vegetables in a large bowl and add the lemon’s pulp and lemon thyme sprigs to it.
In a mortar and pestle, combine the garlic cloves, lemon zest, olive oil, brown rice syrup, salt and black pepper. Smash everything together until the garlic cloves are broken down. Pour this mixture over the vegetables and mix, with your hands, to coat them evenly. Transfer the veggies to the baking tray and sprinkle a bit more salt and pepper over them.
Cover the baking tray loosely with parchment paper. Roast the vegetables, covered, for 45 minutes. After that time, roast, uncovered, for additional 15 minutes or until golden brown.
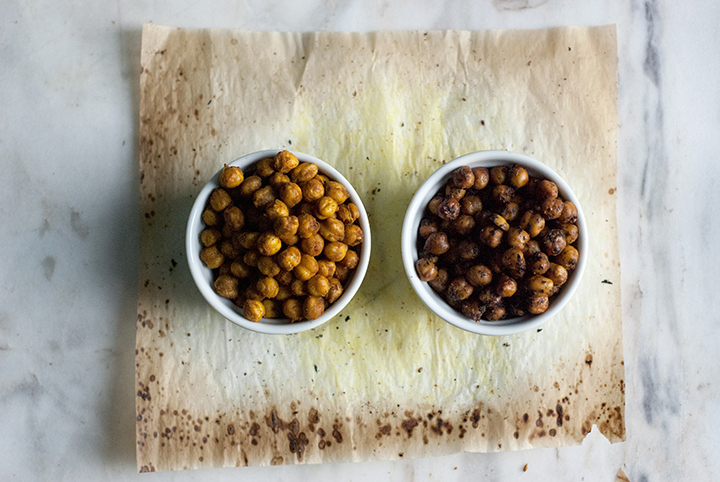
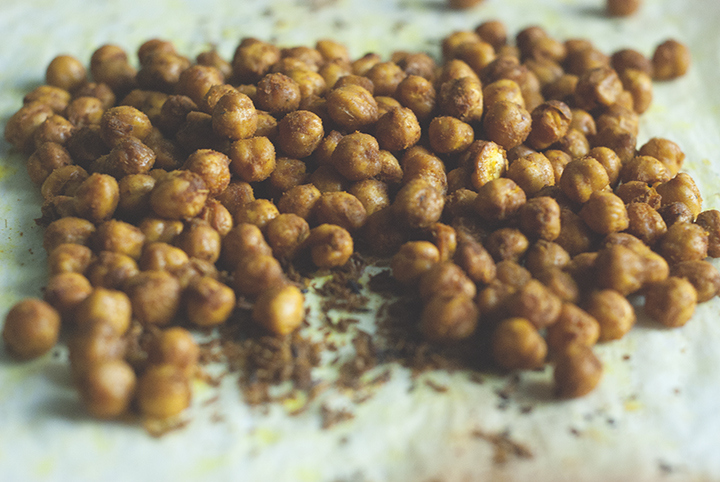
Roasted Chickpeas – Two Ways
I had never been much into sports. As a kid, I tried swimming and gymnastics and, even though I liked the later way more than the former, it wasn’t something I was passionate about. In my teen years, I was introduced to fencing and started to realise that the kind of physical activity I liked had to be in the form of individual, not collective, sports.
In the recent years, and after a very long time – way too much time – of not exercising at all, I started to run. It wasn’t love at first sight – I had many bad runs where I practically ran out of breath and ended up giving up – but, over the time, I started to really enjoy it. These days, I can’t imagine myself not running on a regular basis. I don’t have the right emotional vocabulary to describe how good running makes me feel, but I love every aspect of it – the fresh breeze stroking my cheeks, the feeling of freedom, that sort of alienation from reality by being able to not think about anything… I’m sure most of you guys who run can relate.
Over the last 2/3 months, I’ve been training for my first half-marathon. As the date of the race approaches – it will be in two weeks – I’ve been increasing my running distance. That means that, even though I have the music to keep me distracted, I also have plenty of time to elaborate ideas and projects in my head. Sometimes, I find myself thinking about recipes and ingredient combinations to try. I had the intention to make roasted chickpeas in the back of my head for a while, but it was only while running, the other day, that I thought about the particular flavour combinations I’m now sharing with you.
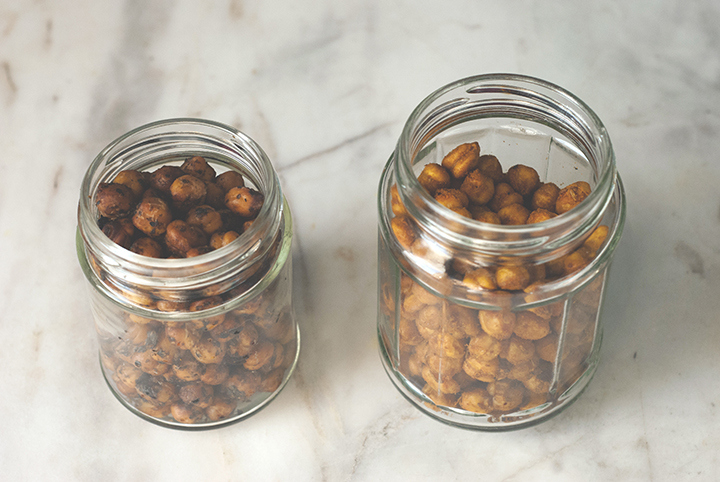
I’ve never thought roasted chickpeas would be so good. You’ll end up with tasty crunchy bits, packed with flavour, that not only make perfect protein-packed snacks, but are also a great addition to salads. This one’s a very straight-forward recipe, but I’d advise you not to skip the step where you have to take the chickpeas from the oven for a couple of minutes and then pop them back in again. It really makes them crunchier. I also think that home-cooked chickpeas work best for this recipe instead of canned. Canned chickpeas tend to be too soft and mushy, whereas with the dried variety, you’re in control and will likely avoid over-cooking. However, if cooking beans from scratch isn’t your thing, just make sure you really dry the chickpeas well before putting them into the oven.
Roasted Chickpeas – Two Ways
(serves 6, as an appetizer)
475 g / 2 ½ cups cooked chickpeas
for the turmeric/cumin version:
½ teaspoon turmeric
2 teaspoons cumin seeds, crushed in a mortar and pestle
a pinch of dried chilli flakes
1 ½ teaspoon olive oil
salt to taste
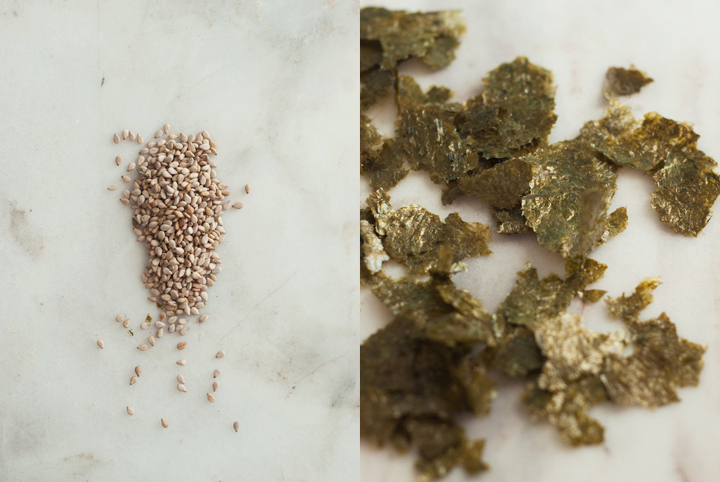
for the nori/sesame version:
1 nori sheet
2 teaspoons toasted sesame seeds
1 ½ teaspoons olive oil
salt to taste
tamari sauce to taste
Pre-heat the oven to 200C.
Spread the chickpeas over a large clean kitchen towel. Grab another towel and put it on top, gently pressing down in order for the moisture to be absorbed. Add half of the chickpeas to a bowl, and the other half to a different bowl.
For the turmeric/cumin version: Combine half of the chickpeas with the oil, followed by the spices and salt. Toss well to evenly coat them.
For the nori/sesame version: Place the nori sheet in a small baking dish. Toast it, in the pre-heated oven, for 10 minutes. Remove it from the oven and let it cool a bit until it crisps up. Now, tear the nori into pieces and add it to the bowl of a food processor, pulsing until you get a fine powder. At this stage, add the sesame seeds and pulse a few times, just to break them down a bit.
Mix the other half of chickpeas with the olive oil. Add the nori/sesame mixture, a pinch of salt, and toss everything together.
Place both chickpeas’ mixtures in two separate baking tray and roast, in the top and middle thirds of the oven, for 30 minutes, rotating halfway through. After that time, take the trays out of the oven and let them cool, at room temperature, for at least 5 minutes. Return the chickpeas to the oven for additional 10 minutes or until golden brown. Once ready and cooled, coat the nori/sesame chickpeas with a splash or two of tamari sauce. Store the chickpeas in glass jars or tightly sealed containers — they’ll keep well for a week.
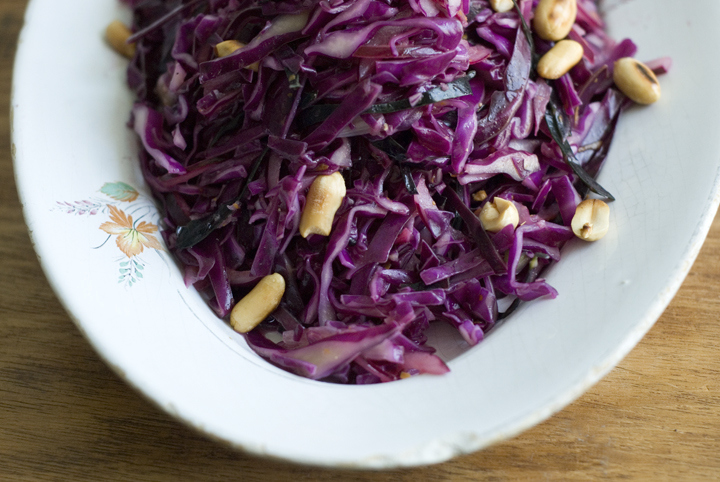
A Purple Salad
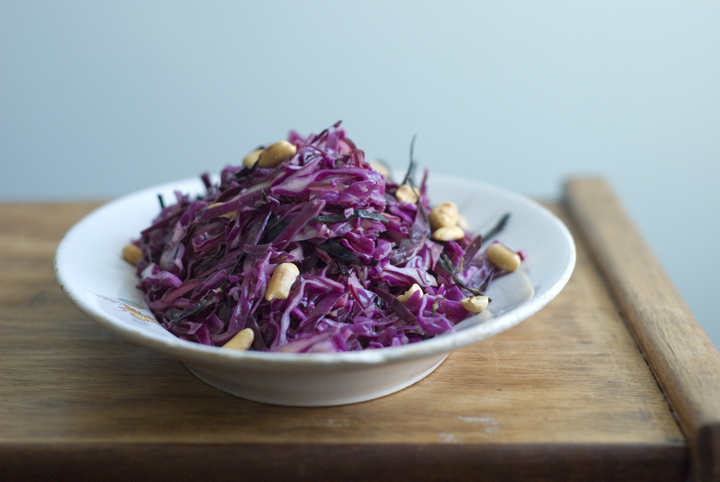
My friend Ana‘s favourite colour is purple. The other day I was driving back home from her place and stopped at this little grocery store. I was into buying some vegetables for lunch and, subconsciously thinking about the conversation we had about colour that day, I decided to bring home, amongst other things, a purple cabbage. Purple cabbage isn’t the kind of vegetable I eat much. I love cabbage and cook it often but, for some reason, I’ve never cared much for the purple variety. However, after making this salad I guess that is about to change. The cabbage is “cooked” in a garlicky and vinegar-y dressing and the toasted nuts add a nice contrast thanks to their depth and earthiness. I didn’t add any fresh herbs to the whole thing because I didn’t have any at hand, but you can definitely finish it off with some finely chopped parsley or coriander. When it comes to salads, I usually think “The simpler, the better”. Work with a few ingredients, cut them appropriately, make a slighty more acidic/vinegary dressing and you’re good to go. And in case you want to know, I’ve already decided what my next “purple experiment” will be: sauerkraut.

A Purple Salad
(serves 4)
½ medium sized / 300 g purple cabbage
½ red onion / 80 g, thinly sliced
3 tablespoons / 30 g toasted peanuts (or walnuts), coarsely chopped
for the dressing:
2 tablespoons olive oil
2 tablespoons red wine vinegar
1 big piece / 15 g of fresh ginger, grated
1 garlic clove
1 teaspoon agave nectar
zest of one orange
Remove the cabbage’s outer and tougher leaves. Then, cut the cabbage in half and remove its white stalk. Cut each half into paper thin slices. Transfer the shreds of cabbage to a large bowl.
Now, it’s time to make the dressing. Add all the dressing’s ingredients (except the ginger) to a bowl and whisk to combine. Finely grate the ginger and squeeze it over the bowl (you’re not going to use the pulp). Add the sliced onion to the bowl with the dressing and let it sit, covered and at room temperature, for at least 15 minutes. The dressing will “cook” the onion making it softer and sweeter to the palate.
Add the dressing and onion to the bowl with the shredded cabbage. Using your hands, massage the salad for at least 3 minutes or until its volume reduces by half. Serve immediately sprinkled with coarsely chopped peanuts or walnuts (preferably toasted).
Grilled Asparagus with Sunflower Seed Sauce and Gram Crêpes
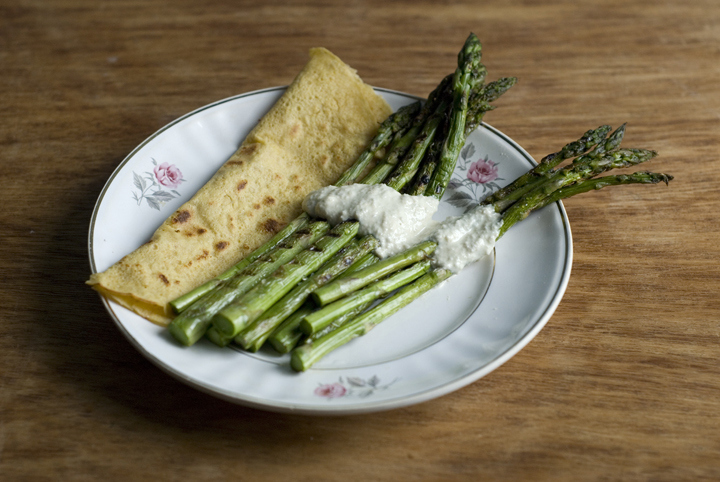
I frequently spot asparagus in supermarkets and groceries stores, but they’re so expensive around here that I tend not to buy them. Plus, they usually come from very far away, which means long airplane travels and refrigeration time. I often wonder how long they have been harvested, and as much as I like eating them, that thought keeps me away from bringing them home. However, the other day I spotted locally sourced fresh asparagus and, knowing they’re in season, I prepared a simple and practical dish with this spring treat. The thing with asparagus is that you don’t want to overcook them as well as masking their flavour by combining them with a hundred different ingredients. With that in mind, this recipe came to live. The sunflower sauce is creamy and delicate in flavour making a perfect match for the grilled asparagus. I have a recipe for gram crêpes deep in the archives but, as I’m too lazy to check it out and because it’s a simple one to write down, I’m reposting it here again. Hope you enjoy this one, I’ll be coming back soon. (;
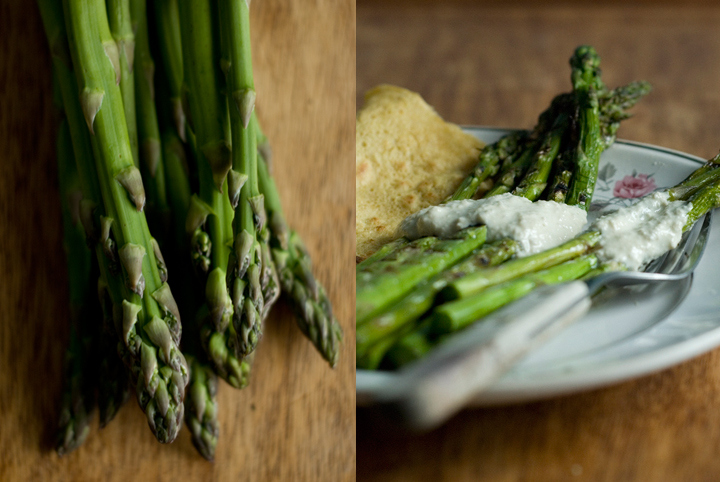
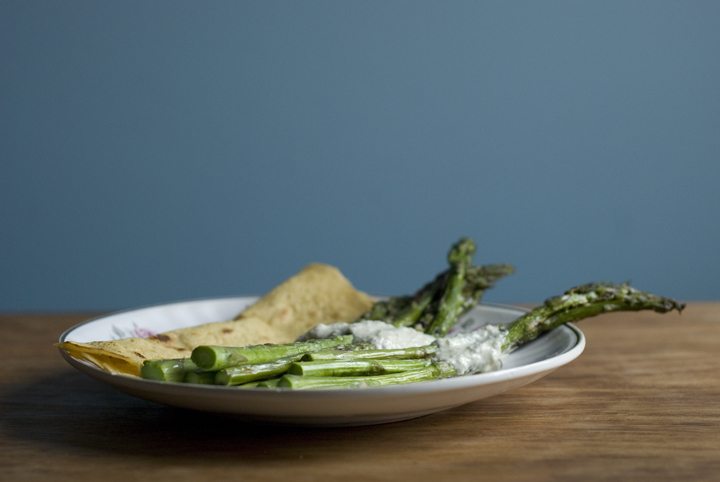
Grilled Asparagus with Sunflower Seed Sauce and Gram Crêpes
(serves 2)
1 bunch / 300g asparagus, trimmed
olive oil
salt
for the sunflower seed sauce:
¼ c. / 35 g sunflower seeds
¼ c. / 65 ml hot water
2 tablespoons olive oil
2 tablespoons freshly squeezed lemon juice
½ teaspoon sal
freshly ground black pepper
for the gram crêpes:
¼ c. / 35 g gram flour
½ c. /125 ml warm water
¼ teaspoon salt
olive oil
For the sauce, add all the ingredients to the bowl of a food processor. Process on high speed for 1-2 minutes or until the sauce gets a fairly smooth consistency. Add more hot water if you want to thin it out a bit and adjust the seasonings to your liking.
To grill the asparagus, start by brushing a griddle pan with olive oil. Turn the heat to medium-high and when the pan is hot, but no smoking, add the asparagus. Sprinkle them with sea salt and grill for 3-5 minutes on each side or until they get visible grilling marks. Set aside.
For the gram crêpes, mix all the ingredients (except the olive oil) in a bowl. Whisk until you get a thin batter with no visible lumps. In the meantime, and using a pastry brush, grease non-stick frying pan and heat it to medium heat. When the pan is hot, but not smoking, add 1/3 cup of the gram batter to it, making sure it evenly covers the bottom of the pan. Cook for 2-3 minutes on each side, being careful not to break the crêpe when turning it over. Add the remaining 1/3 cup of batter to the pan and repeat the proceeding.
To assemble, arrange the asparagus on a plate, spoon the sauce over them and serve the gram crêpes on the side.
Sautéed Beets with Coriander Seeds and Walnuts
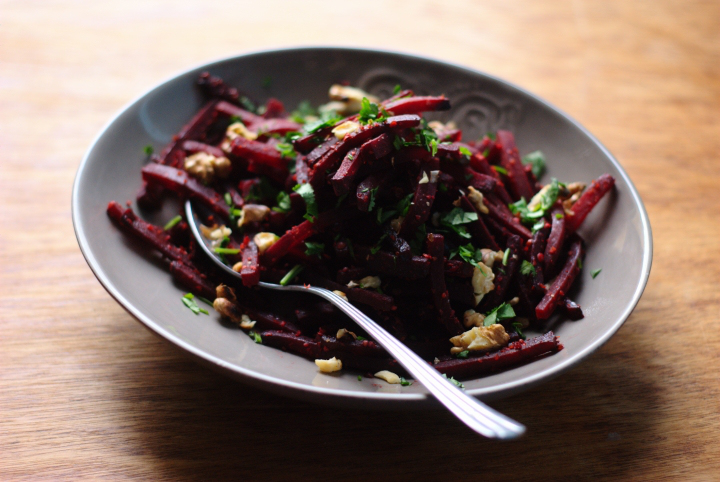
I was a little doubtful about posting this one because it’s a recipe that doesn’t aim to convert non-beet fans to beet lovers. It’s actually aimed at those people who, like myself, adore beets and cook them often. Most of the time, it’s suggested that, in order to prepare beets, you should either boil or roast them. Out of those two methods, I prefer roasting as it lends a smoky flavour to the beets; however, it can take up from 40 to 50 minutes if your beets are medium sized. The other day, I found myself trying to master the julienne technique and, without carrots in sight, I practiced with beets. The whole chopping thing took me a while – I can be a bit of a perfectionist sometimes – but, unless you’re aiming at getting perfect beet matchsticks (which I didn’t get anyway), the chopping process will only take you a couple of minutes. Alternatively, you can get the job done in no time using a mandolin. I decided to sautée the beet matchsticks with some coriander seeds and ended up with a dish that I found really flavourful in around 15 minutes. If you’re going to make this one please don’t skip the walnuts – they’re crucial to balance out the beets’ sweetness and add a very pleasant nuttiness to the whole thing.
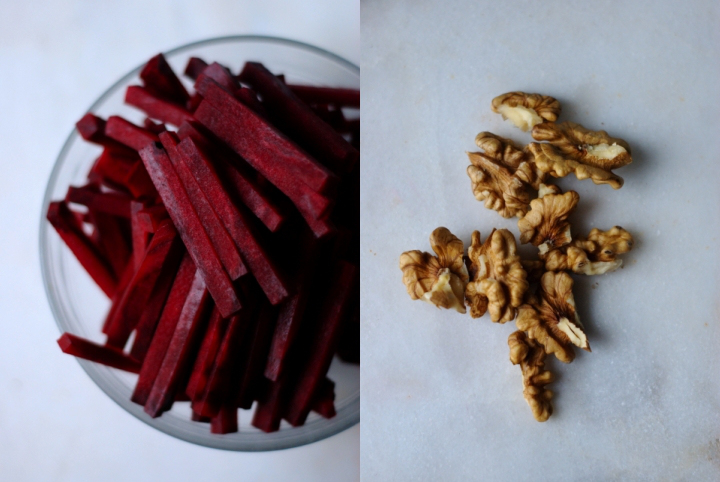
Sautéed Beets with Coriander Seeds and Walnuts
(serves 4, as a side)
3 large beets / roughly 320 gr cut into matchsticks of about 0,7 cm width
2 teaspoons olive oil
3 teaspoons coriander seeds, ground in a mortar and pestle
¼ teaspoon salt
1 ½ tablespoons red wine vinegar
1 big handful toasted walnuts
1 handful chopped coriander leaves
a splash of lemon juice
1. In a large non-stick frying pan over medium-high heat, add the olive oil, the beets and the coriander seeds. Sautée for 1 to 2 minutes and, as soon as the pan starts sizzling, cover it with a lid. Let the beets cook for 10-12 minutes, lifting the lid once or twice to give it a good stir, or until al dente. At the very last minute of cooking, add the red wine vinegar, salt and toasted walnuts to the beets. Stir well and transfer to a platter, finishing up with a splash of lemon juice and chopped coriander. The beets are particularly good served over cooked brown rice.
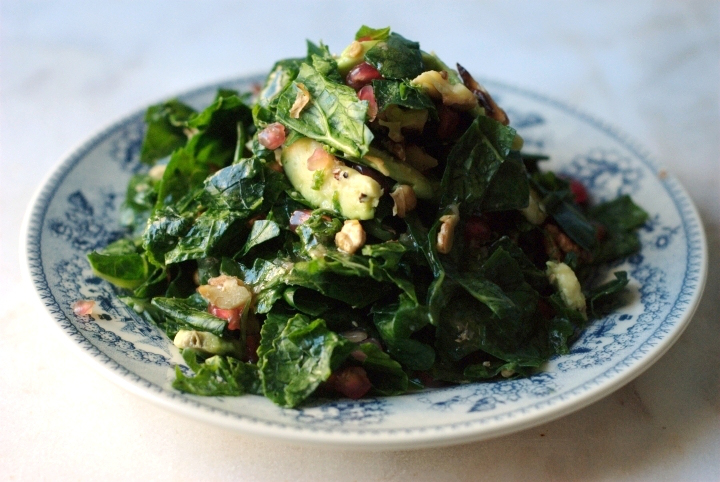
Raw Kale and Pomegranate Salad
Last year was demanding – both physically as well as emotionally – to say the least. A lot of things have happened – some of them were actually quite good, while others were surprising and unexpected in not so good ways. I’ve cooked almost everyday throughout the whole year and never been away from the kitchen, but I guess I just felt uninspired most of the time. That, plus being busy working on other things that left me intellectually drained – 2012 was the year I wrote and presented my master’s thesis – were the major issues that kept me away from this place from what now seems to be a very long time.
However, I’m back. This year I decided to make this blog a priority because either creating recipes from scratch or adapting them from other sources is what makes me happy and what I think I’m good at. To start off the year and to reinaugurate this little place of mine I’m posting a salad recipe I’ve been making a lot.
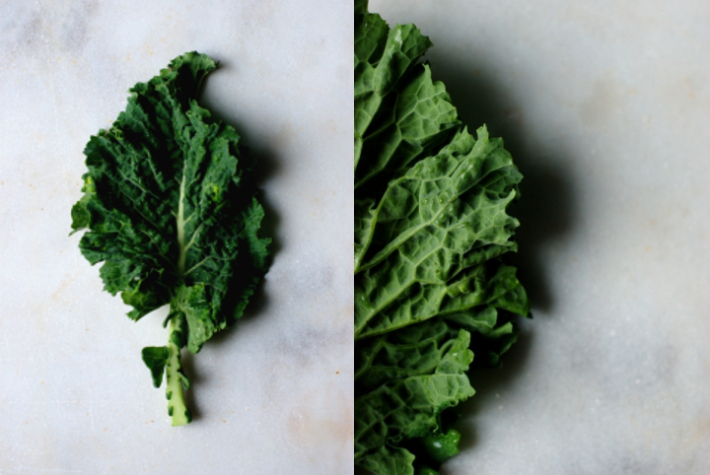
Basically, every weekend my grandmother buys me this huge bunch of kale. I’ve made tons of stews with it, sautéed it with garlic and olive oil multiple times, added it to soups, until I ran out of ideas on how to use it. However, if munching on raw leafs of kale is one of my favourite snacks while preparing dinner, why not to come up with a recipe that calls for this lovely vegetable in its natural state? Raw kale is wonderful in salads thanks to its intense, slightly bitter and cholrophyll-y taste. However, to make the most out it you’ll need to massage its leaves in order to make them softer in texture and sweeter to the palate. Massaging kale leaves will also break down their cellulose structure and make them more easily digestible. This salad calls for kale as its base but all the other ingredients can be easily replaced – instead of pomegranate you could use grapes or tangerine segments, and almonds would also work well in place of the walnuts.

Raw Kale and Pomegranate Salad
(serves 4, as a side)
2 cups (packed) / 110 gr raw kale, coarsely chopped
½ cup / 75 gr pomegranate seeds
half of an avocado (aprox. 100 gr) cut into small slices
¼ cup / 30 gr walnuts, coarsely chopped and lightly toasted
olive oil
lemon juice
for the dressing:
2 tablespoons olive oil
1 tablespoon red wine vinegar
1/8 teaspoon minced garlic
salt and freshly ground black pepper to taste
1. In a small bowl, combine all the dressing’s ingredients. Set aside.
2. Add the kale to a large bowl and combine it with a drizzle of olive oil, a pinch of salt and a few drops of lemon juice. Massage the kale leaves, rubbing them with your hands for 1 to 2 minutes, or until they reduce to half of their original volume and change their colour from bright to dark green.
3. Add the pomegranate seeds, the avocado slices and walnuts to the now tenderized kale. Add the dressing and toss well. Serve the salad right away.
Grilled Pepper and Onion Salad with New Potatoes

This salad recipe is inspired by the popular festivities held in Lisbon and Porto around this time of the year. In these events, it’s common seeing people gathering on the streets to eat, and you can literally feel the smell of barbecued foods in the air wherever you go – mostly sardines and peppers. I don’t eat sardines (or any fish for that matter), so I came up with a recipe that still conveys the spirit of the festivities, but that is animal-free. I don’t usually brag about recipes I post here on the blog but I have a special place in my heart (and belly) for this one. I made this salad three times since last week and I seem not to get enough of it (as a matter of fact, I also had it for lunch today). To make it more of a complete (nutrionally speaking) meal, you can toss in some grilled tofu or cooked red beans. You could also eat it in a bruschetta, by grilling some bread slices and topping it up with spoonfuls of the salad (I’d leave the potatoes out in that case). I believe you can add flavour to your foods without depending on oil to get it, but it’s crucial to this recipe to use the amount of the said ingredient specified in the directions and not a bit less .The oil and vinegar mixture will coat the vegetables thoroughly, imparting them a beautiful flavour so, make also sure you use a good quality olive oil in here. Olive oil is a key ingredient to many Portuguese-inspired dishes, and this one really is no exception. Enjoy!

Grilled Pepper and Onion Salad with New Potatoes
(serves 2 as a main, 4 as a side)
Ingredients:
1 medium sized red pepper, cut into strips
1 medium sized green pepper, cut into strips
1 large onion, cut into rings
10 small new potatoes, skins on (about 300 grams)
3 tablespoons olive oil, plus more for brushing the vegetables
2 tablespoons red wine vinegar
1 tablespoon capers (optional, but highly recommended)
1 small garlic clove, minced
1 small handful coriander, coarsely chopped
salt
1. Fill a medium sized pan with water, add the potatoes and about 1 teaspoon of salt, and let it boil. Once boiling, decrease the heat to medium and cook the potatoes for about 15 minutes. Then, pass them through cold running water. Transfer the potatoes to a cutting board and when they’re cool enough to handle, cut them into halves. Set aside.
2. Brush a grilling pan with olive oil and set it on high heat. When it’s hot, but not smoking, add the peppers’ strips, skin side down, seasoned with a pinch of salt. Grill them for 7 to 10 minutes, or until slightly charred – to get visible grilling marks, I like to press down the peppers’ strips with the back of a spoon against the grilling surface. Grill on the other side for about 5 minutes. Transfer the grilled peppers to a plate and set aside.
3. Add the onion rings (also lightly salted) to the grilling pan and cook them for 3 to 4 minutes or until soft and browned.
4. In a medium sized bowl, combine 3 tablespoons of olive oil with the red wine vinegar. Add a pinch of salt and whisk until incorporated.
5. Put all the vegetables (onion, peppers’ strips and boiled potatoes) on a large serving plate. Pour the oil and vinegar mixture over them and toss well. Finally, add the capers (if using), minced garlic and coriander on top. Serve immediately.

4 comments