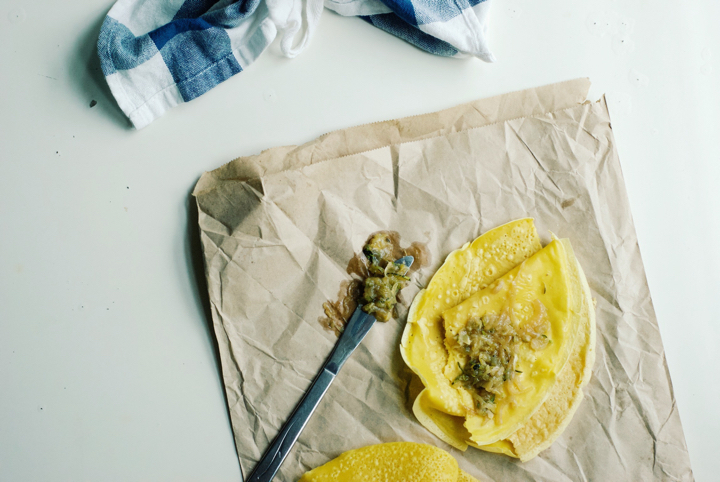
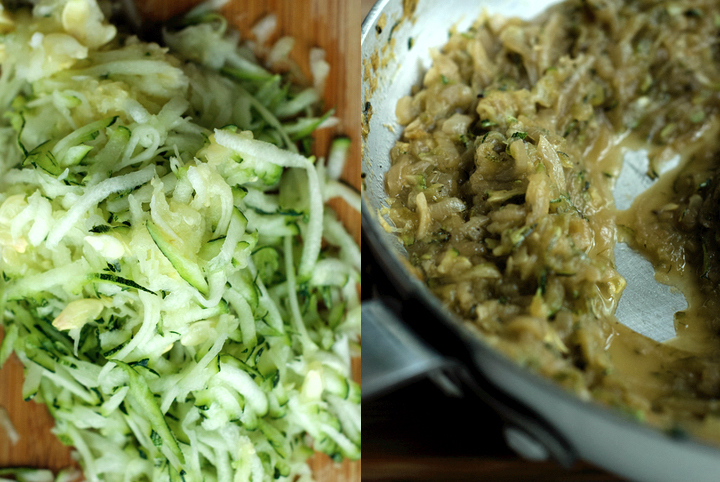
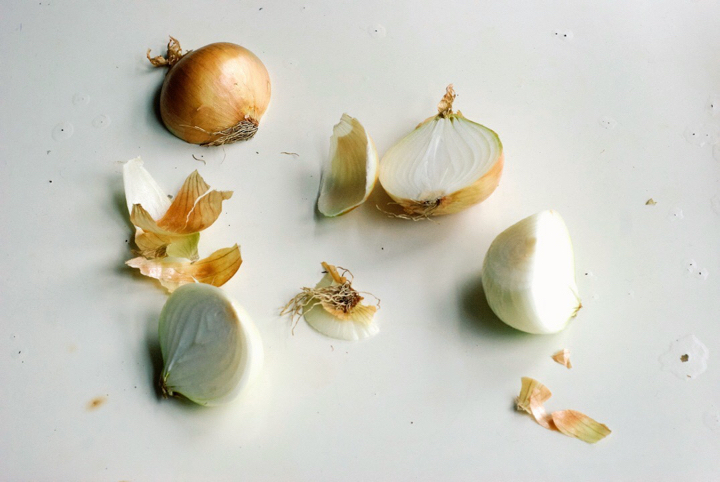
Caramelized Onion & Marrow Spread
I’ve been making an effort to live with less clutter. Like most people, I’m sure I own more things – clothes, documents, random objects – than I need. Coming to Glasgow with probably less than half the stuff I have back home, made me realize that there are only a few objects I can’t live without. I’ve also been trying to keep things simple in the kitchen, even though this is a big challenge for me because I’m not the kind of cook who intuitively works with only a few ingredients per recipe. I love layering flavours and textures on top of each other, and that’s how I naturally cook most of the time. That probably also explains why I’ve always been more drawn to middle-eastern and southeast asian cuisines (lots of things going on, flavour and texture-wise) than mediterranean (simple – but killer – ingredient combinations).
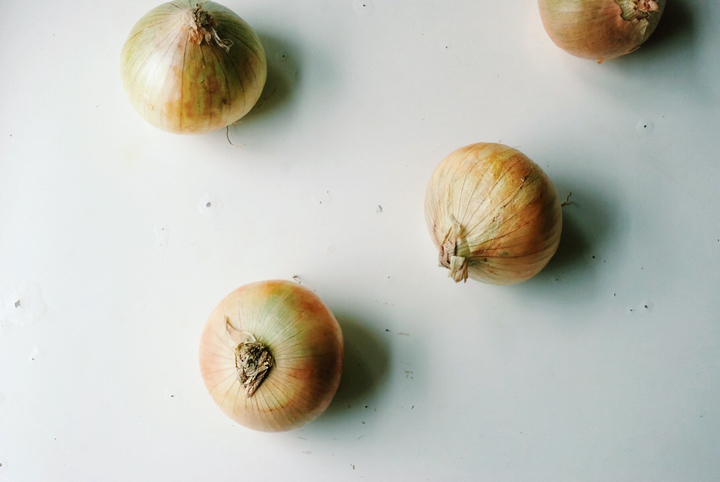
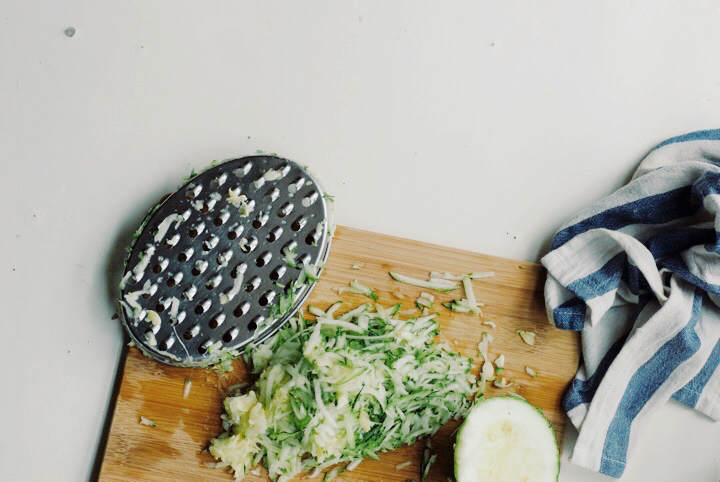
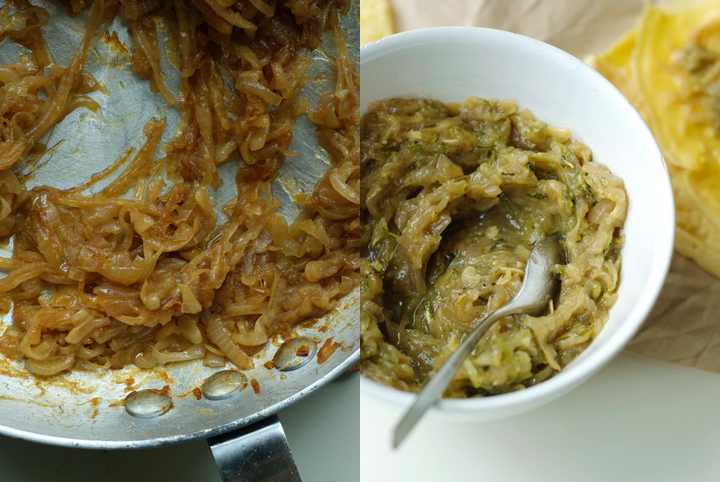
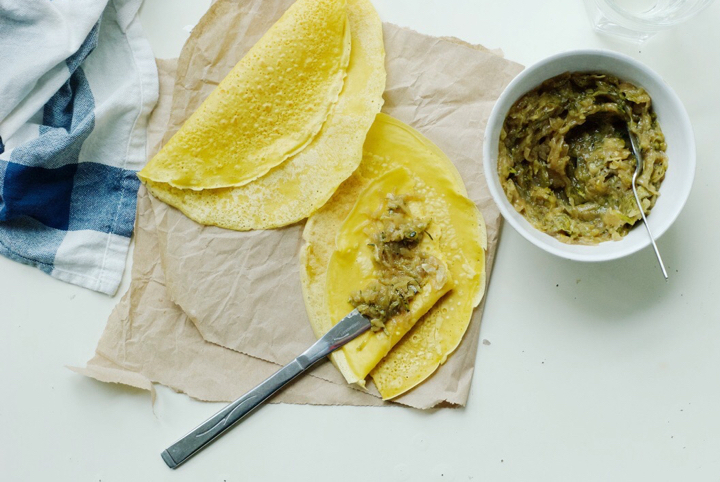
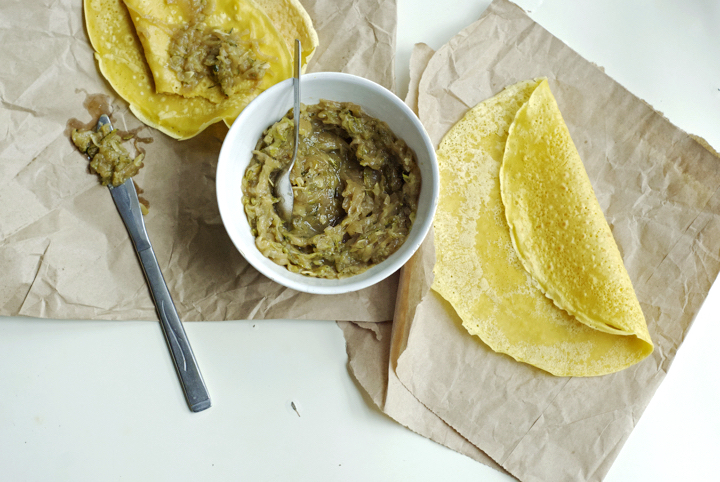
The recipe I’m sharing with you today, although only requiring a few ingredients, has an amazing complex flavour that results from the long cooking time. Just like in this recipe, the onion and marrow flavours and textures are pushed to the limit, and the outcome couldn’t be better. I know that some of you will probably be put off by the idea of peeling and chopping several onions, grating and squeezing the marrow, and waiting more than one hour for the dish to be ready. And since we’re at it, I must advise you there really are no shortcuts here – the vegetables have to brown and caramelize slowly, or there won’t be the same kind of flavour development. But if you think about it thoroughly, most of the cooking time is inactive and, in the end, you’ll end up with an amazing vegetable “jam” that is versatile and tasty enough to be used as a pasta sauce, served on top of cooked lentils, spread on toast and, my personal favourite, used as a filling for chickpea crêpes.
Caramelized Onion and Marrow Spread
(serves 6, as a starter)
Note: As an effort to eat less salt, I’ve been using Lo Salt lately. You can definitely use sea salt in this recipe, but adjust the amount (you’ll probably only need ½ or ¾ teaspoon of it).
Recipe inspired by food52
4 large onions, peeled, cut into half-moons and thinly sliced
6 Tablespoons olive oil, divided
2 Tablespoons water
1 large marrow
1 ½ teaspoons lo salt (see note above)
½ teaspoon freshly cracked black pepper
Heat 4 tablespoons of oil in a large pan over medium heat. When the oil is hot, but not smoking, add the sliced onions. Give the mixture a good stir, so that the onion slices are evenly coated with the oil. Leave undisturbed for 10-15 minutes, so that the onion slices in the bottom of the pan crisp up and brown slightly. After that time, stir the mixture again and reduce the heat to low. Cook for additional 45 minutes. Stir every 20 minutes and add 1 tablespoon of water each time (2 in total), to release some caramelized bits that might have stuck to the bottom of the pan.
In the meantime, grate the marrow into a large bowl. Transfer the grated marrow to a colander and squeeze it with the back of a spoon (or using your hands) to release as much water as possible. Set aside until the onions are cooked.
As soon as the onions have caramelized, add the marrow, low salt, pepper and additional 2 tablespoons of olive oil to the pan. Cook, stirring often, for additional 30 to 40 minutes, or until the marrow has reduced significantly and the mixture has a jam-y kind of texture. The spread can be kept, stored in a airtight container in the fridge, for up to 1 week.
Asparagus, Leek & Lime Soup + Crispy Chilli White Beans

It’s that time of the year when asparagus are finally in season. They’re insanely expensive in Portugal (I’ve noticed many are imported from Chile or Peru – never understood why) but, this time around, I was lucky to find them half their price at the local supermarket. I brought home three bunches. Two of them went into this soup, and the other one was thrown into a salad, grilled. So, as you might guess, there’s been a bit of an asparagus overdose over here, but a well worth one – the soup I’m sharing with you today totally surpassed my expectations.
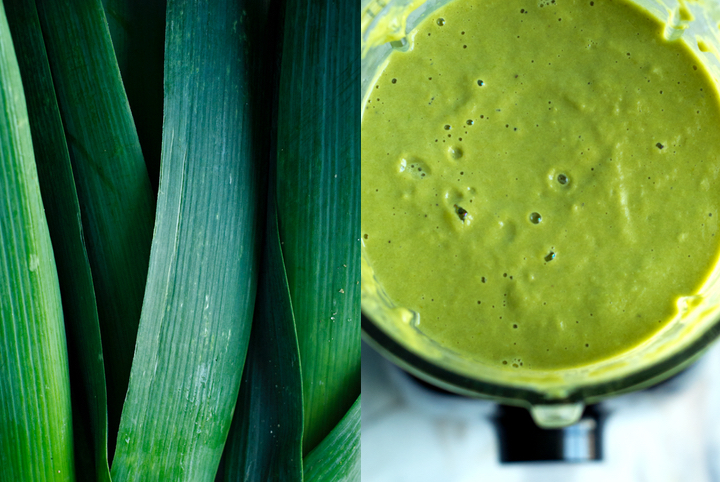
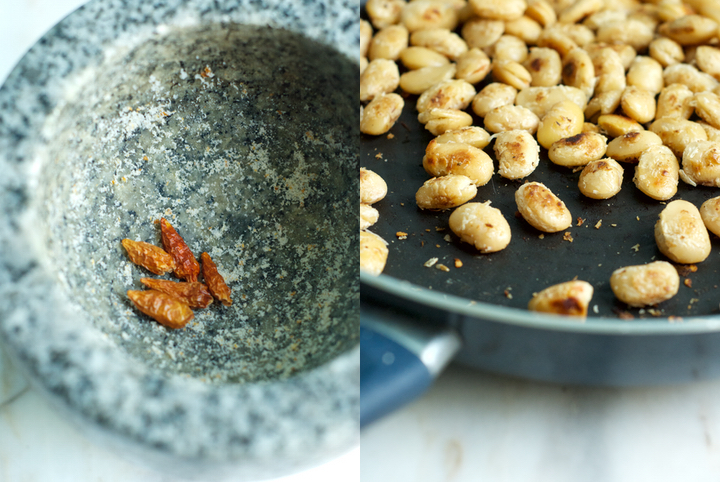
I’ve first saw asparagus soup here, and then here, and that’s when I got convinced to try my own version. Before that, I’ve only ever had grilled and steamed asparagus with a little salt (simplicity is key, specially when dealing with pricy seasonal produce). I also thought about adding a nice topping, because blended soups can be a little monotonous without one – the ideia for the crispy white beans comes from here (coincidentally, Tara also used them on top of an asparagus soup). A couple of things you should consider when making this soup: first, do use the leeks’ green parts (they’re edible, nutritious and delicious) and second, by all means make the topping. The bean croutons, as I like to call them, bind everything together because of their salty and crispy qualities, making a nice contrast to the soup’s smoothness and delicate flavour.


Asparagus, Leek & Lime Soup + Crispy Chilli White Beans
Recipe visually inspired by Seven Spoons (the original link has been deactivated a while ago)
(serves 4)
for the soup:
500 g / 3 large leeks, tougher ends removed
2 Tablespoons olive oil
640 g / 2 medium sized asparagus bunches
625 ml / 2 ½ cups low sodium vegetable stock
250 ml / 1 cup full fat coconut milk
½ teaspoon sea salt
freshly ground black pepper to taste
½ teaspoon lime zest, plus more serving
juice of ½ lime
for the crispy chilli white beans:
1 Tablespoon olive oil
3 dried small chillies
1/4 teaspoon salt
330 g large white beans (canned is fine), rinsed and drained
To make the soup: Cut the ends of the leeks. Cut them lengthwise in half and then into thin half moons. Place the cut leeks in a colander and wash under running water to remove as much dirt as possible.
Pour the oil into a large pot over medium-high heat. Once hot, but not smoking, add the leeks and cook for 8-10 minutes, or until they’re soft.
In the meantime, trim the ends of the asparagus. Chop the asparagus stalks into 2-3 cm pieces and add them to the pot with the leeks. Add the salt, stock and coconut milk, bring to a boil and, once boiling, decrease the heat to medium and cook for 5-6 minutes or until the vegetables are soft.
Add the lime zest and juice and, using a blender, puree the soup until smooth (you might have to do this in batches). Have a taste and adjust the seasoning, adding freshly ground black pepper and more salt if needed.
To make the crispy beans: Dry the beans with a clean towel to remove as much moisture as possible. In a mortar an pestle, combine the dried chillis with the salt and crush until you get a fine powder. Add the oil, beans and chilli seasoning to a large skillet over medium heat. Mix with a wooden spoon to coat the beans evenly, and cook for 15 minutes or until they’re crisp and golden brown.
Serve the soup in bowls with a few tablespoons of the crispy beans on top. Add a little extra lime juice and zest to the soup right before digging in, if desired.
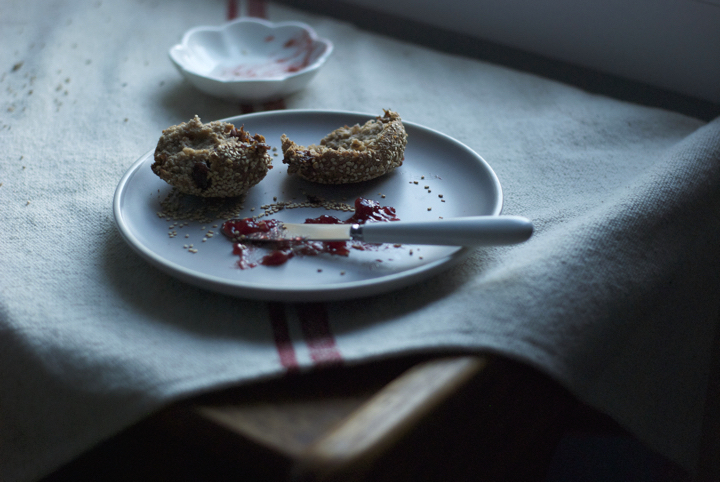
Sourdough Rye Buns with Raisins and Sesame Seeds

Bread. Such a hot topic these days isn’t it? Since the gluten free craze has started, bread seems to be the number one food to be avoided. I take food intolerances very seriously, but with all due respect to those who have allergic reactions to to gluten, I think we’ve gone way too far with this issue.
I love bread, I really do. I don’t eat bread everyday but I eat it very often. And since this whole discussion around gluten has begun, I decided that instead of cutting it out from my diet (which, quite honestly, wouldn’t work), I would make more sensible choices towards the bread I eat. And that’s when I learnt about sourdough. I’ve had sourdough bread during my time in Holland and I’ve always loved its tangy and characteristic taste.


Unfortunately, here in Portugal we don’t have a tradition of sourdough bread, which left me with the only decision of trying to make my own. I’ve made a starter following this guide, and for the last 6 months I’ve been baking my own bread. Sourdough bread is more easily digested than loaves made with commercial yeast, tastes incredibly good, and also keeps longer.
Back to when I was in Holland, I used to go to a whole foods store close to where I lived almost every day to buy their delicious raisin and sesame sourdough buns. Now, I’ve finally found a way to make my own version and, modesty aside, I think they taste pretty close to the original. If you’re intimidated by the idea of making your own sourdough bread, fear not and give it a try. If I knew it was that easy, I would have made it a long time ago. You can make your own starter like I did, or ask a friend who has one to give you some of it. Dear readers from Porto who want to venture into sourdough bread baking: I’ll happily give away some of my starter if you want to. (:

Sourdough Rye Buns with Raisins and Sesame Seeds
Recipe inspired by How to Make Bread, by Emmanuel Hadjiandreou, published in 2011 by Ryland Peters & Small
makes 12 buns
210 g rye flour
90 g whole wheat flour
5 g salt
150 g sourdough starter
240 g warm water
80 g toasted sesame seeds, plus more to coat the buns
150 g raisins
Put the raisins in a medium sized bowl and pour enough boiling water to cover them. Let it sit for ten minutes. After that time, drain the raisins, squeeze them to release the extra moisture and set aside.
In a large bowl, combine the rye and whole wheat flours, the salt and toasted sesame seeds.
In another large bowl, dissolve the sourdough starter in the water. Add the flour mixture to the bowl with the (dissolved) starter and mix until a dough comes together. Cover the bowl with plastic wrap and let it sit in the fridge overnight.
The next day, take the dough out of the fridge and divide it into 12 portions. Put a reasonable amount of sesame seeds in a large plate. Shape each portion into a bun, brush the buns with a little water, and roll them into the sesame seeds.
Put the buns in a large tray lined with parchment paper, cover with a clean towel and let rise in a warm place for 1 ½ hours. In the meantime, pre heat the oven to 240c and place a baking tray in its lowest third. As soon as the oven reaches the right temperature, place the tray with the buns in the middle third of it. Add a few ice cubes to the baking tray in the lowest part of the oven and close the door. Bake for 25-30 minutes.
Cool the buns on a wire rack for at least one hour before eating.
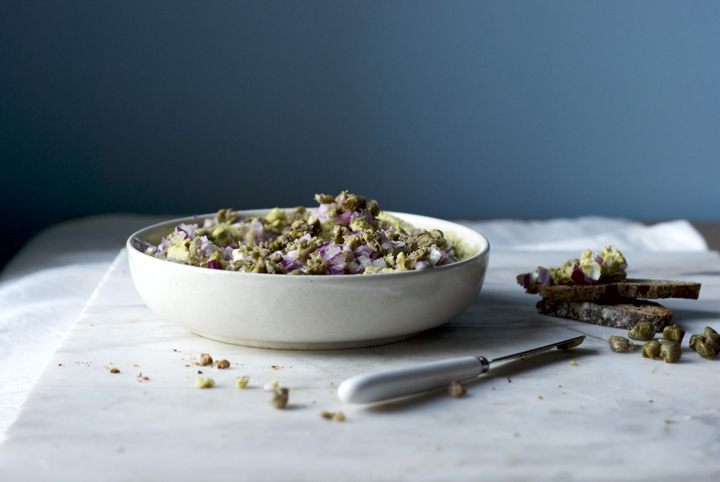
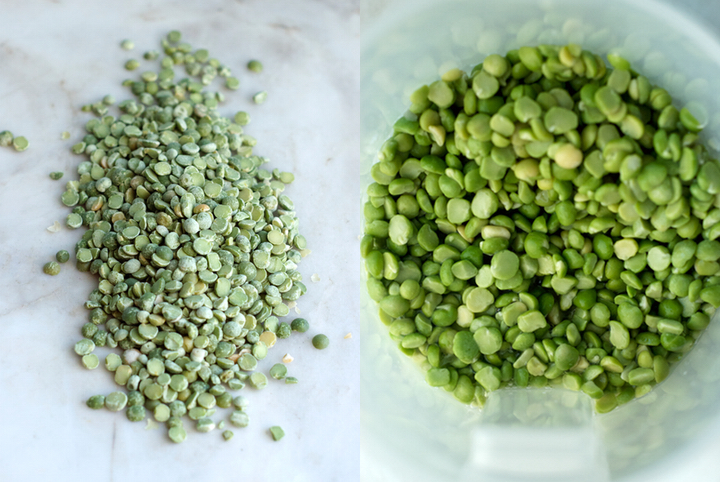
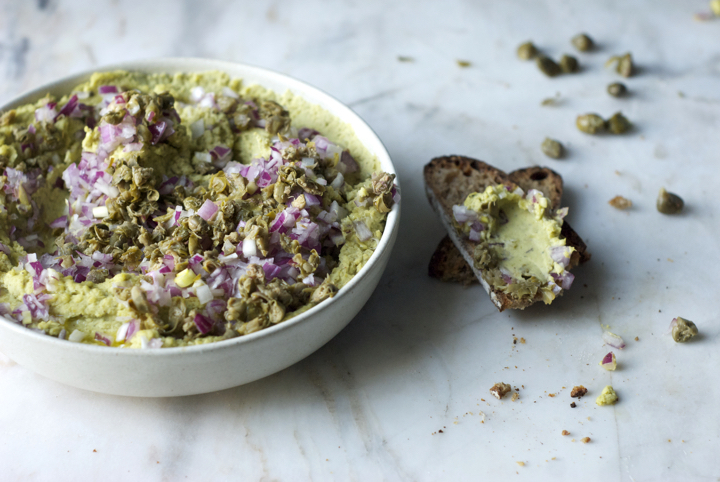
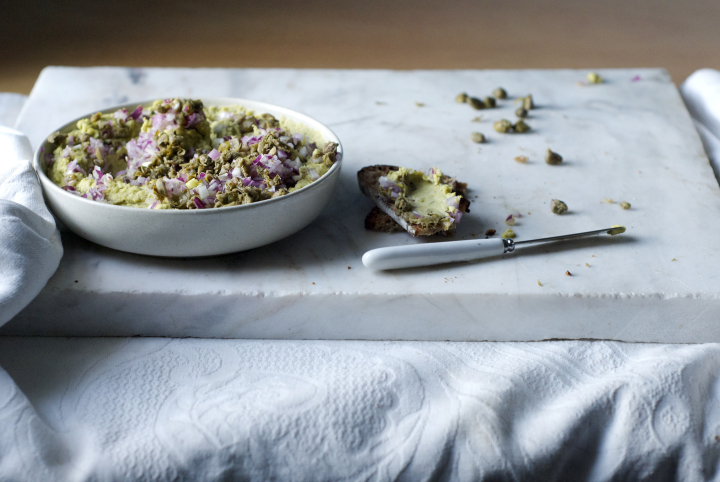
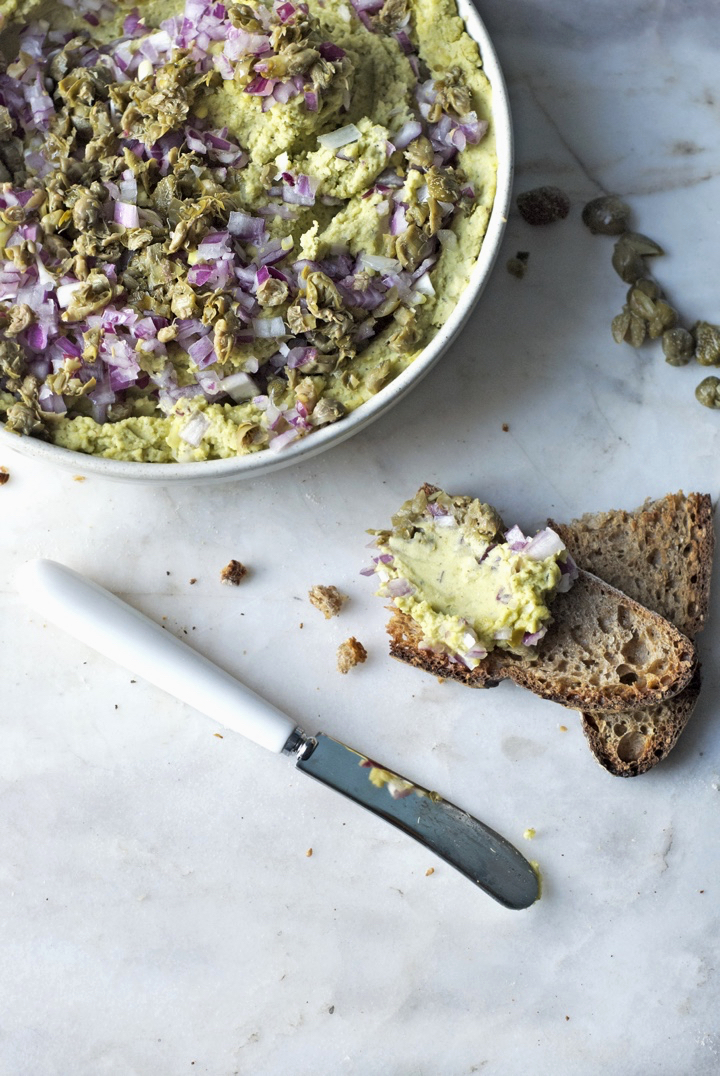
Split Pea Hummus with Capers & Red Onion
Every time I have guests for dinner, I typically serve some sort of homemade hummus or vegetable spread as an entrée. Most of the time I end up making the good old chickpea hummus because it’s one of favourite spreads and everyone loves it. But if I’m pressed for time (because yes, I’m in that tiny group of crazy people who actually thinks that removing the chickpeas’ skins is the secret to making the perfect hummus), I use split peas instead.
This is an incredibly easy, yet really tasty bean spread that’s perfect served on top of toasted bread or used as a dip for raw vegetables. I love to dip carrots and turnips into this hummus, but peppers (cut into strips), raw broccoli florets and/or parsnips are also excellent options.
I always have this thing going on with the blog where I try to balance more complex recipes with everyday, casual ones. That balance is hard to strive because people who aren’t familiar with vegan cooking tend to prefer simple and straightforward recipes, whereas long time vegans and/or foodies appreciate bold and unusual combination of ingredients and techniques.
At the end of the day, I always try to stay true to myself and my cooking “style”. However, I hope that recipes like this one – that do not involve a long list of ingredients but deliver on flavour – inspire people to venture into cooking more vegan food and, most importantly, help break the misconception that eating vegan is all about pricy superfoods and green smoothies (nothing against both, it just totally annoys me when I hear people saying that – and I do, all the time).
Split Pea Hummus with Capers & Red Onion
serves a crowd
195 g / 1 cup green split peas, soaked overnight, drained and rinsed
¾ teaspoon sea salt
¼ teaspoon freshly ground black pepper
1 teaspoon za’atar
1 garlic clove, minced
2 Tablespoons extra-virgin olive oil, plus a little more for serving
3 Tablespoons lemon juice
2 Tablespoon warm water
65 g / half a medium sized red onion, finely chopped
27 g / 2 Tablespoons brined capers, rinsed, dried and chopped
Add the split peas to a large pot over medium-high heat. Add enough water to cover the peas by 2 cm (0.8 inches). Bring to a boil and, once boiling, reduce the heat to low-medium and cook for 20 minutes or until soft. Some foam might naturally form on top of the cooking liquid – in that case, just take it out with a slotted spoon.
Drain the peas once they are cooked and cooled. Add them to the bowl of a food processor along with the sea salt, black pepper, za’atar, garlic clove, olive oil, lemon juice and water. Run the machine until you get a very smooth hummus. If the mixture seems too dry, add 1 or 2 additional tablespoons of water.
Put the split pea hummus in a medium sized deep plate. Add the red onion and capers on top and finish with a generous drizzle of olive oil.
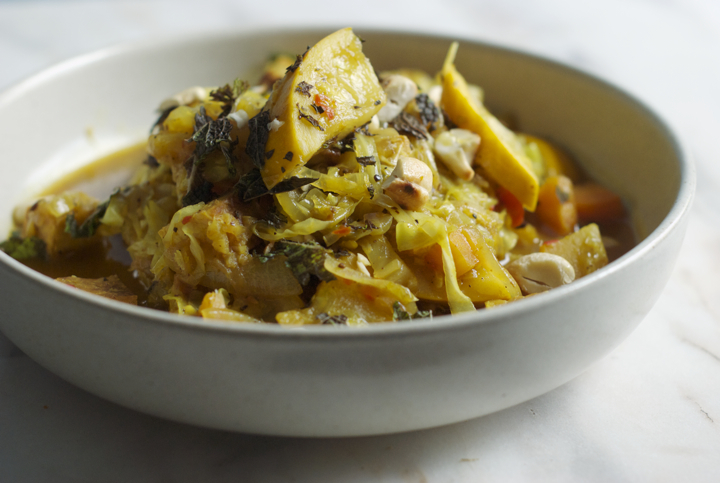
Tempeh Lemon Curry
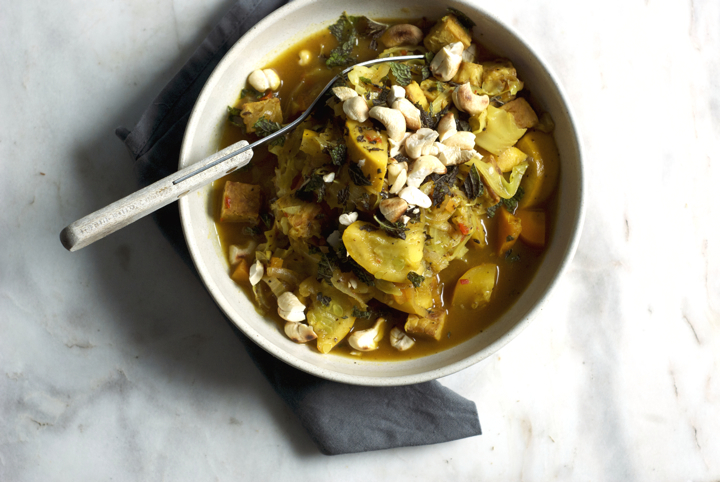
I know I haven’t been around for a while but, hey!, I’m still here, and today we’ll talk curry. I realize this is the first curry recipe I write about on the blog, and to be honest I don’t know how that happened because it’s the kind of dish I cook often. I know there are a lot of vegetable curry recipes on the internet and that you probably don’t need another one, but I’ve made this curry countless times and think it’s a good one to have on your repertoire.
The variations in here could be endless. I’ve made it before with spinach in place of the cabbage and it turned out good, but I prefer to use the latter mainly because of the texture it brings to the whole thing. A word on tempeh: it’s well known that steaming tempeh for 15 minutes before actually cooking with it, removes its bitterness. To be honest, I don’t mind the bitterness and I think it goes practically unnoticed in here, camouflaged by the bold flavours of all the spices and the lemon. Having said this, if you want to steam it first (or even sub it for tofu), go ahead.
Enjoy the curry, have a great summer (guess what: here in Portugal has been raining) and I promise to come back soon! (:

Tempeh Lemon Curry
(serves 4)
3 Tbs. olive oil, divided
1 large onion, finely chopped
4 garlic cloves, finely chopped
1 tsp. ground coriander seeds, roughly pounded in a mortar and pestle
1 tsp. mustard seeds, roughly pounded
1 tsp. caraway seeds, roughly pounded
2 medium carrots, cut into cubes
1 Tbs. fresh ginger
1 tsp. ground turmeric
1 red chilli, finely chopped
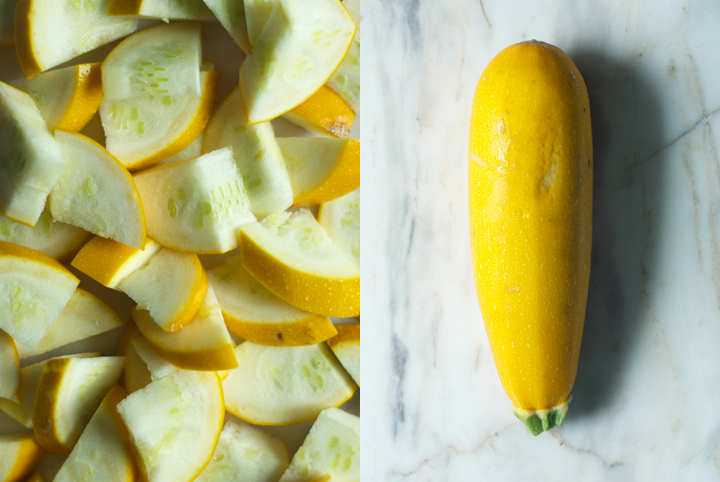
1 large zucchini, cut into half moons
1 cup / 250 ml coconut milk
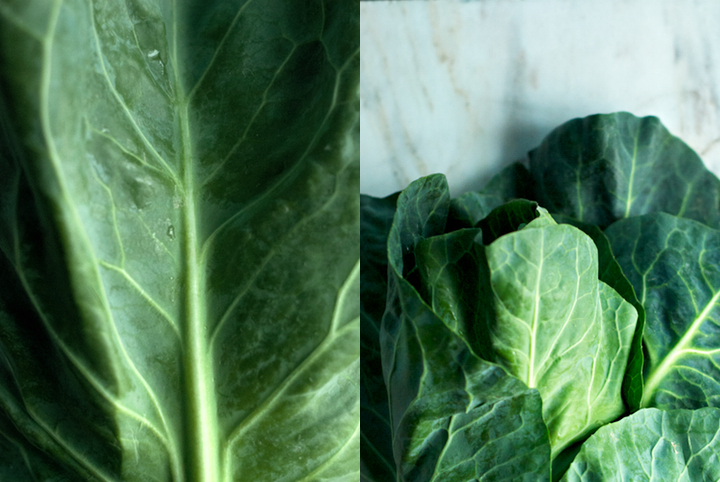
4 cups shredded cabbage
250 gr tempeh, cut into cubes
½ teaspoon
1 tsp. rice syrup
2 Tbs. mirin
zest of one lemon
1 handful toasted cashews, coarsely chopped
1 handful fresh mint, coarsely chopped
juice of ½ lemon
In a large pan over medium heat, add 2 tablespoons of olive oil, onion, garlic cloves and coriander, mustard and caraway seeds. Fry for 3-4 minutes or until the onion has softened and the spices have toasted a bit and smell fragrant.
Add the carrots, fresh ginger, turmeric, chilli and zucchini to the pan. Give everything a good stir and add the coconut milk. Cover the pan and cook for 5 minutes.
In the meantime, heat the remaining 1 tablespoon of olive oil in a frying pan over medium-high heat. When the oil is hot, but not smoking, add the tempeh cubes and fry until golden brown. Turn off the heat, sprinkle the tempeh with a pinch of salt and add it to the pan with the vegetables.
Now, add the cabbage to the pan as well, pressing it gently with the back of an wooden spoon so that it’s covered by the coconut milk. If, at this point, the curry looks as if it hasn’t enough liquid, add up to 1/3 cup of it, but keep in mind the cabbage will release a lot of water too. Cover the pan and cook for additional 5 minutes, or until the cabbage is wilted. Add the salt, rice syrup, mirin and lemon zest. Stir everything together and finish off with the lemon juice, toasted cashews and mint.
Recipe adapted from The Modern Vegetarian Kitchen, by Peter Berley, published by William Morrow Cookbooks, 2008
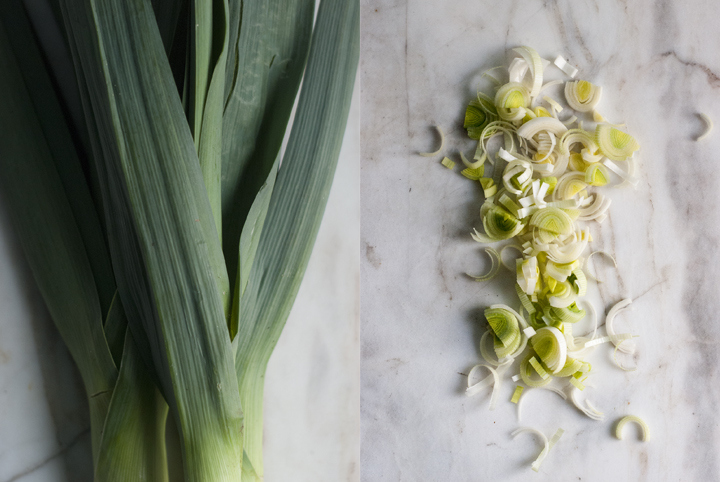
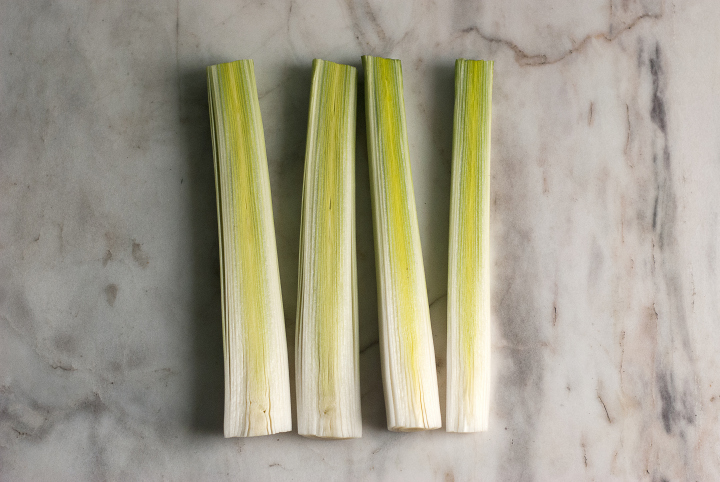
White Bean and Leek Cakes
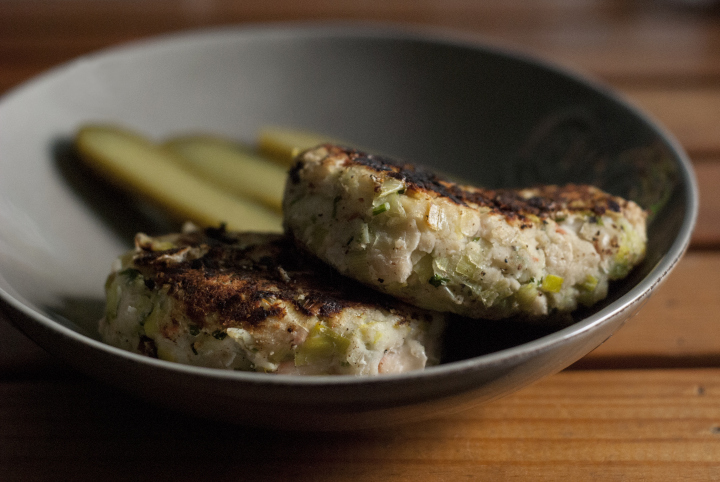
You know the phrase “Don’t judge a book by its cover”. The same principle can be applied to food – there are dishes that don’t necessarily look good (like black bean soup or chilli, for instance) but do taste amazing.
On my laptop, there’s a folder with all the recipes from the blog, organized by categories. Inside that folder, there’s one titled “?” where I keep the recipes I’m not exactly sure if I should post up here. More often than not, those recipes fit into the “ugly-but-oh-so-tasty” category that I mentioned above. There’s the tempeh and mushroom loaf, a version of greek baked beans, and a couple others. They were a nightmare to shoot and I always think they deserve a second chance (photography wise) but, for that to happen, I have to make them again.
The recipe I’m about to share was just an inch away from going into the “?” folder. I took lots of pictures of it, from different angles and with different plates, but only managed to get two or three that I think are just ok. Part of the reason for that is because this is a recipe that has its roots on the british classic bubble and squeak, a dish well known for its lack of sexiness. In this version, white beans replace the potatoes for a kick of protein, and leeks are used instead of greens just because it was what I had around. The patties come together almost effortlessly and do deliver a lot on the tasting front. Don’t sweat trying to make them look perfectly shaped, though – this is meant to be a simple, uncomplicated dish, where the hearty and rustic flavours are all that matters.
White Bean and Leek Cakes
(makes 4 to 6 patties, depending on the size)
2 large / 250 g leeks, white parts only
450 g cooked white beans (canned is fine)
3 large garlic cloves, finely chopped
1 small bunch / 15 g parsley, finely chopped
salt and black pepper to taste
1 tablespoon olive oil plus more for seasoning the pan
Cut the leeks in half and wash the halves thoroughly to remove any dirt. Cut each half into thin half moons.
In a frying pan over medium heat, add 1 tablespoon of olive oil, the leeks, garlic and parsley. Cook for 5 minutes or until the leeks are soft.
Transfer the leeks to a large bowl. Add the white beans and mash everything together with a potato masher (don’t overdo it and leave some parts just barely broken down for a bit of texture). Season the mixture with a bit of salt and lots of freshly cracked black pepper.
Clean the pan in which you have cooked the leeks with kitchen paper towels. Add a generous glug of olive oil to the pan, making sure it covers its surface, and turn the heat on medium. Shape the white bean and leek mixture into patties and add them to the pan. Season each cake with a bit more salt and cook for 5 to 7 minutes on each side, or until golden brown (I like mine almost on the verge of being burnt). Serve with pickled cucumber, mustard, fried capers or whatever you fancy.
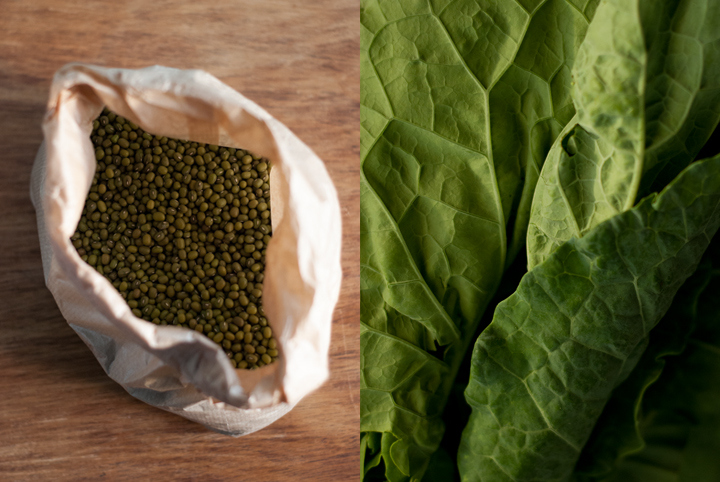
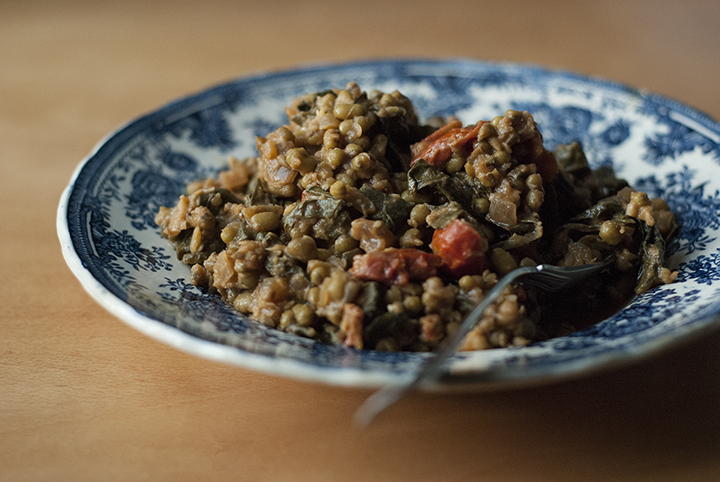
Mung Bean and Kale Stew with Miso
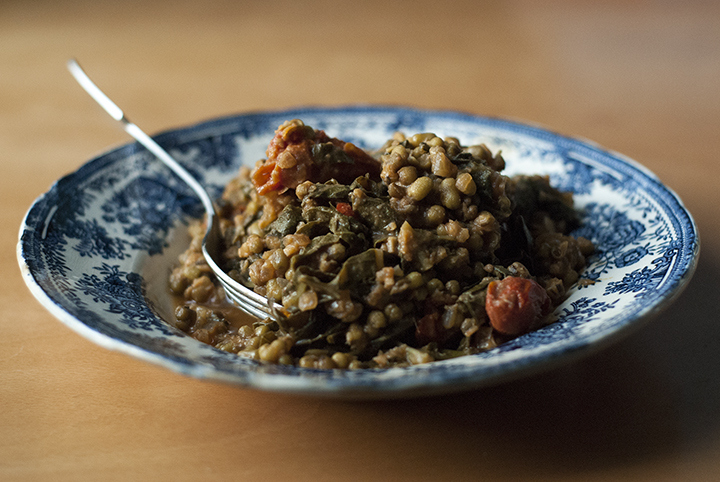
Miso is the kind of ingredient you either love or hate. There’s no middle ground. I strongly believe that those who don’t like it should give it a second chance, as it can be used in a lot of savory dishes and sauces (don’t restrict its use only to soups, please). It sure has a great deal of health properties too – as with all fermented foods, it’s loaded with enzymes and beneficial bacteria – and I’d like to think that a stew like this is one is a wonderful way of eating (and enjoying) this beautiful live ingredient.
I had high hopes of trying to make my own, following the recipes provided by this book, but after getting acquainted with the whole process, I easily gave up. It’s a slow process – miso should ferment from six months to a year –, which has made gain a whole new respect for the art of fermenting foods. There are a lot of types of miso. I’m not going to go deep into that – I also don’t have the knowledge to – but, basically, what you want for this dish is a mild variety, savory but with tiny hints of sweetness. The longer the miso is fermented the stronger and saltier it will taste, so you want to choose a type that’s light brown in color. I used mugi miso in here, a variety made of barley and soya beans – it’s the one I find the most versatile and not overpowering in flavor.
This stew came to live a few weeks ago as an attempt to clean the fridge – I get constantly surprised by how dishes like that seem to be the ones I’m more satisfied with – and it’s easy to put together as there isn’t a lot of prep work to do. I really loved how it came out and have made it twice since then. The recipe makes a lot, and I dare say the stew tastes even better the next day, when the ingredients have meld together and the sauce has thickened for an even yummier flavour.

Mung Bean and Kale Stew with Miso
(serves 4-6 as a main)
1 tablespoon olive oil
1 medium sized onion, finely chopped
4 garlic cloves, finely chopped
1 big piece of ginger / 50 g, peeled and finely grated
260 g kale, coarsely chopped
270 g cherry tomatoes, cut the larger ones in half but leave the smaller whole
1 cup / 200 g mung beans
3 bay leaves
4 cups / 1 litre stock or water
4 tablespoons mugi miso
In a large sauce pan, heat the olive oil, onion and garlic over medium heat. Sautée for 5 minutes or until the onion has softened.
Add the cherry tomatoes to the pan and crush them lightly with the help of a wooden spoon, so that they release their juices. Add the bay leaves, kale and mung beans, followed by the stock. Raise the heat to high and bring the mixture to a boil. Once boiling, decrease the heat to low, cover the pan, and let the stew cook for 30 to 35 minutes, or until the beans are thoroughly cooked and the kale is tender.
After that time, take out the lid and let the stew cool down for 5 minutes – you’re going to add the miso to the pan and you don’t want to ruin its health properties by heating it up excessively.
In a medium sized bowl, add the 4 tablespoons of miso. Then, gently pour ½ cup of the stew’s liquid over the miso and whisk everything together until you get a sauce-like mixture with a smooth consistency. Add the miso mixture back to the pan and mix well to incorporate. Serve with cooked quinoa, crunchy bread, or simply topped up with plenty of roasted almonds.
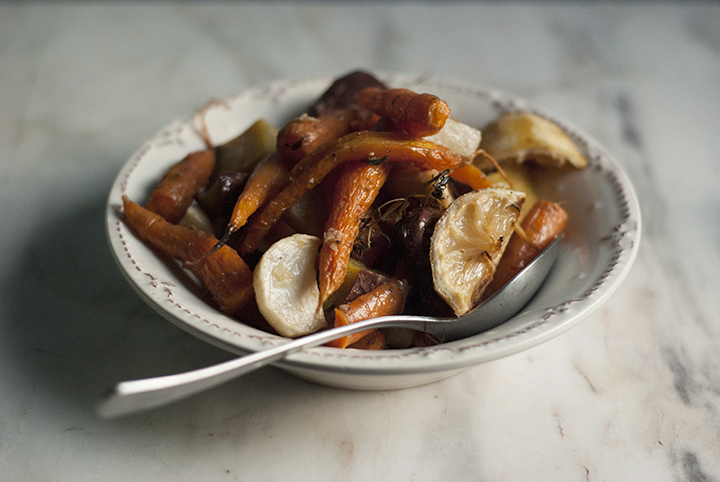
Lemon Roasted Vegetables
Hello guys! Sorry for my absence on the past few weeks. I’m getting used to a new working routine and, as a consequence, the blog has been a bit neglected (I’m slowly getting back into posting more regularly). But before we get into today’s post, I thought we could talk, briefly, about some of the recipes I’ve been making these days –most of them from around the web. I’ve cooked Ottolenghi’s mejadra twice now, only cutting on the oil, and even my grandmother liked it (despite its spiciness). This stew has been in high rotation around here as well, because it’s getting cold and because I love beets (and you do have to like them to truly enjoy this dish). Martha Stewart’s nori rolls are also worth trying – they’re perfect for lunch boxes –, even though the recipe takes a bit of time and you might struggle wrapping up the nori (at least I did, but probably because I was in a rush when I made them). Finally, I’m not a tea person, but I’ve been drinking this one twice a day for the last two weeks (it is that good).
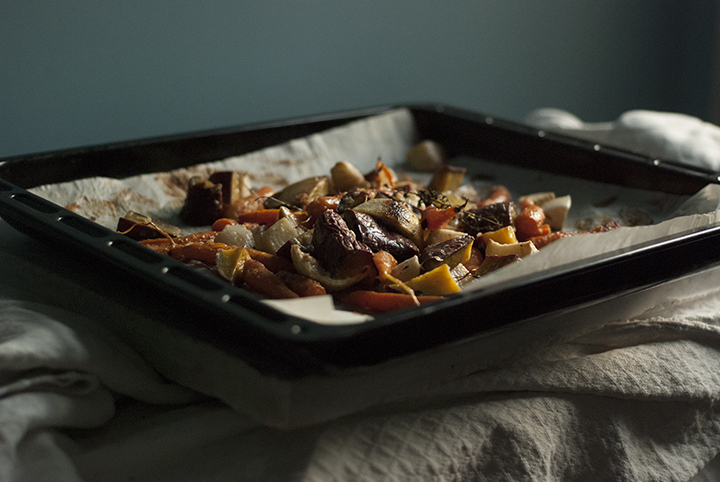
Now, let’s talk roasted vegetables. Around this time of the year, there’s already a great variety of roots in the markets – carrots, turnips, beets… – and they’re perfect for roasting. It might take a bit of time – although not active time – but, in the end, you’ll have a baking tray full of tender and sweet vegetables with slightly brown bits and notes of lemon. They pair incredibly well with simply cooked whole grains and/or puy lentils, for a more complete meal. I guess nothing speaks better of autumn than that.
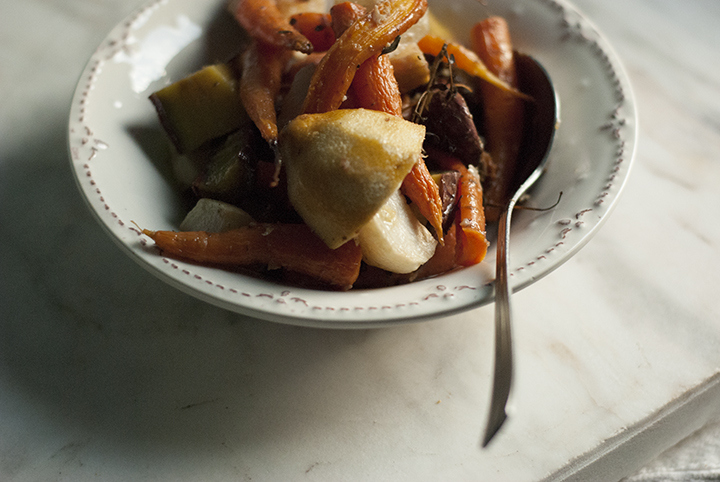
Lemon Roasted Vegetables
(serves 4 to 6, as a side)
380 g small carrots, halved
315 g / 3 medium sized turnips, cut into 5 -6 cm pieces
450 g / 4 medium sized sweet potatoes, cut into 5-6 cm pieces
5 garlic cloves, peeled
one lemon
½ teaspoon salt
¼ teaspoon black pepper
2 tablespoons olive oil
2 teaspoons brown rice syrup
2 sprigs lemon thyme
Pre-heat the oven to 200C. Line a large rimmed baking tray with greaseproof or parchment paper.
Zest the lemon and cut the pulp into quarters. Combine all the vegetables in a large bowl and add the lemon’s pulp and lemon thyme sprigs to it.
In a mortar and pestle, combine the garlic cloves, lemon zest, olive oil, brown rice syrup, salt and black pepper. Smash everything together until the garlic cloves are broken down. Pour this mixture over the vegetables and mix, with your hands, to coat them evenly. Transfer the veggies to the baking tray and sprinkle a bit more salt and pepper over them.
Cover the baking tray loosely with parchment paper. Roast the vegetables, covered, for 45 minutes. After that time, roast, uncovered, for additional 15 minutes or until golden brown.

leave a comment