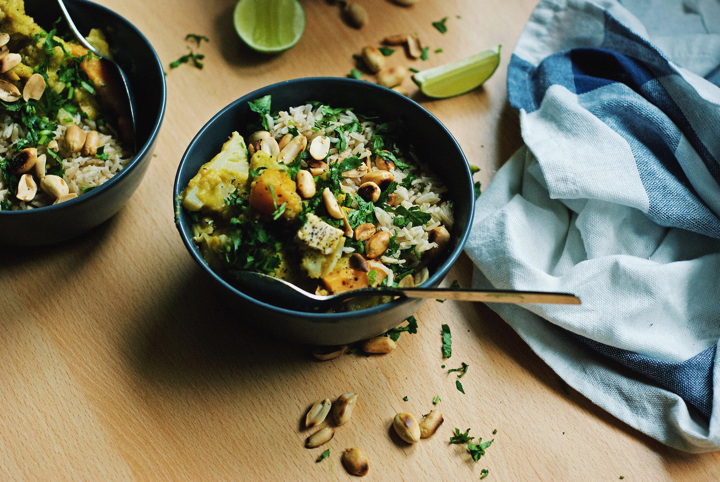
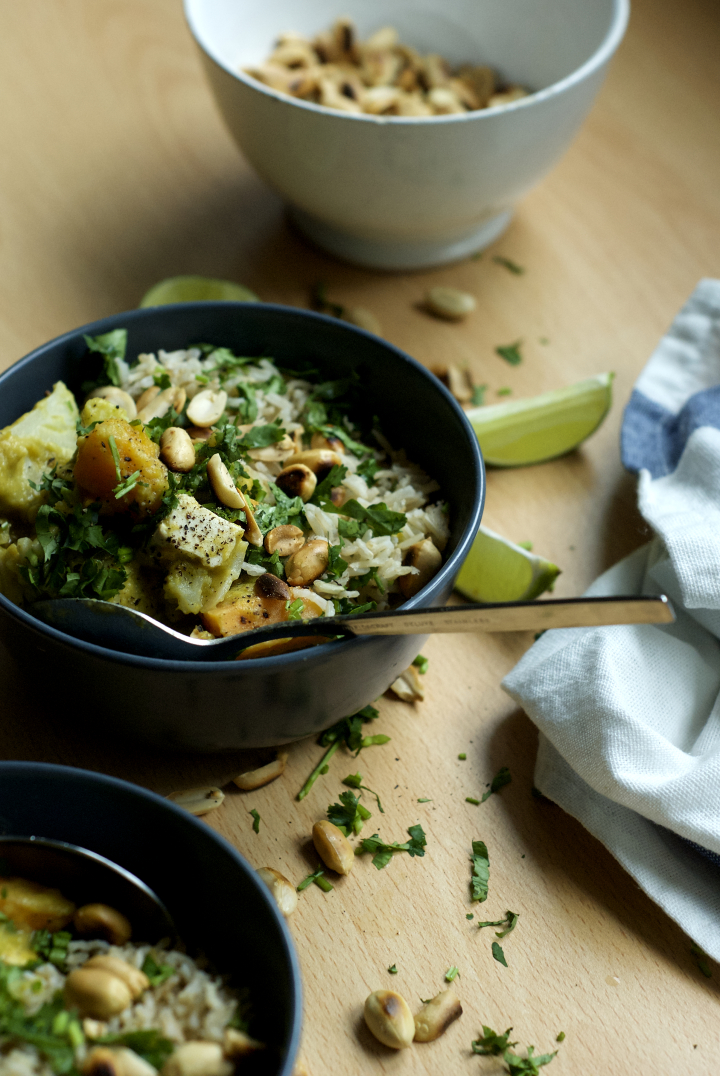
My Favourite Thai-inspired Vegetable Curry
Since I last posted a lot of things have happened in my life. The first and most important one was my recent move from Porto to Glasgow. Between preparing and planning all the stuff that involves moving into a different country, I barely had time to cook, let alone blog. However, and now that I’ve been here for a month and got (almost) everything sorted out (housing, burocracy and the likes), I´m happy to resume blogging and do the very best I can to bring you my favourite vegan recipes.
I’ve been thinking a lot about how things will naturally change around here (in terms of photography and recipe content as well) since I’m not in my own kitchen and do not have all the kitchen tools I’m used to. This will naturally affect the kind of recipes I’ll be posting from now on – they will be simpler, and since I do not own a food scale, lack the accuracy I’d like them to have. However, I do prefer to face this as a challenge (and one that I’m happy to take) rather than a limitation. I came to Glasgow with a 20 kg suitcase. I brought mostly clothes, one book, my laptop and my camera. I left in Porto all my cookbooks and the boards, plates and cutlery that have helped me build this blog’s photography identity over time. I’m already missing my bedroom’s blue wall, the wall that was the background of most of the food pictures I posted here for the last 5 years. But I’m also a firm believer that things happen for a reason. I was probably getting too comfortable with my own style of doing things, and this an opportunity to question that and try new and fresh approaches.
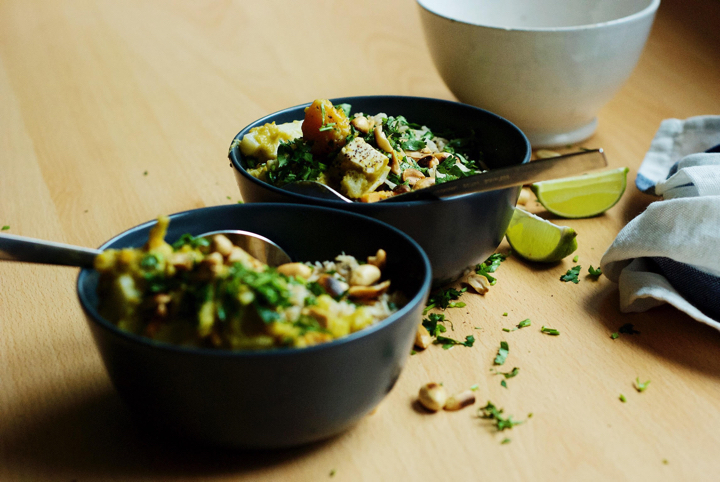

So, let’s talk curry today. I didn’t bring any of my cookbooks with me, but if I could only bring one, I’d definitely go with The Millenium Cookbook. Most of the recipes I cooked from this book were outstanding, and a great number of them have become part of my cooking repertoire. That’s the case with this curry. The original recipe is more labour intensive, and in order to make it simpler and faster I omitted some steps, trying not to compromise too much on the flavour. The recipe might still seem a bit of a project though, but I can guarantee you it’s worth making your own curry “base” from scratch, blending the sauce, and so on. In the end, you’ll have a fantastic curry that feeds a crowd and is definitely a crowd pleaser too. If you can’t come across butternut squash this time of the year, use carrots instead (4 or 5 large ones will do) – I’ve done it before and it works just as well. Also feel free to play around with the vegetables – in the past I’ve tried green beans, broccoli and asparagus and all of them have worked nicely. Hope you enjoy the curry and I’ll be back soon! In the meantime, check my instagram feed for food-related pictures and some suburb memorabilia from Glasgow.
My favourite Thai-inspired Vegetable Curry
Recipe inspired by The Millenium Cookbook
(serves 6, as a main)
*note: I usually use two green chillies with seeds, but I can handle quite a lot of heat. If you’re less tolerable than me, use only one.
For the curry sauce:
2 medium sized onions, chopped
5 large garlic cloves, chopped
1 piece of ginger the size of your thumb, peeled and grated
1 small bunch of coriander
1 teaspoon coriander powder
½ teaspoon turmeric powder
1 teaspoon cumin powder
1 teaspoon sea salt
zest of 2 limes
juice of 2 ½ limes
2 green chillies, finely chopped* (see note above)
1 medium sized butternut squash, peeled, seeded and chopped into cubes
1 can / 400 ml full fat coconut milk
For the curry:
1 Tablespoon coconut oil, melted
1 large sweet potato, peeled and chopped into cubes
1 large carrot, peepled and chopped into cubes
1 small head of cauliflower, cut into medium-sized florets
1 small head of cabbage, thinly sliced
1 lemongrass stalk, tough outer layer removed, bruised in a mortar and pestle (optional)
1 cup / 250 ml water
250 g / 1 package smoked tofu, cubed
For serving:
3-4 spring onions, finely chopped
1 handful of peanuts, toasted
extra coriander, finely chopped
1-2 limes, cut into quarters
For the curry sauce: In a double boiler, steam about ¾ of the butternut squash for 5 to 8 minutes, or until thoroughly cooked. In a high speed blender combine the chopped onions, garlic, ginger, fresh coriander, spices (coriander, cumin and turmeric powders), salt, lime zest and juice, chilies and the coconut milk and blitz until you have a smooth sauce. Working in batches, add the cooked butternut squash to the mixture and blitz until creamy.
For the curry: In a large pot over medium heat, add the coconut oil, the carrot, sweet potato and the remaining ¼ of butternut squash. Sautée for a few minutes or until the vegetables are golden brown. Add the curry sauce followed by the bruised lemongrass stalk (if using) and 1 cup / 250 ml of water and bring to a boil. Once boiling, decrease the heat to low-medium and simmer for 10 minutes. After that time, add the cauliflower, cabbage and smoked tofu and simmer for 5 minutes longer. If the sauce seems too thick, add a bit more water to thin it out to the consistency you like (I like mine to resemble a smooth blended soup). Season with extra salt and serve with the chopped peanuts, scallions, coriander and a good squeeze of lime juice.
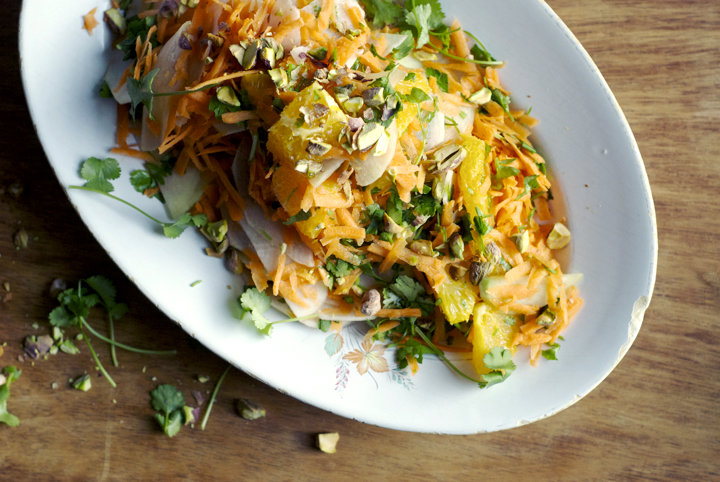
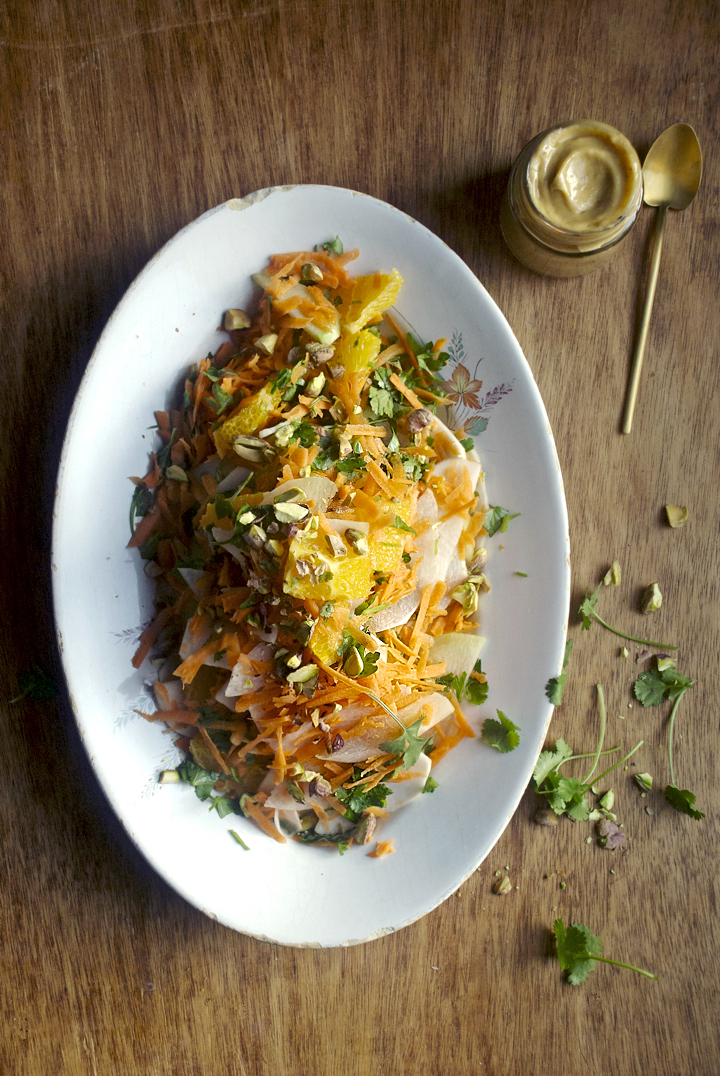
Farmers’ Market Salad with Apricot-Cumin Dressing
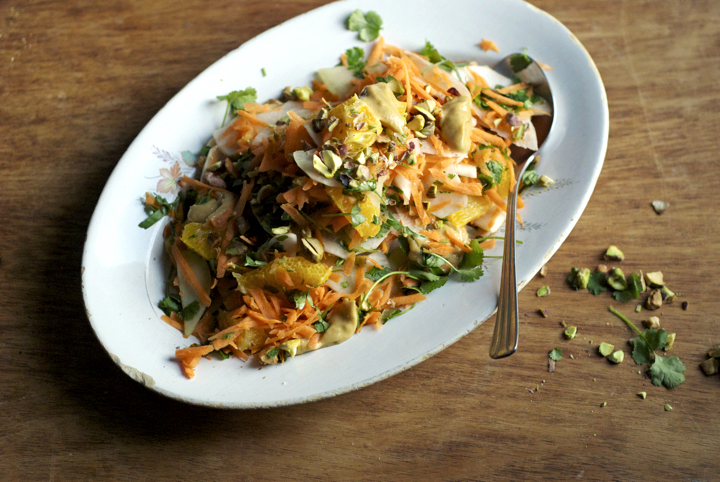
It’s that time of the year when the weather is getting warmer and I start craving raw and cold salads again. This week, at the farmers’ market, I brought home lots of kohlrabi and turnips with the main intention to eat them raw (which is how I like them better anyway).
I know that a lot of people aren’t particularly excited about turnips, and even though I used to share the same opinion, I’ve been rediscovering this vegetable and absolutely loving its versatility. I’ve been enjoying thinly sliced turnips with just a dash of salt and black pepper as a light snack these days – there’s something about its light and yet slightly bitter flavour that I really love.
Anyway, this salad is pretty much like a coleslaw, with lots of crispiness and different textures. I felt I needed to balance that with a smooth dressing, and that’s how I ended up making an apricot-based one. I was really pleased with how it turned out – it’s sweet and tangy at the same time, with just a hint of cumin to make it more complex and intense.
Farmers’ Market Salad with Apricot-Cumin Dressing
Serves 4
For the salad:
220 g /5 medium sized carrots, grated
140 g /1 large kohlrabi, thinly sliced
120 g /1 large turnip, thinly sliced
200 g /1 large orange, sliced into half-moons
15 g / half a bunch of parsley, finely chopped
15 g / half a bunch of coriander, finely chopped
60 g /1/2 cup pistachios, coarsely chopped, toasted and lightly salted
For the apricot-cumin dressing:
65 g /6 dried unsulphured apricots, roughly chopped
6 Tablespoons olive oil
6 Tablespoons lemon juice
3 Tablespoons water
1 ¼ teaspoons cumin seeds, toasted and ground in a mortar and pestle
¼ teaspoon sea salt
black pepper to taste
Combine all the ingredients for the salad in a large bowl.
Put the apricots in a small bowl. Pour 1 cup of boiling water over them, cover the bowl, and let stand for at least 10 minutes, or until the apricots are very soft.
In a blender, combine the drained apricots with all the other ingredients for the dressing. Blend until you get a very smooth mixture.
Pour the dressing over the salad (you might not need all of it, use just enough to coat the vegetables), mix with a wooden spoon or with your hands and serve immediately.
Sautéed Beets with Coriander Seeds and Walnuts
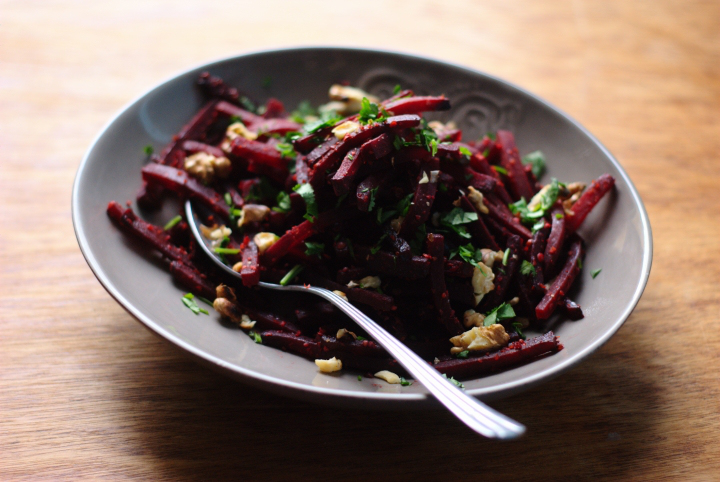
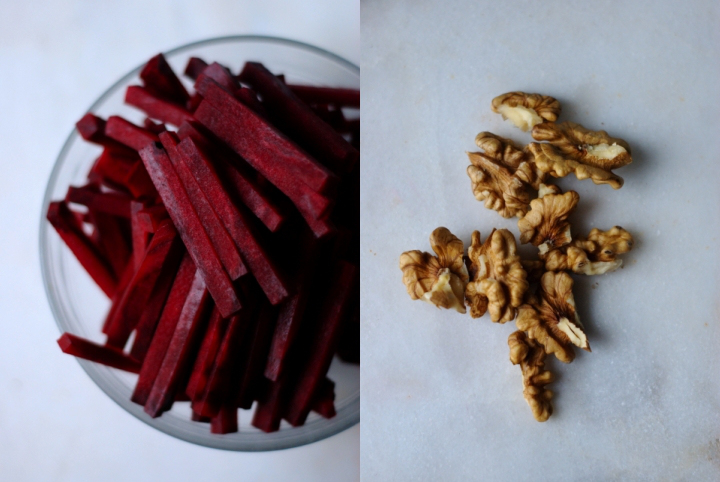
I was a little doubtful about posting this one because it’s a recipe that doesn’t aim to convert non-beet fans to beet lovers. It’s actually aimed at those people who, like myself, adore beets and cook them often. Most of the time, it’s suggested that, in order to prepare beets, you should either boil or roast them. Out of those two methods, I prefer roasting as it lends a smoky flavour to the beets; however, it can take up from 40 to 50 minutes if your beets are medium sized. The other day, I found myself trying to master the julienne technique and, without carrots in sight, I practiced with beets. The whole chopping thing took me a while – I can be a bit of a perfectionist sometimes – but, unless you’re aiming at getting perfect beet matchsticks (which I didn’t get anyway), the chopping process will only take you a couple of minutes. Alternatively, you can get the job done in no time using a mandolin. I decided to sautée the beet matchsticks with some coriander seeds and ended up with a dish that I found really flavourful in around 15 minutes. If you’re going to make this one please don’t skip the walnuts – they’re crucial to balance out the beets’ sweetness and add a very pleasant nuttiness to the whole thing.
Sautéed Beets with Coriander Seeds and Walnuts
(serves 4, as a side)
3 large beets / roughly 320 gr cut into matchsticks of about 0,7 cm width
2 teaspoons olive oil
3 teaspoons coriander seeds, ground in a mortar and pestle
¼ teaspoon salt
1 ½ tablespoons red wine vinegar
1 big handful toasted walnuts
1 handful chopped coriander leaves
a splash of lemon juice
1. In a large non-stick frying pan over medium-high heat, add the olive oil, the beets and the coriander seeds. Sautée for 1 to 2 minutes and, as soon as the pan starts sizzling, cover it with a lid. Let the beets cook for 10-12 minutes, lifting the lid once or twice to give it a good stir, or until al dente. At the very last minute of cooking, add the red wine vinegar, salt and toasted walnuts to the beets. Stir well and transfer to a platter, finishing up with a splash of lemon juice and chopped coriander. The beets are particularly good served over cooked brown rice.
Chickpea and Aubergine Falafel

For a dinner I was invited to on Saturday, I made falafel. Falafel is like the kind of food I’m almost sure every vegetarian on earth has tasted at least once in his/her lifetime. It’s also one of the things I always end up eating every time I travel. However, I had several bad experiences when I tried to make these spiced chickpea balls at home – most of the times, the falafels wouldn’t hold together and consequently fall apart while cooking. This time around I approached the recipe in a different way though – instead of canned chickpeas, I used dried ones, which made all the difference in terms of structure. I also added grilled aubergines to the mixture to provide some depth in terms of flavour. When it comes to falafel, I like it fried more than baked, even though the latter method of cooking is clearly healthier than the former. If you’d rather have it baked, go ahead – just bare in mind the balls won’t be as crispier as if they were fried, even though that comes with the huge advantage of cutting down a bunch of extra calories. Also, frying is, at least for me, a bit of a scary technique – whenever I fry something (which I do rarely), I’m always afraid of getting burnt by the hot oil, so I keep this safety distance from the pan/pot in which things are being fried, and then when I finally decide to turn them over it’s usually too late and they’re already burnt. Anyway, for this post I tried to fry the falafels and the whole process went extremely well – the fact that they were quite firm (I let them sit a few hours in the fridge), has probably contributed to the success. I’ll leave you with this recipe then, but not without the promise of a soon come back.

Chickpea and Aubergine Falafel
(makes about 25 medium sized falafel)
Ingredients:
1 ½ cups (300 g) dried chickpeas
2 tablespoons cumin seeds, crushed
1 tablespoon coriander seeds, crushed
1 big handful coriander (aprox. 7 g)
1 big handful mint (aprox. 12 g)
1 garlic clove, minced
1 teaspoon baking soda
¼ cup regular flour
¾ teaspoon salt
zest and juice of one lemon
2 medium sized aubergines (aprox. 580 g), cut into rounds of about 0.7 cm each
olive oil for frying or baking
1. Put the dried chickpeas in a large bowl and add enough water to cover. Let them soak overnight or for at least 8 hours before using. The day after, drain the chickpeas and wash them thoroughly under cold running water.
2. Now it’s time to salt the aubergine slices: put them in a large tray and add 2 to 3 tablespoons of salt. Leave them like that for at least 30 minutes – you’ll notice they’ll release some liquid and feel softer to the touch. Then, rinse the slices, wash them thoroughly and dry them with the help of a clean kitchen towel.
3. Add chickpeas and all the other ingredients, except the aubergines, to a food processor, and process everything until a thick paste comes together. Transfer the chickpea mixture to a large bowl and set aside.
4. In a large and lightly oiled grilling pan over medium/high heat, cook the aubergines’ slices for about 3 minutes on each side, or until they’re slightly browned or have grilling marks. When the slices are cool enough to handle, cut them into small pieces and add them to the chickpea mixture.
5. Shape the chickpea mixture into medium-sized balls and line them on a baking sheet. Refrigerate for at least 3 hours – the falafels should be cold and firm; if they’re not, let them sit in the fridge for a little longer.
6. Now, you can either fry or bake the falafels. If you want to fry them, heat about 5 cm (2 inches) of oil (I used olive oil) to aprox. 180 C (350 F) in a deep pan or pot. Add the falafels in small batches and fry them for 4 to 6 minutes or until golden brown. Transfer the falafels to a plate covered with paper towels to drain the excess oil. If you prefer to have them baked, brush the balls with olive oil and bake them in the oven (180 c / 350 F) for 15 minutes or until golden brown, turning halfway through for even browning.
7. Serve the falafels in pita bread with some yoghurt-based (I used a soy-based vegan yoghurt) sauce, chopped tomatoes, avocados and salad leaves.
Roasted Butternut Squash and Red Lentil Soup with Cinnamon

I served this soup yesterday to some house guests who came over for dinner and got such great reviews that I thought sharing it with you. We were eight at the table yesterday night, meaning that I made a huge pot of soup and will be enjoying the leftovers today as part of my Christmas dinner. Red lentils and butternut squash really are a great combo, and the natural sweetness of the latter (enhanced by roasting) is complemented by the addition of cinnamon. To give things a little punch, dried chiles are added to the soup, and the final result - yet very delicate - has some background heat, almost like the role played by back vocals in melodies. A couple more technical notes on the soup: it lasts for a couple of days in the refrigerator (three to four), but as it has the tendency to thicken over the time, add a little water when reheating it. Also, if you don’t have the chiles at hand, you can add some cayenne pepper instead (1/4 teaspoon should be enough).
And finally last, but not the least: there are a couple of traditional portuguese recipes (both sweet and savory ones) typical for this of the year that I’d like to post up here. I still do have to work on them, as they’re not vegan, but once I get them right, they’re all yours too. Mery Christmas to all of you. Love, J.
Roasted Butternut Squash and Red Lentil Soup with Cinnamon
(for 8 to 10 servings)
1,3 kg butternut squash, seeded and cubed, but not peeled
1 and ½ cups (270 grams) red lentils
8 cups (2 liters) light vegetable broth
3/4 teaspoon plus 1 teaspoon ground cinnamon
1/2 teaspoon ground ginger
3 small dried red chiles, stemmed and finely cut
salt to taste
2 large white onions, finely chopped
olive oil
a handful chopped coriander, for serving
8 tablespoons pine nuts
1. Pre-heat the oven to 180ºC. Line a baking dish with parchment paper and lightly coat it with olive oil. Add the cubed butternut squash, sprinkle with a little salt, and roast for 30 to 40 minutes, or until the squash is tender and golden brown. Remove from the oven and let cool at room temperature.
2. In the meantime, heat a large pot over medium-heat, add a few glugs of olive oil (2 to 3 tablespoons), the chopped onion, dried chiles, 3/4 teaspoon of ground cinnamon, and the ground ginger. Cook, stirring often, for 8 to 10 minutes, or until the onion has softened and browned just a bit.
3. Add the lentils and stock to the pan. Bring to a boil and, once boiling, reduce the heat to a low-medium and simmer for 20 minutes, or until the lentils are cooked. Once the lentils are cooked, add the roasted butternut to the pot, and season with salt to taste.
4. With an immersion blender, puree the soup until smooth.
5. Toast the pine nuts in a large dry skillet over medium-high heat. It should take about 3 to 4 minutes to get them slightly brown. At the last minute of toasting, stir in 1 teaspoon of ground cinnamon and a pinch of salt, mixing well until the pine nuts are well coated.
6. To serve, transfer the soup to deep plates and add plenty of chopped coriander and one tablespoon per person of the toasted pine nuts.
recipe loosely inspired by Moro East
Curried Zucchini and Apple
This recipe is what I had for lunch today, alongside some grilled tofu and toasted bread slices. It’s one of those recipes that you can put together in a matter of minutes, and is really tasty. What is important in here is to slice both apple and zucchini as stated in the directions, so that they cook thoroughly in the amount of time I’ve specified. The point is to just slightly overcook the zucchini, while the apples retain some of their crunchiness (one of the reasons why I haven’t peeled them). Also, you don’t to use tart apples such as, for instance, Granny Smith, but sweet and crisp ones, as a way of balancing the addition of lemon and ginger juices to the dish. For me, Starking apples work the best in here, but if you can’t find them, I bet Red Delicious would make it as well. For some of you who don’t really know what else to do with zucchini, give this recipe a shot – I’m almost sure it won’t disappoint.
Curried Zucchini and Apple
(serves 4, as a side)
540 grams zucchini (3 medium ones)
200 grams Starking apples (2 small ones)
2 garlic cloves, minced
2 tablespoons olive oil
1 teaspoon curry powder
2 tablespoons water
1 tablespoon freshly squeezed ginger juice
1 and ½ tablespoons freshly squeezed lemon juice, plus a bit more
1 tablespoon lemon zest
¼ cup toasted almonds, coarsly chopped
1 small handful of chopped coriander
salt and pepper to taste
1. Quarter the zucchini lengthwise. Then, cut each quarter into two halves. Finally, cut each half crosswise into sticks about 8 centimeters long. Set aside.
2. Quarter the apples and remove their core. Slice each quarter into 3 equal pieces, about 0,5 centimeters thick. Transfer the apples to a bowl, and add a squeeze of lemon juice to them, to prevent oxidation.
3. In a large sautée pan over medium heat, add the olive oil, garlic cloves, and curry powder, and fry for 1 minute. Add the zucchini and the 2 tablespoons of water, cover, and cook for 8 to 10 minutes, stirring occasionally.
4. Add the apples to the pan and cook for additional 5 minutes. In the last minute of cooking, add the lemon and ginger juices, the lemon zest, and season well with salt and pepper.
5. Remove from heat and divide among 4 deep plates. Add the almonds and chopped coriander on top of each serving and serve immediately.
inspired by Vegetarian Cookery, published by Dorling Kindersley, 1991 (I believe the book is now out of print)

4 comments