Chickpea and Shredded Cabbage Salad with Miso Tahini Dressing
I haven’t been in the kitchen that much in the past few days, hence the lack of posting around here. I have to confess I’ve been feeling lazy to cook, also because here in Portugal we’ve been under extremely hot temperatures - around 35º degrees -, and all I don’t want to do is to spend time in front of an hot stove. So, nothing better than a great and easy salad recipe such as this one, that will only take you a few minutes to prepare.
The only trick in here is to make sure the cabbage is sliced very thinly; if not, the salad will not be as light as it is supposed to be. As far as the dressing goes, it was my first time putting together tahini and miso, and I was surprised by how well the combination worked out: the nutty taste of the tahini seems to soften miso’s typical saltiness, without actually masking its taste. If you shred the cabbage and make the dressing ahead of time, you can put this salad together in less than five minutes. I served this at room temperature, but I bet it would be delicious served cold too. If you’re planning to do the latter, place the salad in a large bowl, cover with cling film, and refrigerate it for 1 to 2 hours or until chilled to your liking. This method will also help the flavors meld together, contributing for a tastier salad.
Chickpea and Shredded Cabbage Salad with Miso Tahini Dressing
(serves 3, as a side)
260 grams canned chickpeas, drained and rinsed
1 small cabbage (180 grams)
1 teaspoon minced chilli
for the dressing:
1 tablespoon tahini
1 tablespoon mugi miso
2 tablespoons lemon juice
2 tablespoons warm water
1 tablespoon olive oil
2 teaspoons agave nectar
1. Start with the cabbage: cut it into halves, remove the hard core, and shred each halve into very thin strips. You don’t want to have very long strips, so cut them in half if needed.
2. In a large bowl, combine the chickpeas and shredded cabbage. Set aside.
3. For the dressing, combine all the ingredients in a medium size bowl, and whisk them together until you achieve a creamy consistency. At this point, you can add a bit more water if you want a thinner dressing, although I like mine on the creamy, slightly thick side.
4. Add half of the dressing to the bowl with the chickpeas and cabbage and toss everything together. At this point, you can refrigerate the salad for at least 1 hour or, as I did, serve it at room temperature.
5. To serve (either cold or at room temperature), divide the salad among 3 plates, sprinkle with the minced chilli, and spoon the remaining dressing over the top of each serving. Serve immediately.
Roasted Beetroot Soup with Cumin Potatoes

Everybody’s seem to have some kind of issue with beetroot. Some people only can eat them in salads, mixed with other veggies, some others can’t really stand them, and then there are those individuals (aka me) that could live on beetroot for the rest of their lifes and remain totally happy (well, sort of…).
I’d argue that the best way to cook beetroot is to roast them, as roasting enhances their sweet flavor and also adds a bit of a smoky taste. Roasting the beetroot is the step that will take longer when making this soup, but I assure you it is totally worth it. Apart from that, the soup couldn’t be more simple to make: just put the required ingredients on the food processor, blend until smooth, serve, eat. The addition of dill complements well the sweetness of the beetroot, and the crispy potatoes, with their hint of cumin, add crunchiness and depth to the soup. As I specify in the directions, you can adjust the amount of water to your liking (the amount mentioned makes for a soup on the thick, creamy side, as it is how I like mine), but bear in mind that if you thin it, you’ll probably have to adjust the seasonings afterwards.

Roasted Beetroot Soup
(serves 2 to 3, depending on the consistency you want your soup to have)
350 grams raw beetroot
200 grams natural unsweetened soy yoghurt
1 tablespoon olive oil
1 teaspoon salt
1 small garlic clove
3 tablespoons finely chopped dill, plus a bit more for garnish
1/3 cup water
for the cumin potatoes:
260 grams waxy potatoes (about 2 large), peeled and cubbed
¾ teaspoon ground cumin
a pinch of salt
1 tablespoon olive oil
1. Preheat the oven to 180ºC.
2. Place the beetroot in a baking tray lined with parchment paper. Sprinkle the beetroot with salt, and roast for at least 1 hour, or until tender.
3. Let the beetroot cool a bit before handing them. Then peel them under running cold water and cut into small cubes.
4. In a food processor, combine the cubbed beetroot, soy yoghurt, garlic clove, olive oil, dill, and water, and process until smooth. Taste, adjust the seasonings, and if the soup seems too thick, add a bit more water to thin it to your liking. Taste and adjust the seasonings, adding a bit more salt if necessary.
5. Divide the beetroot soup among 2 or 3 bowls. Set aside.
6. To make the cumin potatoes, heat 1 tablespoon of olive oil in a large frying pan over medium-high heat, then add the potatoes, salt and ground cumin. Cook, covered, for approximately 15 minutes, giving the pan a good shake every 5 minutes. They’re ready when crisp and uniformly golden brown.
7. To serve, scatter 2 or 3 tablespoons of the potatoes over each bowl of soup. Sprinkle each bowl with a bit more dill and serve immediately. The soup can be enjoyed cold or at room temperature, although I prefer the latter.
Smoked Tofu and Caramelized Onion Sandwich

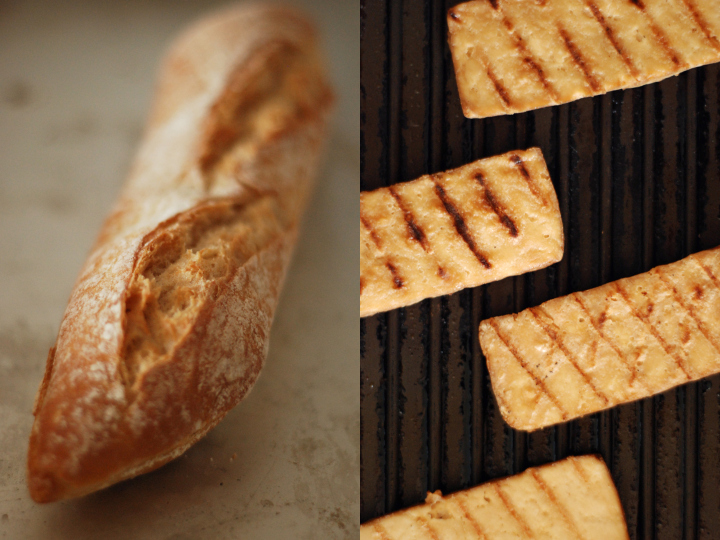
This is one of my favorite sandwiches. It calls for only a few ingredients, but they work so well together that you don’t need anything else. A crispy baguette is filled with caramelized onion (whose sweet flavor is brightened by the addition of balsamic vinegar), slightly grilled smoked tofu and a few sprigs of thyme. That’s it. This is actually a very straight-forward recipe, and I bet that if you serve it to non-vegetarian friends, they will certainly enjoy it. The smoked tofu I used in here is quite mild, and I recommend you to use a mildish one too, as to complement perfectly the flavor of the caramelized onion. I feel that smoked tofu, once cooked (particularly grilled), looses quite a lot of its flavor and can also get a bit dryish, so the key in here is to grill it just long enough to heat it through.
Smoked Tofu and Caramelized Onion Sandwich
(for one sandwich)
1 medium size baguette
100 grams smoked tofu, cut into 0,5 cm thick slabs
1 large (200 grams) onion, peeled and sliced into thin rings or strips
1 tablespoon olive oil
1 tablepsoon balsamic vinegar
a pinch of salt
a few thyme sprigs, for garnish
1. Heat the olive oil in a large skillet on medium heat. Add the onion rings and a pinch of salt and cook for 10/15 minutes, or until the onion has soften and browned a bit.
2. When the onion has browned, lower the heat to the minimum and add the balsamic vinegar. Stir and cook uncovered for additional 3 minutes, or until the liquid has reduced a bit and the onion is deeply caramelized.
3. At the same time the onion is cooking, heat a grilling pan over medium-high heat, add the tofu slabs, and cook for 4 to 5 minutes on each side. When done, transfer the tofu to a plate, but do not turn off the heat yet.
4. Cut the baguette in half lengthwise. Place the halves, cut side down, in the same grilling pan in which the tofu has cooked, and toast for 4 minutes, or until they’re golden brown and crisp around the edges.
5. Transfer the baguette slices to a plate and spread the cooked onion over one of the slices, followed by the tofu slabs, 2 or 3 sprigs of thyme, and the remaining slice. Serve immediately.
Chocolate Cake
It took me a while to write this post. Actually, it took me a while to think of a nice and reasonable way to put into words my mixed feelings towards chocolate. It’s a back and forth relationship, the one I have with this ingredient: sometimes I love it, other times I can’t stand it. I have friends who die for chocolate, not being able of spending an entire day without putting their teeth into a chocolate bar or some kind of chocolaty treat. I, on the opposite, can spend quite some time, with no sacrifice at all, without eating it. I’ve learned to enjoy chocolate throughout the years, as it was something I never got enthuasiastic about, but still I tend to prefer sweets made out of other ingredients. My childhood food memories are filled with cinnamoon, orange and banana cakes, apple pies and roulades, goods that I’d help my grandmother preparing, as I’ve spent a great amount of time, as a kid, at her place. Time has passed, but those remain the sweet baked goods I still like the most. Simple cakes with honest flavors. No chocolate involved.
Actually, I had never baked a chocolate cake until yesterday. So, you may wonder, what on earth suddendly has happened to me to bake a chocolate cake? Honestly, I don’t know. I think it was more of a conscious and logical issue. I mean, I’ve cooked and baked so many things so far, and it feels strange not having a chocolate cake recipe in my repertoire. So, to fill this gap, I’ve decided to pick up a good chocolate cake recipe, one that I could easily make egg and dairy-free (if it wasn’t already like that), and bake it. It was not without surprise that, while searching, I found out that Deb, at Smitten Kitchen , posted a recipe for an everyday chocolate cake . The recipe was dead easy to put together (it took me only 10 minutes to measure the required ingredients, mix them into a batter, and put the batter on the prepared loaf pan), and it called for only one egg, which I easily replaced by some puréed tofu.
The cake was that good. It was dense, rich, and not overly sweet, as I don’t like my baked goods to be too sweet. Also, thanks to the addition of muscovado sugar, it developed a nice crust. We enjoyed the cake today right after lunch, and my grandparents, who usually come over for a visit on sundays, even took home some good slices of it with them, to enjoy later on today or tomorrow with a cup of tea.
Chocolate Cake
(for one cake, baked on a loaf pan of 22 x 7 cm)
110 grams (1/2 cup) vegan margarine
190 grams (1 cup) light muscovado sugar
90 grams (1/2 cup) granulated sugar
40 grams (1/4 cup) tofu, crumbled
3 tablespoons water
250 ml (1 cup) soy milk mixed with 1 tablespoon plus 1 teaspoon of lemon juice (this makes a good substitute for buttermilk)
75 grams (3/4 cup) dutch processed cocoa powder (I used Green & Black’s)
190 grams (1 1/2 cups) regular flour
¼ teaspoon baking soda
½ teaspoon baking powder
¼ teaspoon table salt
1. Preheat the oven to 170º.
2. Grease a loaf pan (22 x 7 cm) and line with non-stick parchment paper.
3. In a food processor, combine the tofu with the water and process until creamy. Add the vegan margarine and soy “buttermilk” and process until smooth.
4. In a large bowl, combine the dry ingredients.
5. Add the tofu, margarine and “buttermilk” mixture to the bowl with the dry ingredients, and stir with a spoon until well combined, being carefull not to overmix. You can also do it (as I did) with an electric mixer, as it blends the ingredients more easily.
6. Pour the batter into the prepared loaf pan. Bake for 50 to 60 minutes, or until a toothpick inserted in the center of the cake comes out clean.
7. Let the cake cool on the pan for 10 to 15 minutes, at which point you can transfer it to a wire rack, to cool down completely. It keeps for up to 2 days, wrapped tightly in plastic.
adapted from a recipe posted on the food blog Smitten Kitchen
Chickpea Burgers
I’ve always been afraid of making my own veggie burgers. With all my previous attempts, some kind of minor disaster had happened: most of the times, the burgers would fall apart while cooking, not keeping the perfect round shape I wanted them to keep after being cooked. So today, I was determined to make the perfect veggie burgers I was dreaming on for such a long time. I had some cooked chickpeas sitting on the fridge, so I haven’t thought twice: I’d be making chickpea burgers.
I came to a conclusion: my previous attempts failed because there wasn’t any ingredient binding all the other components of the burger, hence their loss of structure. How I wish I had realised that sooner… This time around, not only the burgers kept their shape, thanks to the addition of ground flax seeds and tahini, but were also delicious in their own right. I served these guys on top of a grilled portobello mushroom and topped them up with an homemade apple and zucchini chutney. But feel free to use whatever condiments and fixings you like – I bet they would go particularly well with tzatziki and/or a peach salsa.
Chickpea burgers
(makes 6 burgers)
2 cups cooked chickpeas (canned is fine)
½ cup breadcrumbs
1 teaspoon salt
1 tablespoon ground cumin
1 tablespoon coriander seeds
2 small garlic cloves, minced
2 teaspoons curry powder
1/2 teaspoon black pepper
1 tablespoon tahini
2 teaspoons flax seeds
5 tablespoons water
95 grams extra firm tofu, crumbled
½ cup cornmeal
zest of ½ lemon
1. In a large bowl, combine the chickpeas, breadcrumbs, ground cumin, coriander seeds, curry powder, pepper, minced garlic, salt and crumbled tofu. Set aside.
2. In a coffe grinder or food processor, grind the flax seeds. Add the tahini and slowly pour the water, processing everything until you get a mixture with the consistency of a thick sauce. This will work as a binder.
3. Add the flax seeds and tahini mixture to the large bowl. Mix well all the ingredients.
4. Put all the ingredients in a food processor. Process until everything comes together. Don’t bother if the mixture isn’t totally smooth; it’s actually great to find some small bits of chickpeas in there, as they add some crunchiness to the burgers.
5. Divide the mixture into 6 equal portions. With your hands, form round patties that are about 8 centimeters in diameter and 1 centimeter thick.
6. In a deep plate, combine the cornmeal with the lemon zest. Dip the patties in the mixture, shaking off the excess cornmeal.
7. Put a large grilling pan, previously brushed with olive oil, over medium-high heat. When it’s hot, but not smoking, add the patties.
8. Cook the patties for about 8 minutes on each side, turning them only once.
9. Serve them right after cooking.
Note: The burgers are quite firm and really hold their shape while grilling. Due to the low content of fat in the recipe, it’s really necessary to brush the grilling pan with olive oil to prevent them from sticking. For this very same reason, I don’t think that baking them would be a great idea, as baking usually absorbs a lot of moisture and would make the burgers a bit too dry, even if you brush the baking sheet with oil. On the other hand, and as an alternative to grilling, you could heat a large skillet with 1 or 2 tablespoons of oil and cook them over medium-heat for the same amount of time (8 to 10 minutes on each side) until golden brown on both sides.

2 comments