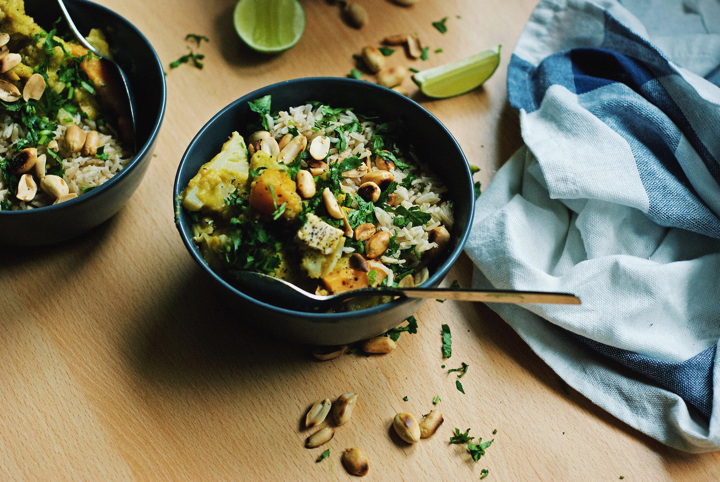
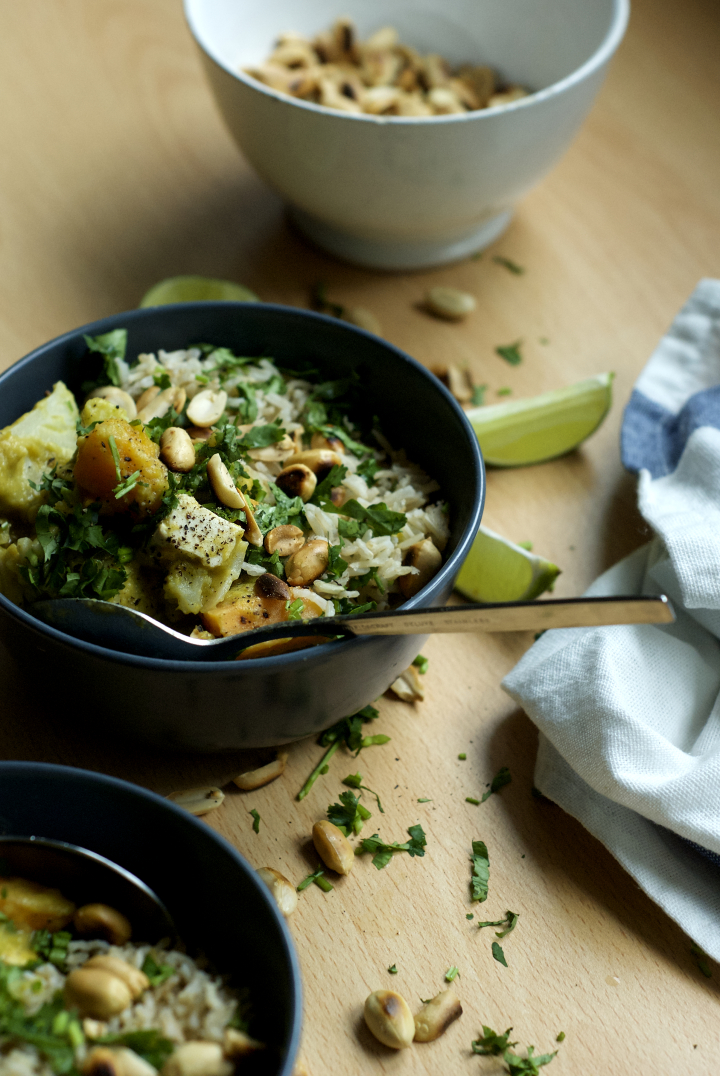
My Favourite Thai-inspired Vegetable Curry
Since I last posted a lot of things have happened in my life. The first and most important one was my recent move from Porto to Glasgow. Between preparing and planning all the stuff that involves moving into a different country, I barely had time to cook, let alone blog. However, and now that I’ve been here for a month and got (almost) everything sorted out (housing, burocracy and the likes), I´m happy to resume blogging and do the very best I can to bring you my favourite vegan recipes.
I’ve been thinking a lot about how things will naturally change around here (in terms of photography and recipe content as well) since I’m not in my own kitchen and do not have all the kitchen tools I’m used to. This will naturally affect the kind of recipes I’ll be posting from now on – they will be simpler, and since I do not own a food scale, lack the accuracy I’d like them to have. However, I do prefer to face this as a challenge (and one that I’m happy to take) rather than a limitation. I came to Glasgow with a 20 kg suitcase. I brought mostly clothes, one book, my laptop and my camera. I left in Porto all my cookbooks and the boards, plates and cutlery that have helped me build this blog’s photography identity over time. I’m already missing my bedroom’s blue wall, the wall that was the background of most of the food pictures I posted here for the last 5 years. But I’m also a firm believer that things happen for a reason. I was probably getting too comfortable with my own style of doing things, and this an opportunity to question that and try new and fresh approaches.
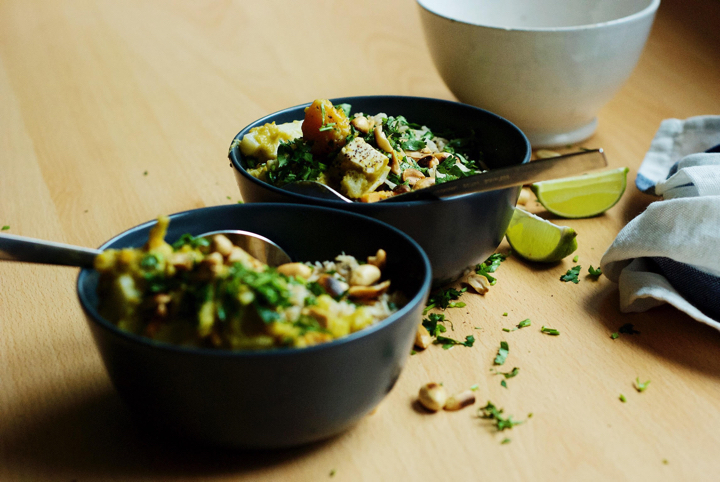

So, let’s talk curry today. I didn’t bring any of my cookbooks with me, but if I could only bring one, I’d definitely go with The Millenium Cookbook. Most of the recipes I cooked from this book were outstanding, and a great number of them have become part of my cooking repertoire. That’s the case with this curry. The original recipe is more labour intensive, and in order to make it simpler and faster I omitted some steps, trying not to compromise too much on the flavour. The recipe might still seem a bit of a project though, but I can guarantee you it’s worth making your own curry “base” from scratch, blending the sauce, and so on. In the end, you’ll have a fantastic curry that feeds a crowd and is definitely a crowd pleaser too. If you can’t come across butternut squash this time of the year, use carrots instead (4 or 5 large ones will do) – I’ve done it before and it works just as well. Also feel free to play around with the vegetables – in the past I’ve tried green beans, broccoli and asparagus and all of them have worked nicely. Hope you enjoy the curry and I’ll be back soon! In the meantime, check my instagram feed for food-related pictures and some suburb memorabilia from Glasgow.
My favourite Thai-inspired Vegetable Curry
Recipe inspired by The Millenium Cookbook
(serves 6, as a main)
*note: I usually use two green chillies with seeds, but I can handle quite a lot of heat. If you’re less tolerable than me, use only one.
For the curry sauce:
2 medium sized onions, chopped
5 large garlic cloves, chopped
1 piece of ginger the size of your thumb, peeled and grated
1 small bunch of coriander
1 teaspoon coriander powder
½ teaspoon turmeric powder
1 teaspoon cumin powder
1 teaspoon sea salt
zest of 2 limes
juice of 2 ½ limes
2 green chillies, finely chopped* (see note above)
1 medium sized butternut squash, peeled, seeded and chopped into cubes
1 can / 400 ml full fat coconut milk
For the curry:
1 Tablespoon coconut oil, melted
1 large sweet potato, peeled and chopped into cubes
1 large carrot, peepled and chopped into cubes
1 small head of cauliflower, cut into medium-sized florets
1 small head of cabbage, thinly sliced
1 lemongrass stalk, tough outer layer removed, bruised in a mortar and pestle (optional)
1 cup / 250 ml water
250 g / 1 package smoked tofu, cubed
For serving:
3-4 spring onions, finely chopped
1 handful of peanuts, toasted
extra coriander, finely chopped
1-2 limes, cut into quarters
For the curry sauce: In a double boiler, steam about ¾ of the butternut squash for 5 to 8 minutes, or until thoroughly cooked. In a high speed blender combine the chopped onions, garlic, ginger, fresh coriander, spices (coriander, cumin and turmeric powders), salt, lime zest and juice, chilies and the coconut milk and blitz until you have a smooth sauce. Working in batches, add the cooked butternut squash to the mixture and blitz until creamy.
For the curry: In a large pot over medium heat, add the coconut oil, the carrot, sweet potato and the remaining ¼ of butternut squash. Sautée for a few minutes or until the vegetables are golden brown. Add the curry sauce followed by the bruised lemongrass stalk (if using) and 1 cup / 250 ml of water and bring to a boil. Once boiling, decrease the heat to low-medium and simmer for 10 minutes. After that time, add the cauliflower, cabbage and smoked tofu and simmer for 5 minutes longer. If the sauce seems too thick, add a bit more water to thin it out to the consistency you like (I like mine to resemble a smooth blended soup). Season with extra salt and serve with the chopped peanuts, scallions, coriander and a good squeeze of lime juice.
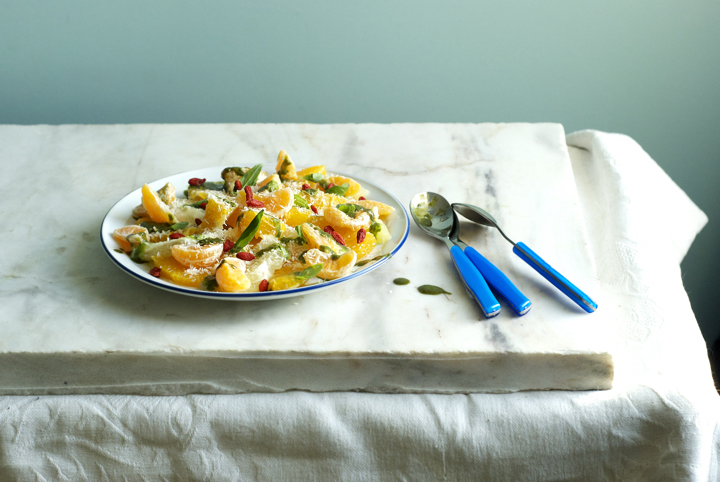
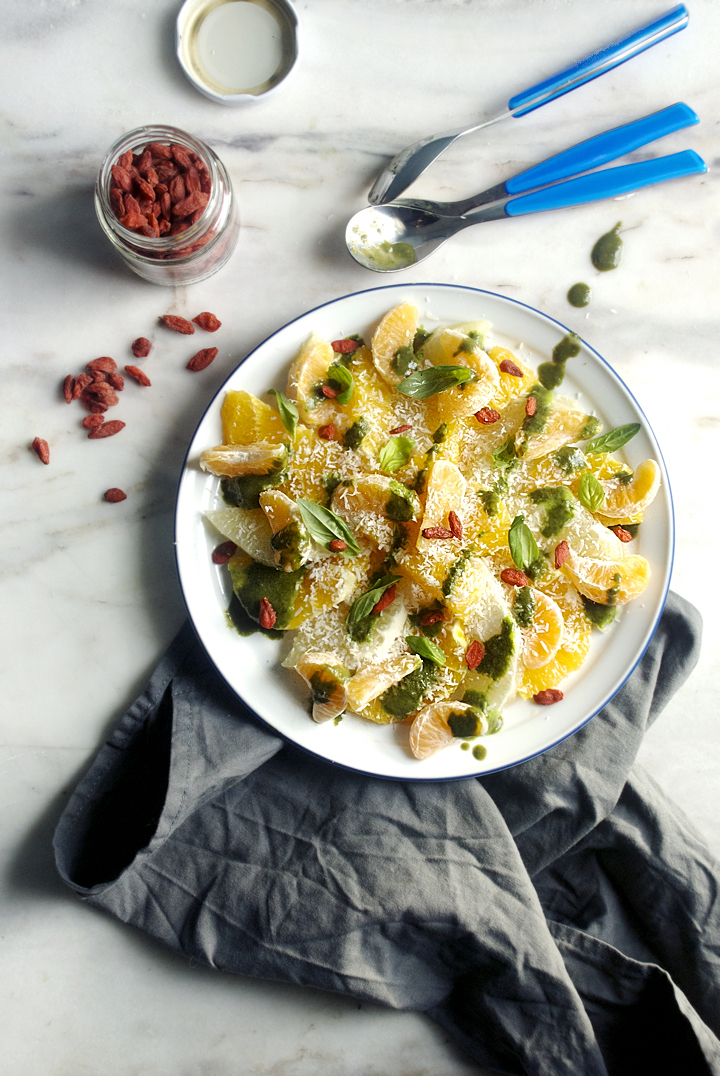
Citrus Salad with Basil-Coconut Sauce
I always do my food shopping on Saturdays. I go to the farmers market in the early afternoon and buy fresh fruit and vegetables for the week. Unless I have friends coming over for dinner, I almost never plan what I’m going to bring home – I just buy seasonal and fresh produce. Last Saturday, the market stalls were filled with tons of oranges, grapefruit, tangerines and lemons. Being a citrus lover, I couldn’t help but buying some, and on the way back home I even manage to peel and eat a giant orange while at the same time carrying all the bags packed full of fresh produce.
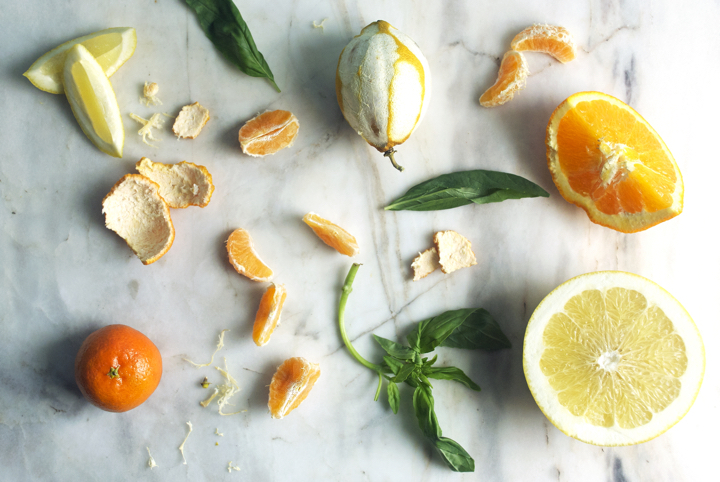

Back at home, I fantasized about baking an old fashioned orange cake with a beautiful orange glaze, but then I just thought that the fruit was so delicious and fresh that throwing it into a cake wasn’t the best way to make it justice.
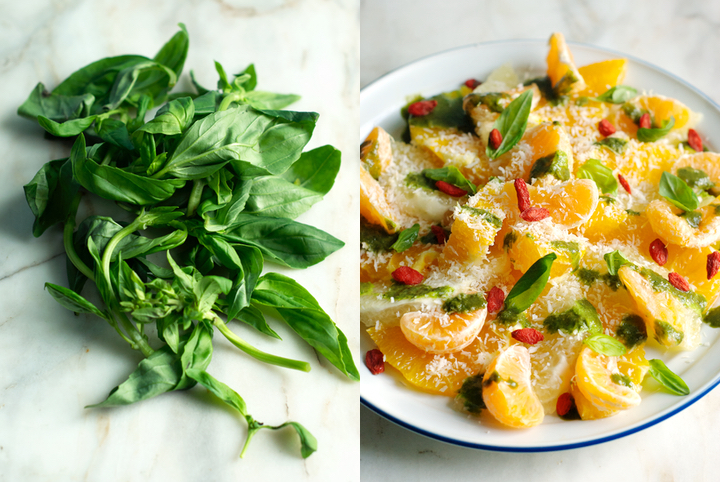
I remembered years ago seeing Jamie Oliver on a show making a savoury basil sauce to go with a raw tomato salad, and that idea kind of got stuck in my head and ended up being the inspiration for this dish. The combination of flavours might seem unusual but it works incredibly well. I ate the salad as an afternoon snack but it could easily be served as a light dessert. Needless to say, there’s room for adaptations here: you can omit the grapefruit if you want to (subbing it for more orange and tangerine), or you can take a different route, by using pineapple instead of all the citrus (I bet it’s equally delicious).
Citrus Salad with Basil-Coconut Sauce
Serves 2
Note: all the fruit was weighted after being peeled.
For the salad:
185 g / 1 large grape fruit
166 g / 1 large orange
75 g / 2 small tangerines
2 Tablespoons dried coconut
a small handful of goji berries
for the basil-coconut sauce:
18 g / 1 medium bunch basil leaves
4 Tablespoons coconut milk
2 Tablespoons brown rice syrup
In a small skillet over medium-high heat, toast the coconut until it’s fragrant and just beginning to brown.
Cut the orange and grapefruit into 0,5 cm round slices. Split the tangerines into segments and remove the pits (if they have any).
In a blender, combine all the ingredients for the sauce and process until smooth. If it’s too thick, add an extra tablespoon of coconut milk.
Put the sliced fruit in a serving plate and sprinkle with the toasted coconut and goji berries. Drizzle with the sauce and serve immediately.
Coconut, Roasted Banana and Passion Fruit Tart

I live in an apartment and therefore do not have any available outdoor space to grow vegetables and fruit (the balcony doesn’t count). However, though, I’m lucky enough to have friends who, knowing my obsession with food and natural produce, occasionally bring me goodies from their gardens. This time around, my dear friend Filipa has brought me tons of thyme, an extra large zucchini (they’re everywhere around this time of the year, aren’t they?) and a bag full of passion fruit.

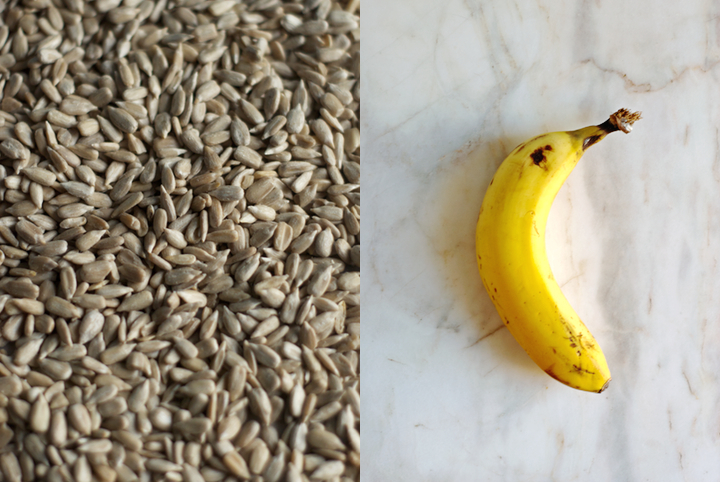
I knew straight way what to do with the first two ingredients (a huge batch of za’atar with the thyme, and a simple zucchini and apple soup), but I struggled with the latter. I’ve never been a huge fan of passion fruit, but knowing how outstanding it looks on desserts, specially cheesecakes and the like, I decided to make a tart with it. I approached it the way I usually do with vegan cheesecake-y desserts – I’m not a fan of using tofu, so the filling was coconut and banana based, firmed up with the help of Mr. Agar. I was very happy with how it turned out, specially because the filling had just the right texture – not too firm, but not too jiggly either. Eaten cold, I dare say it was probably the best dessert I’ve made this year.

Coconut, Roasted Banana and Passion Fruit Tart
(serves 8)
for the crust:
1 cup sunflower seeds
1 1/2 cups oat flour (gluten free or not)
2 Tbs. flaxseed meal + 1/4 cup water
1/3 cup brown rice syrup
1/4 tsp. fine grain sea salt
1/4 cup coconut oil, melted
for the filling:
400 ml /2 cans full fat coconut milk
2 tsp. agar agar flakes
1/3 cup brown rice syrup
1 vanilla bean, split lengthwise, and seeds scraped
2 Tbs. tapioca starch
5 Tbs. water
for the passion fruit sauce:
6 medium sized passion fruit
3 Tbs. brown rice syrup
1. Pre-heat the oven to 180ºC/350F. Line two small trays with parchment paper. Add the banana, unpeeled, to one of the trays, and the sunflower seeds to the other. Put the trays in the oven and roast the seeds for 10-15 minutes (redistribute them halfway through, so they’re evenly toasted), and the banana for 5 minutes longer. Take the trays out of the oven and let the seeds and banana cool down.
2. When the toasted seeds are cool enough to handle, add them to a food processor and process until finely ground. In a large bowl, add the seeds, oat flour and salt. In another bowl, add the flaxseed meal along with 1/4 cup of water. Mix well and add the coconut oil and brown rice syrup, stirring everything together until thoroughly combined. Add the wet mixture to the dry one and mix until a firm dough comes together. If the dough seems wet, add a little more flour. Basically, it’s perfect as long as it doesn’t stick to your hands or the bowl.
3. Lightly oil a 33 x 9 cm non stick pie pan and, with your fingers, press the dough into it. Cover it with parchment paper, add some beans or pie weights and blind bake for 20-25 minutes, or until the edges of the tart are golden brown.
4. While the crust is baking, make the filling. In a small bowl, whisk together the tapioca starch and 5 Tbs. of water until well combined. In a small pot over low-medium heat, add the coconut milk, agar agar flakes, vanilla seeds and brown rice syrup. Whisk the mixture constantly for about 8 minutes. Now, add the tapioca mixture to the pot and whisk for additional 2 minutes, or until the liquid has thickened.
5. Unpeel the banana and add it to a blender or food processor. Add the coconut milk mixture and blend until smooth. Add the filling to the previously baked crust. Let it cool to room temperature and refrigerate for at least 2 hours before serving.
6. Right before serving, cut the passion fruit in half and extract their pulp with a spoon to a bowl. Add the brown rice syrup and stir to incorporate. Drizzle the sauce over the tart and serve.
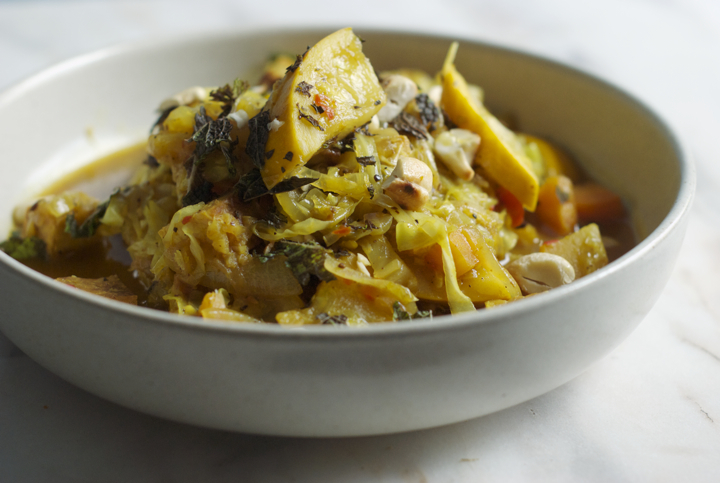
Tempeh Lemon Curry
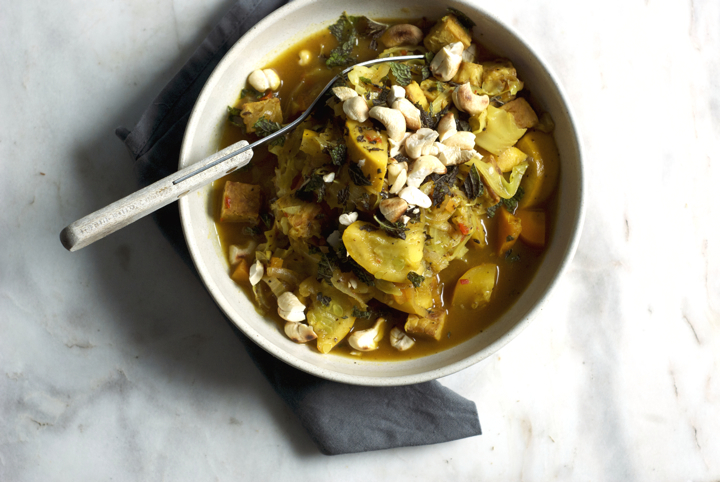
I know I haven’t been around for a while but, hey!, I’m still here, and today we’ll talk curry. I realize this is the first curry recipe I write about on the blog, and to be honest I don’t know how that happened because it’s the kind of dish I cook often. I know there are a lot of vegetable curry recipes on the internet and that you probably don’t need another one, but I’ve made this curry countless times and think it’s a good one to have on your repertoire.
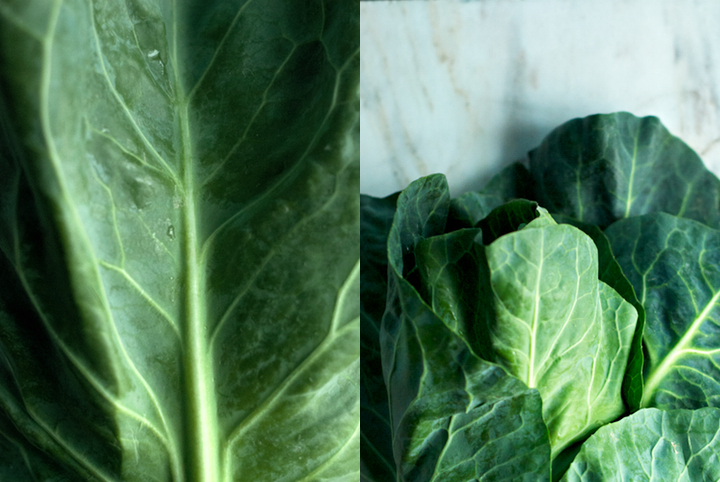
The variations in here could be endless. I’ve made it before with spinach in place of the cabbage and it turned out good, but I prefer to use the latter mainly because of the texture it brings to the whole thing. A word on tempeh: it’s well known that steaming tempeh for 15 minutes before actually cooking with it, removes its bitterness. To be honest, I don’t mind the bitterness and I think it goes practically unnoticed in here, camouflaged by the bold flavours of all the spices and the lemon. Having said this, if you want to steam it first (or even sub it for tofu), go ahead.
Enjoy the curry, have a great summer (guess what: here in Portugal has been raining) and I promise to come back soon! (:

Tempeh Lemon Curry
(serves 4)
3 Tbs. olive oil, divided
1 large onion, finely chopped
4 garlic cloves, finely chopped
1 tsp. ground coriander seeds, roughly pounded in a mortar and pestle
1 tsp. mustard seeds, roughly pounded
1 tsp. caraway seeds, roughly pounded
2 medium carrots, cut into cubes
1 Tbs. fresh ginger
1 tsp. ground turmeric
1 red chilli, finely chopped
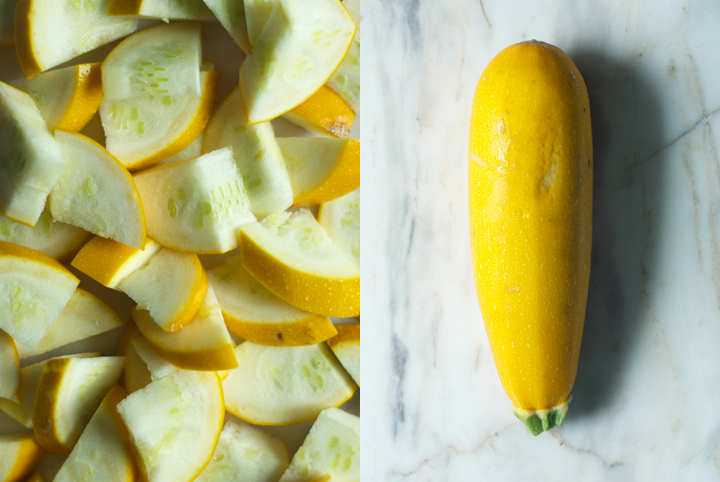
1 large zucchini, cut into half moons
1 cup / 250 ml coconut milk
4 cups shredded cabbage
250 gr tempeh, cut into cubes
½ teaspoon
1 tsp. rice syrup
2 Tbs. mirin
zest of one lemon
1 handful toasted cashews, coarsely chopped
1 handful fresh mint, coarsely chopped
juice of ½ lemon
In a large pan over medium heat, add 2 tablespoons of olive oil, onion, garlic cloves and coriander, mustard and caraway seeds. Fry for 3-4 minutes or until the onion has softened and the spices have toasted a bit and smell fragrant.
Add the carrots, fresh ginger, turmeric, chilli and zucchini to the pan. Give everything a good stir and add the coconut milk. Cover the pan and cook for 5 minutes.
In the meantime, heat the remaining 1 tablespoon of olive oil in a frying pan over medium-high heat. When the oil is hot, but not smoking, add the tempeh cubes and fry until golden brown. Turn off the heat, sprinkle the tempeh with a pinch of salt and add it to the pan with the vegetables.
Now, add the cabbage to the pan as well, pressing it gently with the back of an wooden spoon so that it’s covered by the coconut milk. If, at this point, the curry looks as if it hasn’t enough liquid, add up to 1/3 cup of it, but keep in mind the cabbage will release a lot of water too. Cover the pan and cook for additional 5 minutes, or until the cabbage is wilted. Add the salt, rice syrup, mirin and lemon zest. Stir everything together and finish off with the lemon juice, toasted cashews and mint.
Recipe adapted from The Modern Vegetarian Kitchen, by Peter Berley, published by William Morrow Cookbooks, 2008
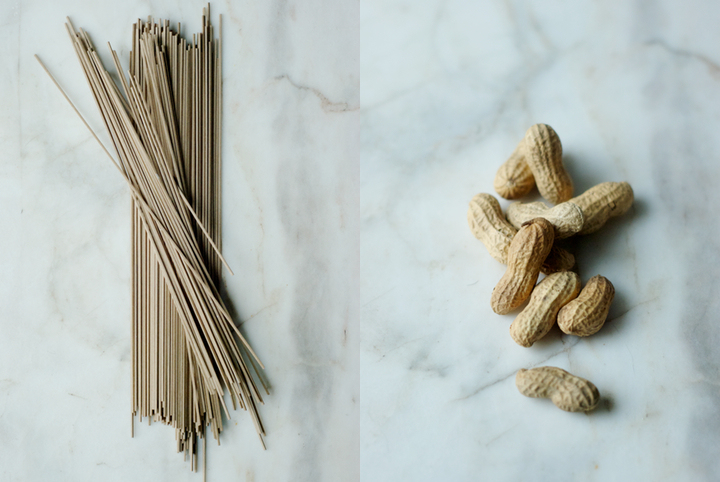
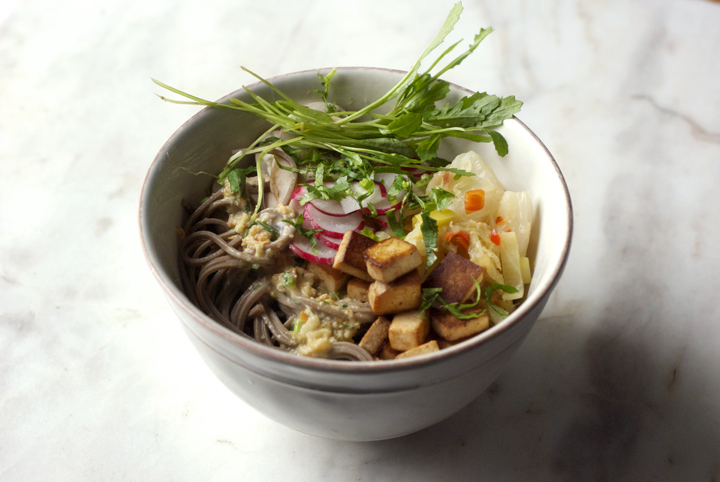
Soba Noodle Bowl with Kimchi and Satay Sauce
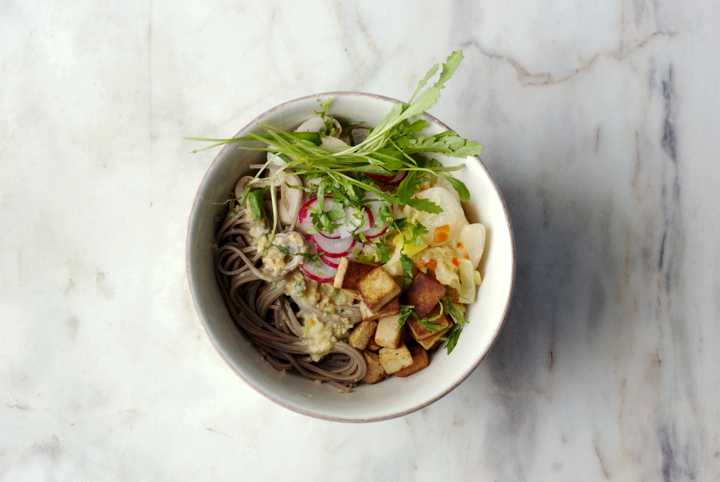
One quality I highly admire in people is their ability and willingness to try new or “different-than-usual” foods. While some people sometimes seem to be afraid of new tasting experiences (I know quite a few), others dig into new dishes without blinking an eye and just for the sake of curiosity.
I guess Luís fits into the latter category. The other day I was all excited with my first attempt at making kimchi and, to my surprise, he seemed to like it. He compared it to wasabi, which at first might sound odd, but thinking of it I realized those two foods share the same kind of fresh and invigorating spiciness.
Even though the instructions for this recipe (particularly the kimchi) seem to be long, this is a dish that is really easy to put together. The peanut satay calls for ingredients you probably have in the fridge already, and you can use tahini or almonds in the place of the peanuts if you feel like it. As far the as vegetables go, use what you have on hand, really: spring onions, raw turnips’ or carrots’ batons and assorted greens can definitely replace the ones I call for in here.
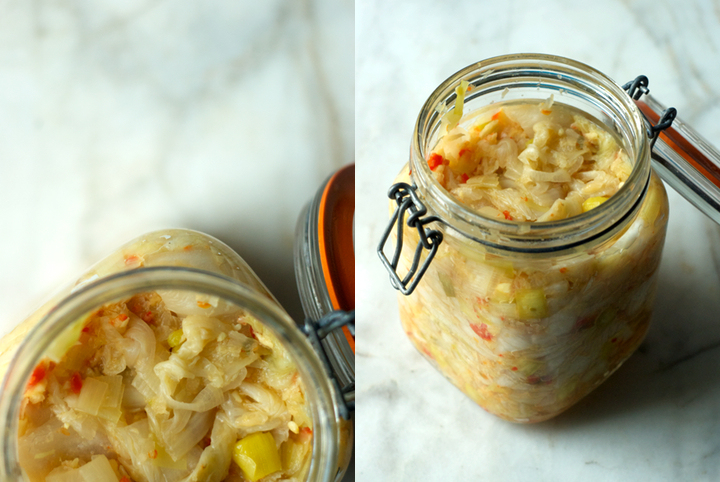
Now, onto the kimchi: I highly encourage you to make your own kimchi and start digging into the fermentation topic a bit – this is a wonderfully written book on that, by the way –, as it’s fascinating how the action of time imparts such a peculiar tangy sourness to vegetables. You might get addicted along the way and, if you’re like me, start fermenting everything in sight. At this moment, I have a jar filled with (almost soured) beets and another one with cabbage, which will soon turn into (hopefully) delicious sauerkraut.
Soba Noodle Bowl with Kimchi and Satay Sauce
(serves 2-3, as a main)
160 gr soba noodles
6 to 8 radishes, thinly sliced
3-4 button mushrooms, thinly sliced
200g pan fried tofu, cubed
plenty of green leaves (I used baby rocket)
1-2 tablespoons fresh coriander, finely chopped
kimchi (recipe follows – as much or less as you want)
for the satay sauce
60 gr / 1/3 cup unsalted peanuts
80 ml / 1/3 cup plus 2 tablespoons coconut milk
juice of one medium-large lemon
¼ teaspoon salt
¼ teaspoon red chili flakes
1 teaspoon soy sauce
15 gr fresh ginger, finely grated
1 small coriander bunch / about 12 gr finely chopped
for the kimchi
1 kg / one very large chinese or napa cabbage, coarsely chopped
6 large garlic cloves
3-4 tablespoons fresh ginger, finely grated
3 red chilis, finely chopped
1 large leek, finely sliced
8 cups water
8 tablespoons sea salt
To make the satay sauce: in a pan over low-medium heat, toast the peanuts until they’re golden brown (3-4 minutes). In a mortar and pestle, mash the peanuts and the salt together. I like my satay fairly chunky, so I don’t mash the peanuts until they come to a paste – I leave some of them broken down for a bit of texture.
Transfer the peanut and salt mixture to a bowl. Add all the remaining ingredients and whisk everything together until you get a creamy sauce. Have a taste and adjust the seasoning, adding more salt if needed be.
In the meantime, bring a large pan with plenty of salted water to a boil. Once boiling, add the noodles and cook them for 6-7 minutes. Drain and set aside.
To make the kimchi: In a large non-reactive bowl, mix the water and the salt. Whisk for a minute or two or until the salt is dissolved. Add the cabbage to the bowl and make sure it’s covered by the salted water (brine). Let it sit in the fridge overnight.
The next day, drain the cabbage and reserve some of the brine (1 or 2 cups should be enough). If it’s too salty, wash the cabbage under cold water, rinse and drain again. If it’s not, simply drain it.
Mash the garlic cloves, ginger and chilli into a mortar and pestle. Rub this paste into the cabbage. Add the chopped leek to the mixture and pack everything together into a clean 1 liter jar. With your clean fingers, press the cabbage down into the jar so that it releases some of the brine. Make sure the cabbage is submerged in the brine (it should be 1 cm above the cabbage). If it’s not, add back some of the brine you previously reserved. Cover the kimchi with another jar, slightly smaller than the one you’re using, filled with water or beans to press the cabbage down. Check your kimchi every day and, with your clean fingers, press it down a little bit each time, always making sure it’s covered by the brine. After a week or so, it’s ready to be eaten and you can store it in the fridge, where it will continue to ferment but at a much slower pace.
To assemble: add to each bowl a fairly good amount of soba noodles, and top them with plenty of sauce (1-2 tablespoons per person or as much as you want). Add the raw vegetables (radishes, mushrooms and greens), the pan fried tofu and, finally, the kimchi (I add about 2 tablespoons per bowl).
The Kimchi recipe is lightly adapted from the book “Wild Fermentation” (2003), by Sandor Ellix Katz
Chocolate Cardamom Tarts

I had the idea for this recipe on my mind for a few weeks now, but was holding back to try it out because sweet goods “don’t really suit my style”. Chocolate desserts, in particular, are far from being my forte. Don’t get me wrong though, I think this one is a great dessert. For chocolate fans. I mean, not the milk-chocolate-candy-bar ones, but for those who appreciate chocolate’s bitterness and more authentic flavour. Let’s say the hardcore fans.
Cardamom is one my favourite spices (followed by cinnamon) and I recently found out it pairs incredibly well with chocolate. These two, coupled together as a filling for a nutty crust, give the little tarts a lot of depth and intensity in flavour. Having said that, and even though this recipe only makes four small tarts, you’ll probably be fine, as I was, with only half of one. A couple specifics: the crust used in here is gluten-free, and because gluten-free doughs tend to be temperamental and hard to work with, you won’t need to roll it, but to press it directly into the tart shells. It won’t look as perfect as if it was rolled but, really, there’s no need to complicate things unnecessarily and only for the sake of presentation…

You might also realise this recipe doesn’t call for any sugar and for me it’s fine as is. However, your taste buds are certainly different than mine and if you find the filling too bitter, one or two tablespoons of coconut sugar or other sweetener of your choice won’t hurt. Lastly, do add the flaky salt or fleur de sel on top of the tarts – it really makes a difference, as salt is known to work as chocolate’s flavour enhancer.


Chocolate Cardamom Tarts
(makes 4 tarts, using small tart shells of 7,5 cm in diameter)
for the crust:
70 g / ½ cup chestnut flour
50 g / ½ cup hazelnut meal
¼ teaspoon salt
1 tablespoon flax seed meal
60 ml / ¼ cup melted coconut oil
2 tablespoons cold water
for the filling:
6 cardamom pods, green shells removed and crushed in a mortar
and pestle into a fine powder
100 g / roughly ¾ cup 70% dark chocolate, cut into small pieces
125 ml / ½ cup coconut milk
extra coconut oil for greasing the tins
cocoa powder
flaky sea salt or fleur de sel
Pre-heat the oven to 175º/350ª degrees.
Sift the chestnut flour, hazelnut and flaxseed meals and salt into a bowl. Add the melted coconut oil and the water, and work the mixture with your hands until you get a firm dough. Divide the dough into 4 equal portions.
Using a pastry brush, grease your tart tins with extra melted coconut oil. Press one piece of dough into one of the tart shells and, working with your hands, make it evenly cover its bottom and sides. Using a fork, pinch the dough a few times. Repeat this procedure with the remaining dough and shells.
Cover the pastry shells with greaseproof paper, fill it with baking beans or pie weights and bake blind for 15 minutes. After that time, remove the beans and paper and bake the tarts for additional 10 minutes, or until they’re golden brown.
In a small pan, heat the coconut milk with the ground cardamom until it almost starts to boil (don’t let it boil, though). Remove from the heat and add the chocolate. Stir around with a wooden spoon until the chocolate has fully melted. Let the mixture cool a bit, but not to the point of starting to set.
Divide the mixture evenly between the four tart shells. Let it set for 1 to 2 hours at room temperature. After that time, you can refrigerate the tarts for 1 additional hour if you prefer them cold (I actually ended up eating a forth of one at room temperature and enjoyed it). Unmold before serving and sprinkle with cocoa powder and flaky sea salt or fleur de sel.
Vegan Panna Cotta with Stewed Blackberries

The other day, my mom went to the park to pick up some blackberries. She came home with a bag full of them, and asked me to use them as part of a dessert. I couldn’t help myselft but thinking of a delicious, simple, spoon dessert, made of coconut milk, agar agar, and stewed fruit. You may have heard about agar agar before: it’s a gelatinous substance derived from an algae, mostly used in asian cuisine. It’s all natural, 100% vegan, and doesn’t have the artificial ingredients gelatin generally does have (I’m not even mentioning the part that gelatin is derived from animals’ bones…).

I’ve been working with agar agar powder as a substitute for gelatin for quite some time now, but it took me a while to get the best out of it. The main problem I’ve found while using it in various spoon desserts, is that it tended to harden way more than I wanted it to. The consistency I’d get, although reminding that of gelatin, wasn’t as soft as the latter. But after some experiments, I think I came up with the right ratio: for each 300 mililiters of liquid, add 1 and ½ teaspoons of agar agar flakes. Less than that, you’ll get a runny consistency; and adding just a bit more for the said amount of liquid, will make your dessert a bit on the hard side.
Now, this recipe for Vegan Panna Cotta is a favorite around here; it’s dead easy to make and really tasty. Not only adding the right amount of agar agar powder but also using coconut milk, are really important things in here, so do not try to substitute any of those ingredients. The coconut milk with its rich and subtle flavor really complements well the sweetness of the stewed berries. As far the fruit goes, you don’t really need to use blackberries in here; others, such as blueberries or even strawberries, will work out. I even tried once to make this dessert using stewed figs – delicious. Just bare in mind you want a fruit that is delicate and soft, but still firm enough to hold part of its structure after being cooked.

Vegan Panna Cotta with Stewed Blackberries
(serves 3)
¼ cup regular sugar
¼ cup water
300 grams blackberries
1 vanilla bean, split lengthwise
400 ml coconut milk
5 tablespoons agave nectar
1 and ¾ teaspoons agar agar flakes
1. Heat a saucepan over low-medium heat, add the blackberries, vanilla bean, sugar, and water. Cook, covered, for 10 to 15 minutes, or until the liquid has thickened a bit but hasn’t all evaporated. Let it cool and discard the vanilla bean.
2. In another pan over low-medium heat, add the coconut milk, agar agar flakes and agave nectar. Bring the mixture to a simmer (do not let the coconut milk boil) and stir constantly, for 15 minutes. When it’s done, remove the pan from the heat and let cool for 10 minutes.
3. Divide the coconut mixture equally among 3 cups. Refrigerate the cups for at least 2 hours, or until the mixture has harden to the consistency of gelatin.
4. Now, add the blackberries as well as the liquid that has been realeased while stewing them, on top of each cup. Cover the cups with cling film and refrigerate for additional 1 or 2 hours before serving.

4 comments