Chocolate Cardamom Tarts

I had the idea for this recipe on my mind for a few weeks now, but was holding back to try it out because sweet goods “don’t really suit my style”. Chocolate desserts, in particular, are far from being my forte. Don’t get me wrong though, I think this one is a great dessert. For chocolate fans. I mean, not the milk-chocolate-candy-bar ones, but for those who appreciate chocolate’s bitterness and more authentic flavour. Let’s say the hardcore fans.
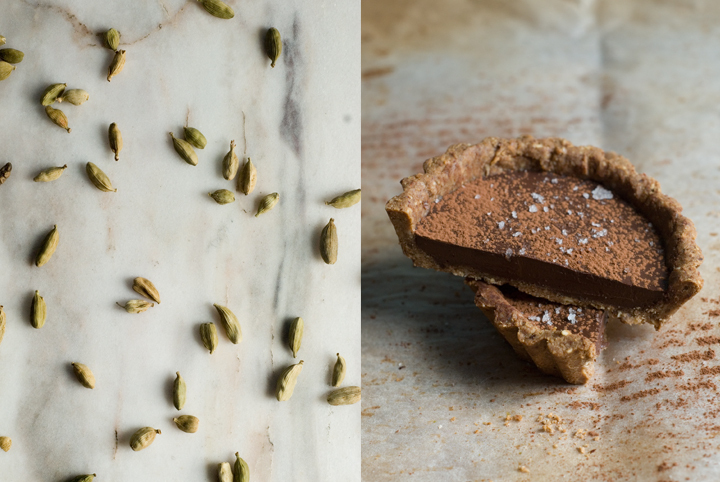
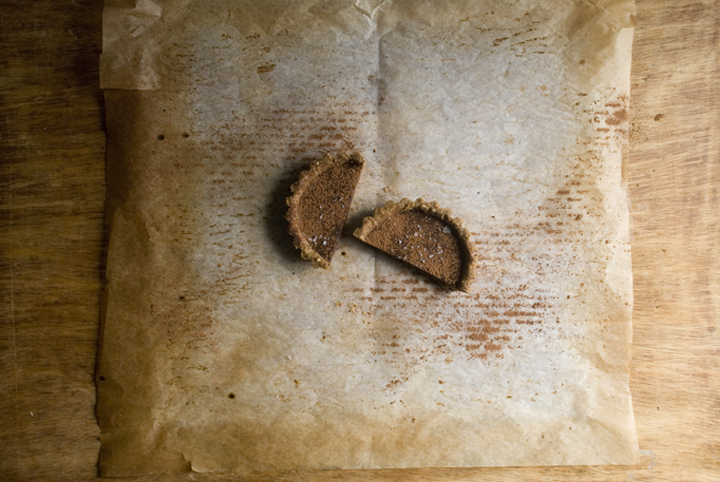
Cardamom is one my favourite spices (followed by cinnamon) and I recently found out it pairs incredibly well with chocolate. These two, coupled together as a filling for a nutty crust, give the little tarts a lot of depth and intensity in flavour. Having said that, and even though this recipe only makes four small tarts, you’ll probably be fine, as I was, with only half of one. A couple specifics: the crust used in here is gluten-free, and because gluten-free doughs tend to be temperamental and hard to work with, you won’t need to roll it, but to press it directly into the tart shells. It won’t look as perfect as if it was rolled but, really, there’s no need to complicate things unnecessarily and only for the sake of presentation…
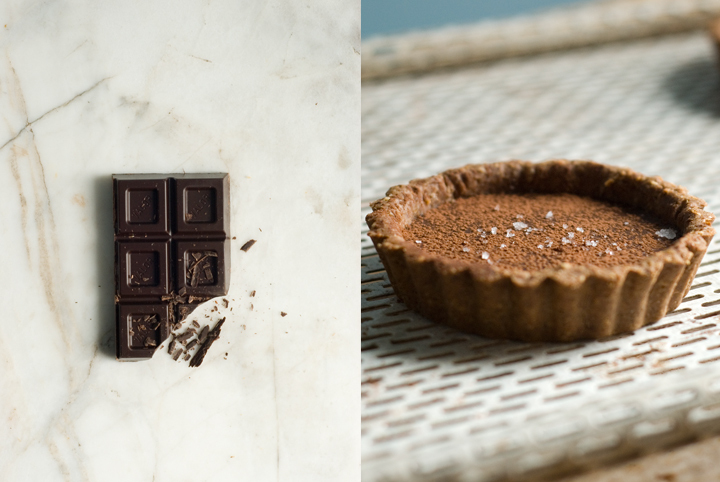
You might also realise this recipe doesn’t call for any sugar and for me it’s fine as is. However, your taste buds are certainly different than mine and if you find the filling too bitter, one or two tablespoons of coconut sugar or other sweetener of your choice won’t hurt. Lastly, do add the flaky salt or fleur de sel on top of the tarts – it really makes a difference, as salt is known to work as chocolate’s flavour enhancer.
Chocolate Cardamom Tarts
(makes 4 tarts, using small tart shells of 7,5 cm in diameter)
for the crust:
70 g / ½ cup chestnut flour
50 g / ½ cup hazelnut meal
¼ teaspoon salt
1 tablespoon flax seed meal
60 ml / ¼ cup melted coconut oil
2 tablespoons cold water
for the filling:
6 cardamom pods, green shells removed and crushed in a mortar
and pestle into a fine powder
100 g / roughly ¾ cup 70% dark chocolate, cut into small pieces
125 ml / ½ cup coconut milk
extra coconut oil for greasing the tins
cocoa powder
flaky sea salt or fleur de sel
Pre-heat the oven to 175º/350ª degrees.
Sift the chestnut flour, hazelnut and flaxseed meals and salt into a bowl. Add the melted coconut oil and the water, and work the mixture with your hands until you get a firm dough. Divide the dough into 4 equal portions.
Using a pastry brush, grease your tart tins with extra melted coconut oil. Press one piece of dough into one of the tart shells and, working with your hands, make it evenly cover its bottom and sides. Using a fork, pinch the dough a few times. Repeat this procedure with the remaining dough and shells.
Cover the pastry shells with greaseproof paper, fill it with baking beans or pie weights and bake blind for 15 minutes. After that time, remove the beans and paper and bake the tarts for additional 10 minutes, or until they’re golden brown.
In a small pan, heat the coconut milk with the ground cardamom until it almost starts to boil (don’t let it boil, though). Remove from the heat and add the chocolate. Stir around with a wooden spoon until the chocolate has fully melted. Let the mixture cool a bit, but not to the point of starting to set.
Divide the mixture evenly between the four tart shells. Let it set for 1 to 2 hours at room temperature. After that time, you can refrigerate the tarts for 1 additional hour if you prefer them cold (I actually ended up eating a forth of one at room temperature and enjoyed it). Unmold before serving and sprinkle with cocoa powder and flaky sea salt or fleur de sel.
Grandma’s Orange Birthday Cake

I’ve left a pot of lentils cooking on the stove, while I sit on the couch with my laptop to write you about a cake I’ve baked this weekend. So, my grandmother’s birthday was on Saturday, and the cake I’ve made for us to enjoy was, in her words, the best I’ve baked so far. I was quite happy with a such a great compliment, and here I am sharing the said cake recipe with you. I tell you straight way: it has a long list of ingredients and requires the use of a couple bowls and pans, putting it under the “time consuming recipe“ label. But, on the other hand, I’d say it makes a great appearence at parties and will definitely impress your guests. As far as the taste goes, despite being quite orangy, it’s not overbearing orangy – you call actually perceive the delicate taste given by the combination of oat and rice flours in the batter, as well as the cream’s nutty scented flavor. An advise to all the sweet tooth out there: I tend to use very little sugar in baked goods in comparison to other recipes, because I’m not a fan of too sweet desserts, but, if you aren’t like me, I suggest you to increase the amount of sugar used in here by a couple tablespoons (four or five). I’ve told you before I’m not that much of a baker, and fussy and time consuming sweet baked goods aren’t really my thing. That’s mainly because the recipes I’ve tried so far tend to give priority to the final aestethical aspects rather than reflecting concerns on healthy baking. With this cake, I’ve done my best to combine both factors, working on a recipe that – I think – looks quite good, and even though calling for the use of wholegrain and wheat-free flours, that doesn’t compromise its flavor.

Grandma’s Orange Birthday Cake
(makes one 20 cm diameter cake, 6 to 8 slices)
For the cake:
100 grams oat flour
60 grams white rice flour
60 grams brown rice flour
1 and ½ teaspoons baking powder
½ teaspoon baking soda
¼ teaspoon salt
1 large ripe banana (about 200 grams), mashed
125 ml (½ cup) non dairy milk
200 grams soy yoghurt
125 ml (½ cup) orange juice
2 tablespoons orange zest
140 grams non-dairy margarine
120 grams muscavado sugar
For the Syrup:
200 grams orange marmalade
2 tablespoons regular sugar
80 ml (1/4 cup) orange juice
For the cream:
70 grams unsalted cashew nuts
250 grams silken tofu
60 grams icing sugar
grated dark chocolate or silvered almonds, for topping
special equipment: food processor and electric beater
1. Pre-heat the oven to 180ºC, racks in the lower and upper thirds of the oven. Butter two 20 cm (8-inch) round pans, and lightly dust them with flour.
2. Put all the ingredients for the cream in a food processor and pulse for 1 to 2 minutes or until totally smooth and similiar, in consistency, to that of heavy cream. If too thick, add one or two tablespoons of water to make the cream just a little more runny. Refrigerate it while you proceed with the recipe.
3. Mix the mashed banana with 125 ml non-dairy milk in a food processor, and blend until smooth.
4. In a large bowl, and using and electric beater, cream the vegan margarine with the sugar. Then, and still with the beater running, slowly pour the banana mixture, as well as the orange juice, soy yoghurt and orange zest.
5. In another large bowl, combine the flours, baking soda, baking powder, and salt.
6. Combine the wet mixture with the dry mixture, just until incorporated – be careful not to overmix.
7. Divide the batter among the two pans and bake, in the pre-heated oven, for 20 to 25 minutes, rotating the pans halfway through. Transfer the cakes to a wire rack to cool and, using a skewer, prick their tops with several holes.
8. In the meantime, prepare the syrup: Heat the ingredients for the syrup in a small saucepan, over medium-high heat, for 2 to 3 minutes, or until the marmalade is runny.
9. To assemble: generously brush the top of one of the cakes with half of the syrup, and then spread about one third of the cream over it. Plaee the other cake over the first one, and brush it with the remaining syrup, finishing off with the remaining cream. Top the cake with grated dark chocolate or silvered almonds, and serve.
I believe - even though I’m not sure - this recipe is remotely inspired by Epicurious
Brown Rice and Lentil Bake with Caramelized Onions

Usually, when it comes to cooking, I rarely plan ahead. That’s not a thing I’m proud of, as planning your meals ahead is the best way to save time and extra effort in the kitchen. The only thing I do that fits into the plan ahead sort of thing, is that everytime I cook beans or brown rice, I make sure I have leftovers. That way, I can throw the cooked beans and/or rice in the freezer and use it for another meals, or refrigerate them and use it that very same week in other preparations.
Last weekend, I’ve made a beetroot and brown rice salad (I’ll be soon posting the recipe), and got more leftovers of brown rice than I thought. Since then, I’ve used them in two different preparations and still have leftovers. One of those preparations wasn’t well succeeded: it was an attempt to make brown rice and spinach burgers, that although have turned ok in terms of structure, didn’t deliver in the taste department. Apart from this not very well succeeded burgers, I’ve made a brown rice and lentil bake, and that’s what I thought sharing today. It’s an easy, tasty and very versatile recipe: if you don’t have brown rice on hand, I’m almost sure you can substitute it for regular rice. On the other hand, and although I served this more as a sandwich, with caramelized onions in between two slices of the bake, I’m sure you can come up with more ideas. For instance, next time around I’m thinking of serving this alongside some stewed or pan fried veggies with a spoonful of tapenade on top, to make it more of a complete, nutritionally balanced main course.


Brown Rice and Lentil Bake
(serves 4)
1 cup ( 170 grams) red lentils
2 garlic cloves
½ teaspoon dried thyme
1 tablespoon olive oil
2 cups (400 ml) light stock
½ finely cut red chili pepper
½ teaspoon salt
¼ teaspoon black pepper
1 and 1/3 cups (190 grams) cooked brown rice
for the caramelized onions:
2 large white or red onions, thinly sliced into rounds
2 tablespoons olive oil
2 tablespoons balsamic vinegar
a pinch of salt
1. Preheat the oven to 180ºC. Line a 20 x 20 centimeters baking dish with parchment paper, and brush it with olive oil.
2. Heat a pan over medium heat. Add the olive oil, red chili and thyme and fry for 1 to 2 minutes.
3. Wash the lentils under cold running water. Add the lentils to the pan, as well as the stock, and cook, covered, for 15 to 20 minutes. Season with the salt and black pepper.
4. Mix the brown rice with the lentils and put everything on the prepared baking pan. Bake for 40 to 50 minutes, or until golden brown around the edges.
5. For the caramelized onions, heat a large frying pan over medium-high heat, add the olive oil and sliced onions, and cook for 15 minutes, or until the onion starts caramelizing and browning a bit. On the last minute of cooking, add the balsamic vinegar and salt and stir well to incorporate.
6. Serve the caramelized onions in between two slices of the brown rice and lentil bake.
Broccoli and Pine Nut Tart

On sunday afternoons, I like to give myself plenty of time to do whatever I want. Usually, that involves napping right after lunch. But yesterday, after some failed attempts at napping, I’ve decided to go to the kitchen and focus on a culinary project, one that would take some time, to keep me occupied until dinner time. And so I’ve made a tart. A delicious one. Perhaps one of the best vegan tarts I’ve ever had. Usually, savory tarts call for buttery crusts and rich custards made out of eggs and cream, but this one, not having any of those ingredients, packed a lot of flavor and didn’t fall apart at all through slicing.
For some reason, I was never happy with my attempts at making tart crusts. Usually, they would shrink a lot and get soggy after being cooked, and also had a bland and not interesting flavor. But since I’ve tried the recipe for this pie crust , I’ve never gone back: the toasted oats and the addition of sesame oil really complement each other well and give such a dense and nutty flavor to the crust. The poppy seeds (which in the original recipe, by Peter Berley, are replaced by sesame seeds) contribute for the crunchiness.

As far as the custard goes, I’m sure no one would say it doesn’t have eggs or cream in it. First, it really firms up after cooking, and as I said, it keeps its structure beautifully through slicing. On the other hand, it’s just delicious on its own: using pureed tofu as the main component of a vegan custard was referred not only in Peter’s book, The Modern Vegetarian Kitchen , but also in Rose Elliot’s Vegan Feasts . So my version is a bit of a mix between the suggestions given by both books (and cooks).
The counterpart of all this, is that the tart will take some time to make. There are some ideas you can put in practice to save some time for the next time you want to make it, such as, for instance, doubling the recipe for the crust and make two instead of one tart shells. All you have to do is to roll the dough and freeze it in the tart pan for one hour or two, to keep its shape, after which you can take out the pan and leave the frozen crust on the freezer for up to a month. The filling could also be doubled and frozen too. Just don’t let yourelf down by the long preparation time and the extensive list of directions for this recipe. In the end, I’m sure you won’t regret.

Broccoli and Pine Nut Tart
(makes one, 20-22 cm tart)
For the tart crust:
½ cup (45 grams) rolled oats
3 tablespoons poppy seeds
¼ teaspoon table salt
1 cup (110 grams) whole wheat flour
½ teaspoon baking soda
1/3 cup (80 ml) unsweetened soy milk
1/3 cup (80 ml) olive or sesame oil (I used the latter)
For the filling:
400 grams firm tofu
200 grams broccoli, chopped into tiny florets
2 medium-large white onions (280 grams), finely chopped
2 fat garlic cloves, minced
2 tablespoons olive oil
½ teaspoon dried thyme
½ teaspoon dried oregano
½ teaspoon dried chives
1/2 cup (125 ml) light stock
1 tablespoon apple cider vinegar
1 tablespoon mugi miso
60 grams pine nuts
1. Preheat the oven to 180ºC.
2. Start with the tart crust: Sift the flour into a large bowl. Add the baking soda, salt and poppy seeds to the same bowl.
3. Heat a large pan over medium heat, add the oats and toast them for 6 to 8 minutes, or until fragant and slightly brown. Stir the oats as they toast to prevent them from burning.
4. Transfer the toasted oats to a food processor and process until finely ground. Add them to the bowl with the flour and the other dry ingredients.
5. Now, add the soy milk and olive oil to the dry ingredients and mix until a dough comes together.
6. Lightly brush a 20-22 cm tart pan with olive oil. Roll ou the dough in between two sheets of parchment paper, just thin enough to fit the pan. Press the pastry down into the pan and trim the edges. Refrigerate while you make the filling.
7. To make the filling, heat a large sautee pan over medium heat, add the olive oil, minced garlic and onion, and cook for 10 minutes or until the onion is golden brown. Then, add the dried herbs (thyme, oregano and chives), and the stock, and cook, uncovered, for at least 10 to 15 minutes, or until the liquid has almost all evaporated.
8. Crumble the tofu into the bowl of a food processor. Add the onion mixture, vinegar, and miso, and puree until smooth.
9. Heat a pan over medium-high heat, add the pine nuts, and toast them for 5 minutes or until they’re slightly brown. Give the pan a good shake every minute or so, to evenly toast the nuts.
10. In a medium sauce pan over high heat, bring 2 cups of water to a boil. Then add the broccoli florets, and cook for no longer than 1 minute. Drain and wash the broccoli under running cold water, to stop cooking. Drain again, and set aside.
11. Mix the broccoli and pine nuts with the rest of the filling.
12. Fill the tart shell with the tofu and vegetable mixture, and level the top with the help of a rubber spatula. Place the tart into the preheated oven and cook for 45 to 50 minutes, or until the tart has firmed up and is golden brown.
13. Let the tart cool on the pan for at least 15 minutes before slicing. The tart is good eaten lukewarm or at room temperature.
recipe inspired by The Modern Vegetarian Kitchen, by Peter Berley

4 comments