Beetroot and Brown Rice Burgers
I have bookmarked Louisa Shafia’s Beet Burgers a long time ago, and never really got the chance to make them. The other day, while flipping through my notebook, I found the said recipe, that I’ve spotted on her blog and immediately did a quick annotation of the ingredients list to make it. But then, some other plans have crossed my mind and the recipe remained written, but untested. So, this week, having a couple of extra-large beetroot sitting on the fridge, I finally gave Louisa’s burgers a try. And after bitting into one of them, I kept asking myself why haven’t I made the burgers sooner – not only they have the perfect texture and right consistency, but are also packed with flavor. In one word: delicious.
Now, I know there’s a lot of you out there who don’t like beetroot. Some of you, might even hate the poor vegetable. But even with beetroot haters like my mum, the burgers were a huge hit. Now that I think about it I realize they actually don’t taste to beetroot that much – the addition of nuts, caramelized onion, and some spices, not only gives them texture and crunch, but also a delicious, kind of hearty taste, that somehow balances out the natural sweetness of the beetroot. I’ve made a couple tweaks to the original recipe though: substituted the walnuts called for in the original version for a mix of nuts and seeds, and instead of baking the burgers and searing them as suggested, I managed to save some time up by pan-frying them straight away without sacrificing texture – in the end, you still get a well-cooked inside and crunchy outside, the basic requirements for a perfect burger. I’m sure I’ll be making these again, and maybe next time, experimenting with different grains - substituing the brown rice for millet, for example.
Beetroot and Brown Rice Burgers
(makes 6 burgers)
1/4 cup of EACH: sunflower seeds, pumpkin seeds, flax seeds and cashew nuts
2 cups grated beetroot (from approximately 1 large beetroot)
1 1/2 cups COOKED brown rice
1 large white onion, sliced into rings
5 tablespoons olive oil
1 tablespoon paprika
1 teaspoons ground cumin
freshly ground black pepper, to taste
1 teaspoons salt
1. After grating the beetroot, place them in a colander and squeeze out all the liquid. Discard the liquid and set aside. Alternatively, you can use the liquid - like I did - to make a juice and/or a smoothie.
2. Heat a large pan over medium heat, add the onion and 2 tablespoons of the olive oil and cook, stirring often, for at least 10 minutes, or until the onion starts browning and caramelizing. While the onion is cooking, add the paprika and ground cumin to the pan, as well as a pinch of salt and freshly ground pepper.
3. In a large food processor, add the cooked rice, 1 cup of the grated beetroot and 1 teaspoon of salt, and process for about 2 minutes, or until it has the consistency of a thick puree. This will work as a binder.
4. Add the cooked onion and all the different nuts and seeds to the food processor and pulse no more than 3 times. You want the burgers to have some texture and crunch, so this mixture only needs to be broken down a bit.
5. Add the puree to the remaining 1 cup of grated beetroot and mix well until incorporated. Have a taste and salt a bit more, if needed be. The mixture should be thick and easy enough to handle and shape into patties.
6. Divide the mixture into 6 equal portions. With your hands, form round patties that are about 8 centimeters in diameter and 1 centimeter thick. At this point, you can keep the burgers refrigerated for 2 to 3 days and cook them within that time.
7. Heat a large non-stick frying pan over medium heat, and add 3 tablespoons of olive oil. When the oil is hot, but not smoking, add the burgers. Pan-fry them for at least 6 minutes on each side, turning them only once.
8. Serve the burgers right after cooking with your favorite fixings. I’ve topped mine with chutney and lots of fresh parsley.
adapted from Lucid Food
Grandma’s Orange Birthday Cake
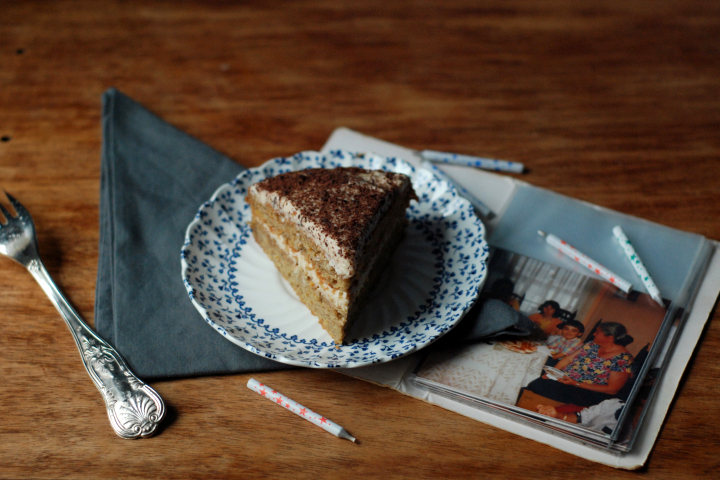
I’ve left a pot of lentils cooking on the stove, while I sit on the couch with my laptop to write you about a cake I’ve baked this weekend. So, my grandmother’s birthday was on Saturday, and the cake I’ve made for us to enjoy was, in her words, the best I’ve baked so far. I was quite happy with a such a great compliment, and here I am sharing the said cake recipe with you. I tell you straight way: it has a long list of ingredients and requires the use of a couple bowls and pans, putting it under the “time consuming recipe“ label. But, on the other hand, I’d say it makes a great appearence at parties and will definitely impress your guests. As far as the taste goes, despite being quite orangy, it’s not overbearing orangy – you call actually perceive the delicate taste given by the combination of oat and rice flours in the batter, as well as the cream’s nutty scented flavor. An advise to all the sweet tooth out there: I tend to use very little sugar in baked goods in comparison to other recipes, because I’m not a fan of too sweet desserts, but, if you aren’t like me, I suggest you to increase the amount of sugar used in here by a couple tablespoons (four or five). I’ve told you before I’m not that much of a baker, and fussy and time consuming sweet baked goods aren’t really my thing. That’s mainly because the recipes I’ve tried so far tend to give priority to the final aestethical aspects rather than reflecting concerns on healthy baking. With this cake, I’ve done my best to combine both factors, working on a recipe that – I think – looks quite good, and even though calling for the use of wholegrain and wheat-free flours, that doesn’t compromise its flavor.
Grandma’s Orange Birthday Cake
(makes one 20 cm diameter cake, 6 to 8 slices)
For the cake:
100 grams oat flour
60 grams white rice flour
60 grams brown rice flour
1 and ½ teaspoons baking powder
½ teaspoon baking soda
¼ teaspoon salt
1 large ripe banana (about 200 grams), mashed
125 ml (½ cup) non dairy milk
200 grams soy yoghurt
125 ml (½ cup) orange juice
2 tablespoons orange zest
140 grams non-dairy margarine
120 grams muscavado sugar
For the Syrup:
200 grams orange marmalade
2 tablespoons regular sugar
80 ml (1/4 cup) orange juice
For the cream:
70 grams unsalted cashew nuts
250 grams silken tofu
60 grams icing sugar
grated dark chocolate or silvered almonds, for topping
special equipment: food processor and electric beater
1. Pre-heat the oven to 180ºC, racks in the lower and upper thirds of the oven. Butter two 20 cm (8-inch) round pans, and lightly dust them with flour.
2. Put all the ingredients for the cream in a food processor and pulse for 1 to 2 minutes or until totally smooth and similiar, in consistency, to that of heavy cream. If too thick, add one or two tablespoons of water to make the cream just a little more runny. Refrigerate it while you proceed with the recipe.
3. Mix the mashed banana with 125 ml non-dairy milk in a food processor, and blend until smooth.
4. In a large bowl, and using and electric beater, cream the vegan margarine with the sugar. Then, and still with the beater running, slowly pour the banana mixture, as well as the orange juice, soy yoghurt and orange zest.
5. In another large bowl, combine the flours, baking soda, baking powder, and salt.
6. Combine the wet mixture with the dry mixture, just until incorporated – be careful not to overmix.
7. Divide the batter among the two pans and bake, in the pre-heated oven, for 20 to 25 minutes, rotating the pans halfway through. Transfer the cakes to a wire rack to cool and, using a skewer, prick their tops with several holes.
8. In the meantime, prepare the syrup: Heat the ingredients for the syrup in a small saucepan, over medium-high heat, for 2 to 3 minutes, or until the marmalade is runny.
9. To assemble: generously brush the top of one of the cakes with half of the syrup, and then spread about one third of the cream over it. Plaee the other cake over the first one, and brush it with the remaining syrup, finishing off with the remaining cream. Top the cake with grated dark chocolate or silvered almonds, and serve.
I believe - even though I’m not sure - this recipe is remotely inspired by Epicurious
Adzuki Bean and Celery Stew
Before we get into today’s recipe, happy new year to everyone! 2010 was a though year for me (both in the professional and personal realms), full of challenges and times when important decisions had to be made. It was also the year I cooked more, having learned from my both succeeded and not-so-well succeeded experiments in the kitchen, and the year I have also started this blog. I’m not a person of making life-changing resolutions or, more precisely, I don’t usually make them this time of the year (although I reflect, as I suppose we all do, about what the previous year has brought to me and what – and how - were its best and worst moments). Anyway, as I’m typing this I’m reflecting about a couple of things I’d like to do more – in culinary terms – in 2011. They’re not resolutions, only desires and things I hope I can accomplish. Those are: I’d like to cook more from cookbooks, studying even more non-vegan recipes and trying to come up with vegan alternatives; to master the art of gluten-free baking; to share more meals with friends and family and to cook more meals alongside friends and family; to have a more mindful way of eating, incorporating as much healthy choices as I can into my diet.
On another front, this year I’d like to run more regularly, to fight the tentation to cut my hair short again, to travel abroad (London and Berlin are on my upcoming travel plans), and to be even more surrounded by people whom I love and admire.
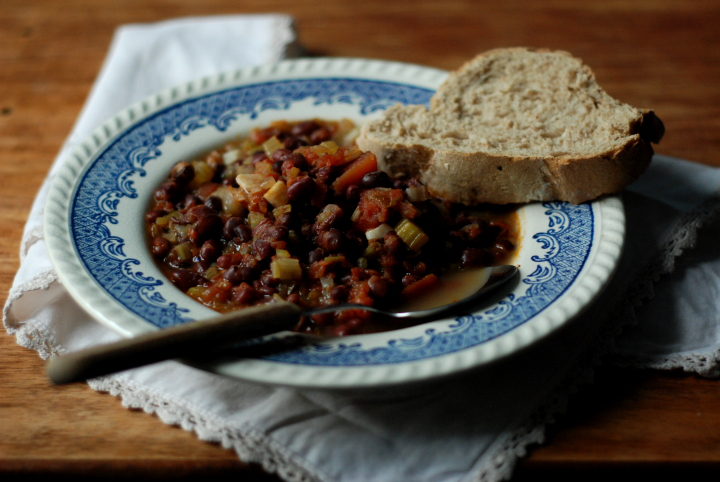
As far as today’s recipe goes, it’s basically an adaptation of this one. It’s a delicious and easy stew, perfect for the cold weather and that goes very well not only with toasted wholegrain bread, but also with some simply cooked quinoa. The recipe is easily doubled, which makes it also a very croud-pleasing dish. Hope you’re all having a great time, and I wish you a 2011 full of fruitful projects and ideas.
Adzuki bean and celery stew
(serves 4 to 6)
500 grams cooked adzuki beans*
10 canned whole plum tomatoes, drained, rinsed and roughly chopped
2 cups light stock
2 large heads of celery (stalks only, trimmed and sliced into 2cm thick chunks)
1 teaspoon celery salt*
4 large garlic cloves, peeled and thinly sliced
1 large white onion, peeled and finely sliced
4 tablespoons olive oil
1. In a large pan over medium-high heat, add the olive oil, onion and celery chunks and cook for 10 minutes, stirring often, or until the vegetables are soften. Add the garlic and 1 teaspoon of the celery salt and cook for additional 4 minutes.
2. Add the tomatoes, stock and the beans to the pan. Bring to a simmer and, once simmering, decrease the heat to low and cook, covered, for 20 minutes. Taste and season with a bit more celery salt if needed. Let the stew sit for a couple of minutes before serving.
*to make the celery salt: Pick a couple leaves (no less than 10) from the celery heads. Heat a dry skillet over high heat and add the leaves. Let them toast for 5 to 10 minutes, or until totally dried out. Then, crumble equal parts of the dried leaves with flaky sea salt. For better results, grind the mixture in a coffee grinder.
*to cook the beans: Soak the beans in a large amount of water for 6 to 8 hours or overnight. Drain and rinse them and put them in a large pot. Add water to come at least 2 centimeters over the beans. Bring the water to a boil and, once boiling, decrease the heat to low-medium and cook, covered, for 1 to 2 hours. Once ready, salt the beans and drain them – reserving a couple cups of the liquid in which they were cooked, that you can later use in preparations such as stews and soups. You can now use the beans, refrigerate them (they’ll keep, store in the refrigerator in an airtight container, for up to a week), or bag and freeze them.
recipe adapted from 101 cookbooks


20 comments