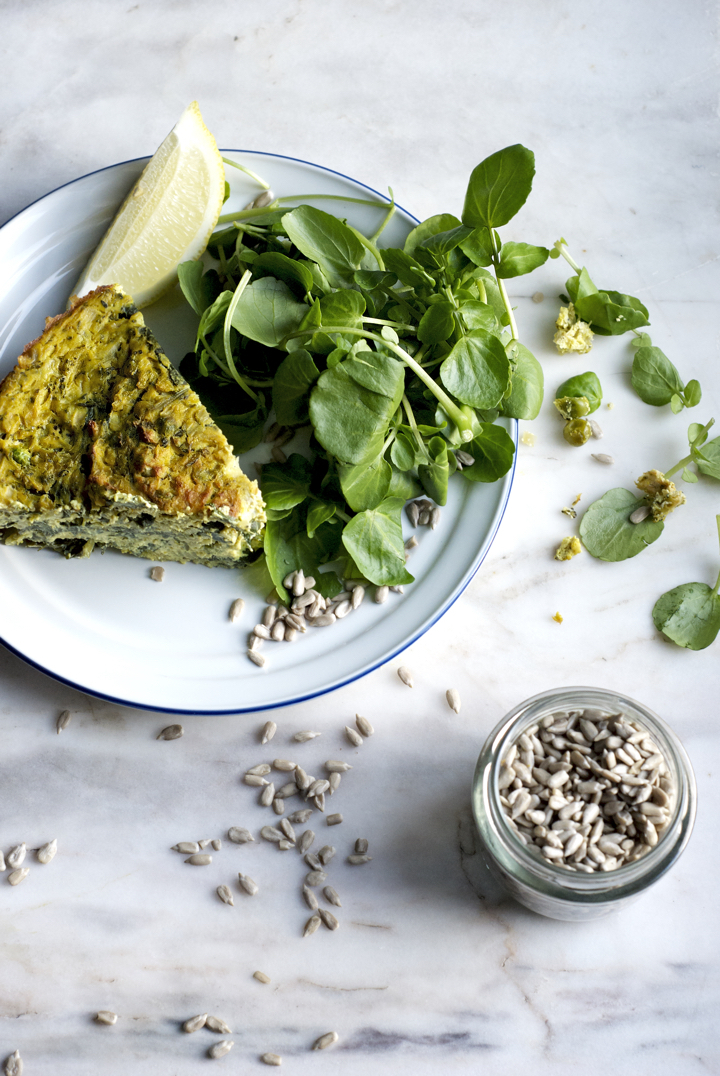
Springtime Vegan Frittata
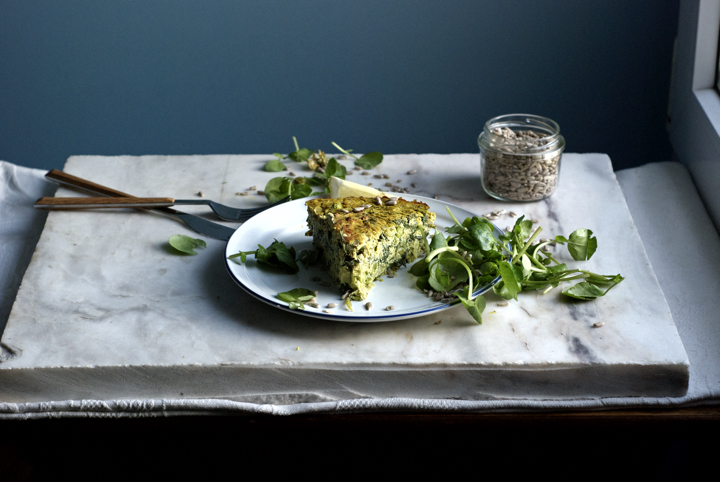
As much as I love my morning bowl of oatmeal, it feels good to have something different for breakfast every now and then. Lately, I’ve been trying different breakfast foods – from salads, to socca, and steamed vegetables with panfried tofu – and while I enjoyed them all, the recipe I’m sharing with today is one of my favourite experiments.
 Before I committed to making my version of a vegan frittata, I’ve searched the web for inspiration. Most of the recipes I saw called for the use of cornstarch or arrowroot to thicken the tofu “custard” and make it firmer. I have nothing against those ingredients, but since I had neither of them at home by the time I was making the frittata, I made it without them and it turned out just fine. However, if you want to be able to cut a perfect slice out of it you have to be patient and wait at least half an hour after it comes out of the oven.
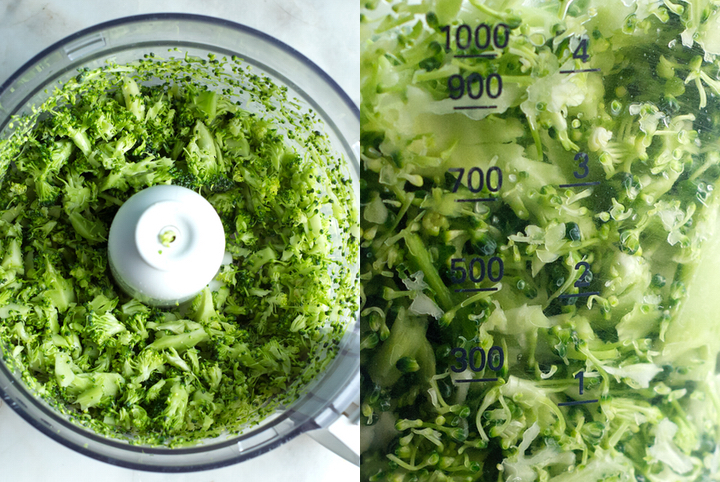
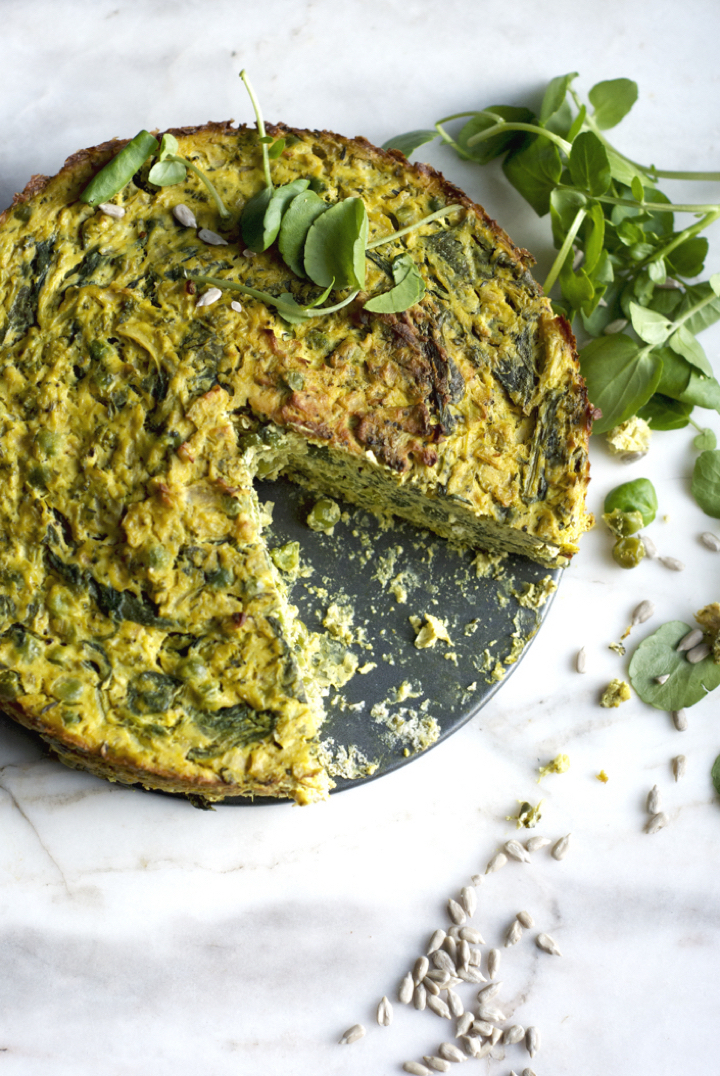
The frittata also becomes firmer the longer it stays in the fridge, and I might say I actually like it better the day after it’s baked – it’s incredible how the flavours improve and become more pronounced overnight. You don’t really need to use the vegetables I used here, and I’m sure that red peppers and/or leeks would be great additions or substitutions.
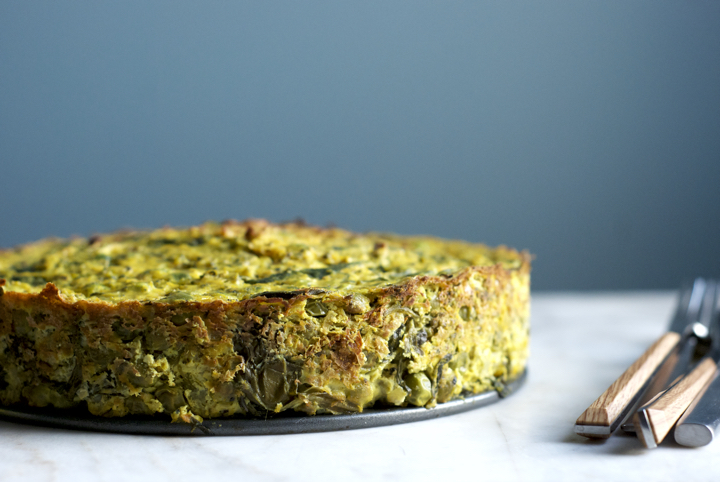
Springtime Vegan Frittata
serves 6 to 8
Ingredients
250 g / 1 large onion, finely cubed
4 garlic cloves, minced
2 Tablespoons olive oil
1 teaspoon dried thyme
2 teaspoons sea salt, divided
690 g fresh firm tofu, cubed
1 teaspoon ground turmeric
2 Tablespoons brewer’s yeast (optional)
grated zest of one lemon
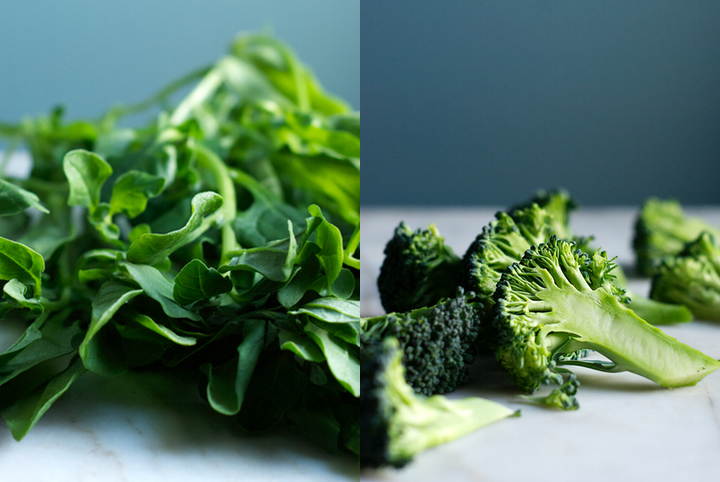
220 g / 1 small broccoli head, cut into medium sized florets
295 g / 1 large bunch spinach
240 g boiled peas (frozen is fine)
freshly ground black pepper to taste
Pre-heat the oven to 180C. Grease a springform pan with oil and set aside.
In a large skillet over medium-high heat, add the onion, garlic, olive oil and dried thyme. Cook, stirring often, for 5-8 minutes, or until the onion has softened and browned just a bit.
Add the broccoli florets to the bowl of a food processor and pulse 3 to 4 times, or until the florets are just broken down (you don’t want to fully blitz the broccoli).
Add the broccoli to the skillet with the onion and garlic mixture and cook for 3 minutes, stirring often. Next, add the spinach and 1 teaspoon of salt and cook until the spinach is wilted – no longer than 2 minutes.
Add the tofu to the bowl of the food processor, along with 1 teaspoon of salt, the turmeric, brewer’s yeast (if using) and lemon zest, and blitz until smooth.
Add the spinach and broccoli mixture to a large bowl, followed by the puréed tofu and the cooked peas. Gently mix the ingredients until everything is well incorporated. Season with freshly ground black pepper and an extra pinch of salt, if necessary.
Add the frittata mixture to the prepared springform pan. Smooth the top with the back of a spoon and bake in the oven for 40-45 minutes or until golden brown. Let it cool in the pan before unmolding and serving.
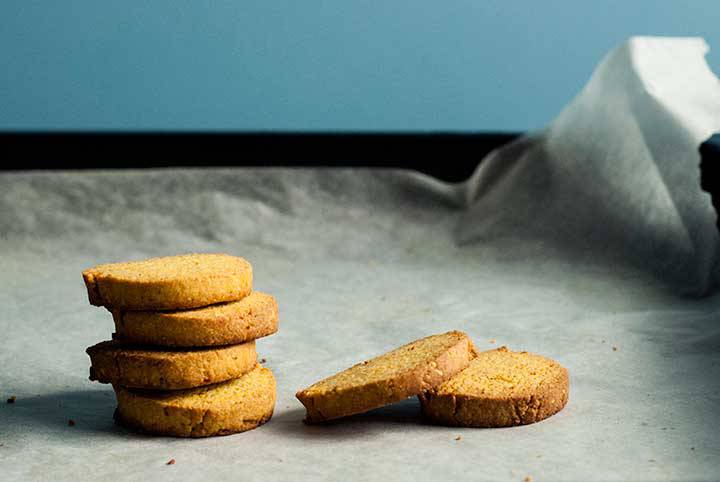
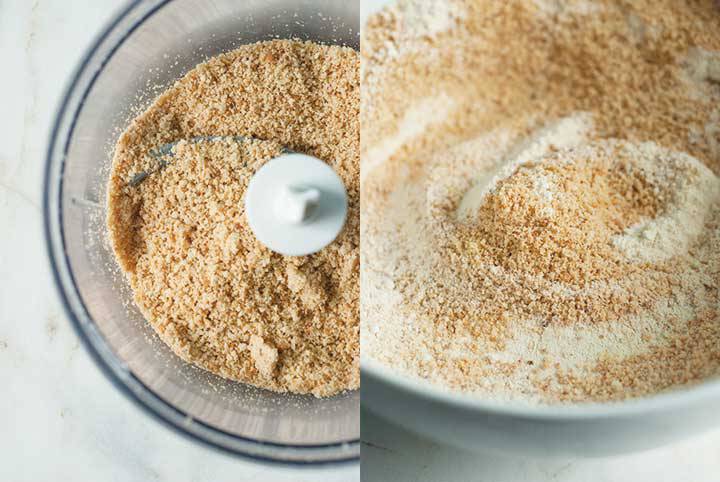
Turmeric & Almond Cookies
My oven is mostly used to roast vegetables (during the last couple of weeks, it roasted an obscene amount of beets and onions) and to make bean casseroles and kale chips. The occasional loaf of bread also comes out of it but cakes and cookies really are a from-time-to-time affair. I have way more ideas for savory dishes than I have for desserts so, whenever I have an idea for a sweet treat, I put my hands to work.
 These gluten free turmeric-almond cookies are dead simple to make. The dough comes together in a breeze and you don’t even have to roll it. They aren’t overly sweet and I like to eat them plain, but you can definitely slather them with a fruit compote or marmalade if you wish. As I’m writing this, it comes to my mind that you could add some caraway seeds to the dough or use orange zest instead of lemon. Turmeric is a spice with a mild earthy taste, so a few additional flavours are always welcomed.
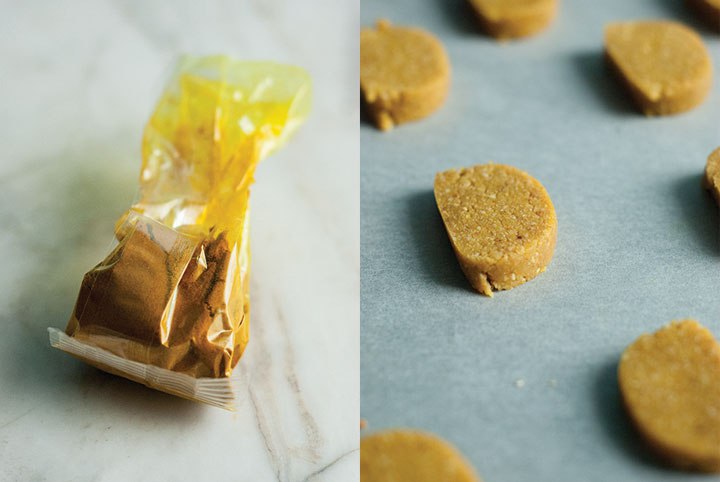
 Turmeric & Almond Cookies
(makes about 30 cookies)
90 g / ¾ cup peeled almonds
105 g / 3/4 cup brown rice flour
60 g / ½ cup corn flour
60 g / ½ cup quinoa flour
½ teaspoon salt
2 teaspoons ground turmeric
zest of one lemon
125ml / ½ brown rice syrup
80 ml / 1/3 cup olive oil
In a dry skillet over medium heat, toast the almonds for 4 to 5 minutes, or until they’re golden brown. Let them cool and, once cooled, grind them in a food processor until you a fine meal.
Add the almond meal, brown rice, corn and quinoa flours, salt, turmeric and lemon zest to a large bowl. Mix everything together. In a separate bowl, combine the brown rice syrup with the olive oil.
Add the wet mixture to the dry one and mix, forming a dough. Cut the dough into two equal pieces. In a lightly floured surface, roll each piece of dough into a log with roughly 4 cm in diameter. Wrap the logs tightly with cling film and seal the ends with kitchen twine. Put the logs in the freezer for 45 minutes to an hour, to firm up. In the meantime, Pre-heat the oven to 180C /350F.
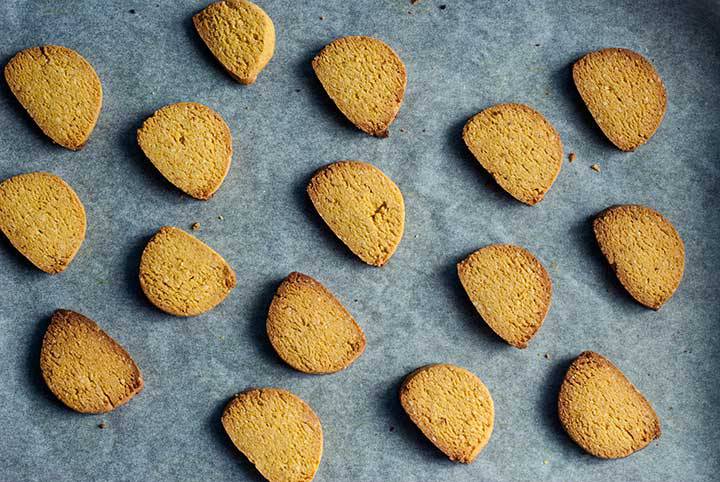
Once the logs have chilled, cut them into 0.7-1 cm disks. Place the disks in a large baking tray lined with parchment paper. Since the cookies won’t rise much while baking, you can put them close together. Bake for 10-12 minutes or until golden brown.
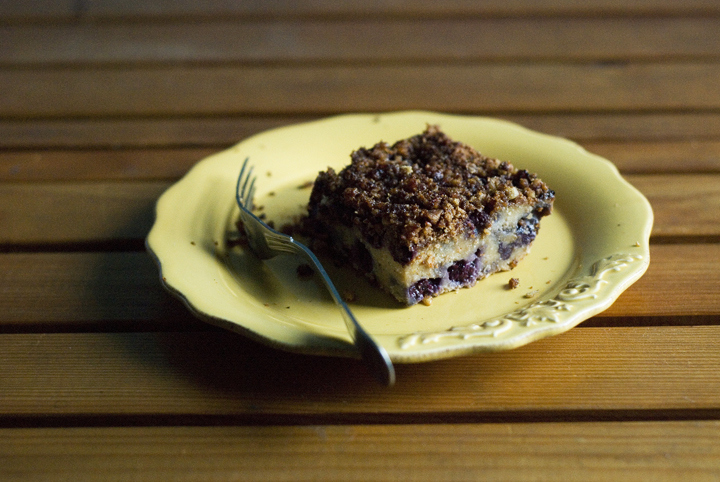
Blueberry Coconut Cake
When God gives you blueberries…. you either a) eat them in one sitting on a particularly lazy Sunday night (as if they were popcorn), or b) drag yourself into the kitchen and, despite the hot temperature (the thermometer has been reaching – and even passing – 30º degrees these days) decide to bake a blueberry cake. After giving the issue some thought and, frankly, not without a few doubts, I went with the last option.
I haven’t baked anything with any sort of berries before, mostly because I can’t help myself from eating them in their natural state, as they taste so incredibly good when in season (as now). However, I most say, if you’re going to make this cake you’re into something. Because, that night, I didn’t bother to check up online recipes and ratios for this particular baked good, I approached it in the same way I work with savoury foods – tasting as I go, paying attention to the amount of liquid added in order to reach the right batter’s consistency…. that sort of intuitive thinking.
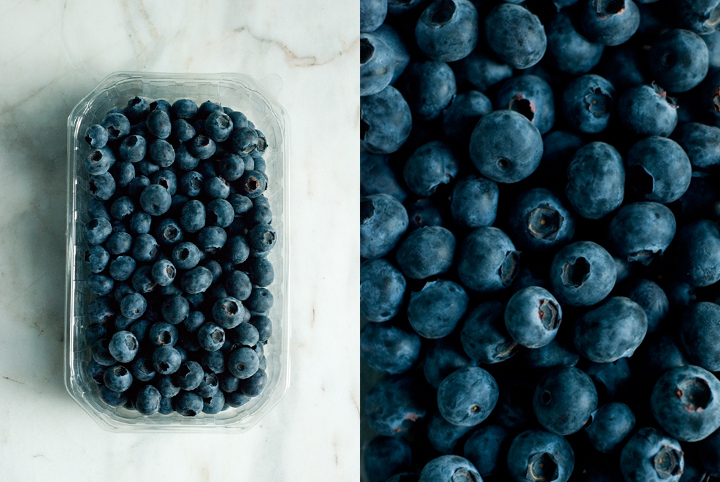
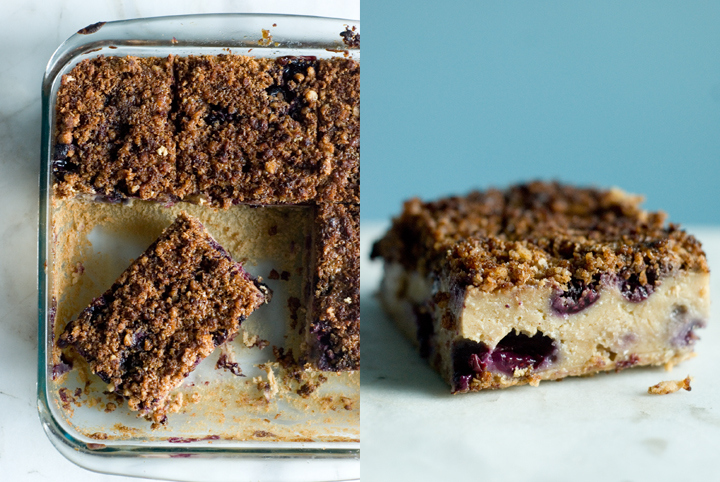
I know (as we all do) that berries love coconut, so that really was my starting point. The cake is full with blueberries (that you could easily substitute with raspberries or blackberries), not too sweet, and with that nutty-crunchy finish that gives it character and an extra boost of flavour. Now, you guys can definitely call me inconsistent – I deserve the title – because I’ve been saying way too many times that baking is not my cup of tea but, honestly, and what I’m about to say is quite a statement, this is probably the best and most accomplished sweet treat I have ever made and shared on this blog.
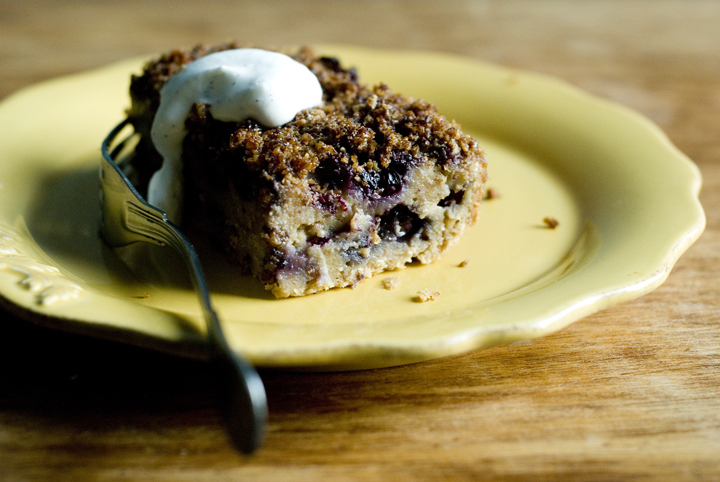
Just a little last note: you can definitely serve the cake with some coconut whipped cream on the side. I don’t have a particular recipe for it but this is how I generally do it: freeze, upside-down, a can of coconut milk for a few hours; open the can, pour the creamy part into a bowl (discard the liquid), add a sweetener (I usually go with agave) and maybe the seeds of half a vanilla bean, mix everything together, et voilà!
Enjoy the summer, do not forget the sun protection cream, and eat your berries (they’re full of antioxidants and other good things that google will be more than happy to tell you). ;)
Blueberry Coconut Cake
(makes 1 cake in a square 20 cm pan)
for the dry mixture:
1 ½ cups / 180g brown rice flour
½ cup / 40 g desiccated coconut
¾ cup / 80 g quinoa flour
1 tablespoon baking powder
¾ teaspoon salt
zest of one lemon
for the wet mixture:
¼ cup / 60 ml melted coconut oil
1/3 cup /55 g coconut sugar
¼ cup / 60 ml agave nectar
2 tablespoons flaxseed meal mixed, in a bowl, with ¼ cup / 60 ml water
1 ½ cups / 375 ml light coconut milk
for the topping:
½ cup / 52 g coarsely ground walnuts
½ cup / 40 g desiccated coconut
2 tablespoons coconut oil
4 tablespoons coconut sugar, divided
½ teaspoon cinnamon
¼ teaspoon salt
–––
2 cups / 290 g blueberries
extra coconut oil, for greasing the cake pan
Pre-heat the oven to 180ºc /350 F. Grease a square 20×20 cm pan with melted coconut oil. Set aside.
In a medium sized bowl, mix the topping’s ingredients, adding only two tablespoons of coconut sugar instead of the four written above (you’ll use the remaining two tablespoons later).
Sift the dry ingredients into a large bowl. In a separate bowl, whisk together the wet ingredients. Pour the wet mixture over the dry one and mix slowly until everything’s well incorporated and you end up with a slightly thick batter.
Pour half of the cake batter into the bottom of the pan. Add one cup of blueberries on top, making sure to distribute them evenly. Add the remaining half of cake batter, followed by the last layer of blueberries. To finish things off, cover the cake with the coconut-walnut topping.
Bake the cake, in the pre-heated oven, for 45 minutes. After that time, take the cake out of the oven and scatter the remaining two tablespoons of coconut sugar on top of it – make sure you cover all the cake’s surface with the sugar, so that you end up with a crisp and caramelised layer. Return the cake to the oven for an additional 5 minutes. Once done, let it cool to room temperature, cut into squares and serve. Even though I like to eat it plain, it goes particularly well with coconut whipped cream.
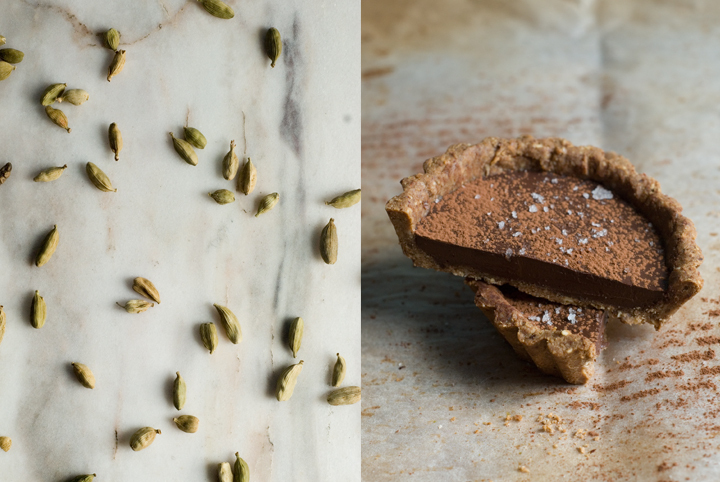
Chocolate Cardamom Tarts

I had the idea for this recipe on my mind for a few weeks now, but was holding back to try it out because sweet goods “don’t really suit my style”. Chocolate desserts, in particular, are far from being my forte. Don’t get me wrong though, I think this one is a great dessert. For chocolate fans. I mean, not the milk-chocolate-candy-bar ones, but for those who appreciate chocolate’s bitterness and more authentic flavour. Let’s say the hardcore fans.
Cardamom is one my favourite spices (followed by cinnamon) and I recently found out it pairs incredibly well with chocolate. These two, coupled together as a filling for a nutty crust, give the little tarts a lot of depth and intensity in flavour. Having said that, and even though this recipe only makes four small tarts, you’ll probably be fine, as I was, with only half of one. A couple specifics: the crust used in here is gluten-free, and because gluten-free doughs tend to be temperamental and hard to work with, you won’t need to roll it, but to press it directly into the tart shells. It won’t look as perfect as if it was rolled but, really, there’s no need to complicate things unnecessarily and only for the sake of presentation…
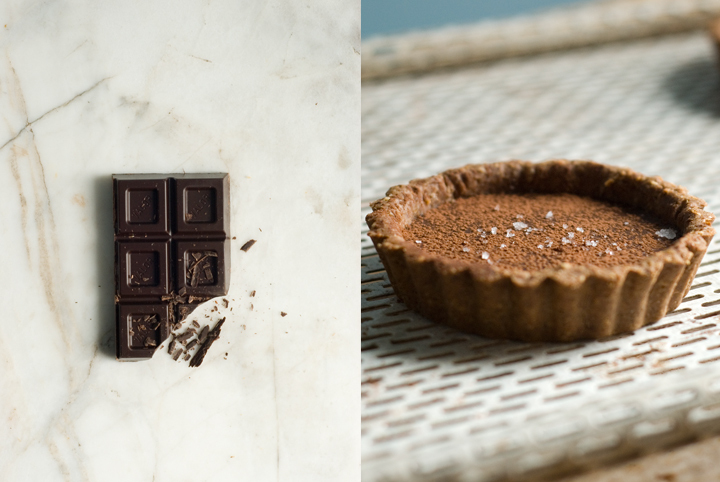
You might also realise this recipe doesn’t call for any sugar and for me it’s fine as is. However, your taste buds are certainly different than mine and if you find the filling too bitter, one or two tablespoons of coconut sugar or other sweetener of your choice won’t hurt. Lastly, do add the flaky salt or fleur de sel on top of the tarts – it really makes a difference, as salt is known to work as chocolate’s flavour enhancer.
Chocolate Cardamom Tarts
(makes 4 tarts, using small tart shells of 7,5 cm in diameter)
for the crust:
70 g / ½ cup chestnut flour
50 g / ½ cup hazelnut meal
¼ teaspoon salt
1 tablespoon flax seed meal
60 ml / ¼ cup melted coconut oil
2 tablespoons cold water
for the filling:
6 cardamom pods, green shells removed and crushed in a mortar
and pestle into a fine powder
100 g / roughly ¾ cup 70% dark chocolate, cut into small pieces
125 ml / ½ cup coconut milk
extra coconut oil for greasing the tins
cocoa powder
flaky sea salt or fleur de sel
Pre-heat the oven to 175º/350ª degrees.
Sift the chestnut flour, hazelnut and flaxseed meals and salt into a bowl. Add the melted coconut oil and the water, and work the mixture with your hands until you get a firm dough. Divide the dough into 4 equal portions.
Using a pastry brush, grease your tart tins with extra melted coconut oil. Press one piece of dough into one of the tart shells and, working with your hands, make it evenly cover its bottom and sides. Using a fork, pinch the dough a few times. Repeat this procedure with the remaining dough and shells.
Cover the pastry shells with greaseproof paper, fill it with baking beans or pie weights and bake blind for 15 minutes. After that time, remove the beans and paper and bake the tarts for additional 10 minutes, or until they’re golden brown.
In a small pan, heat the coconut milk with the ground cardamom until it almost starts to boil (don’t let it boil, though). Remove from the heat and add the chocolate. Stir around with a wooden spoon until the chocolate has fully melted. Let the mixture cool a bit, but not to the point of starting to set.
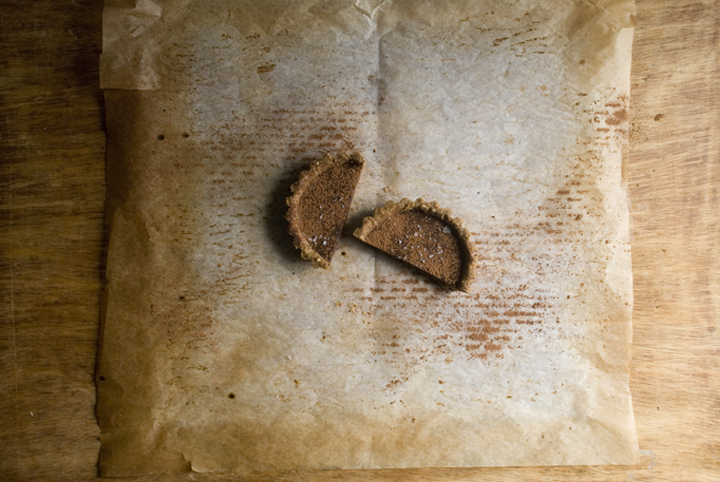
Divide the mixture evenly between the four tart shells. Let it set for 1 to 2 hours at room temperature. After that time, you can refrigerate the tarts for 1 additional hour if you prefer them cold (I actually ended up eating a forth of one at room temperature and enjoyed it). Unmold before serving and sprinkle with cocoa powder and flaky sea salt or fleur de sel.
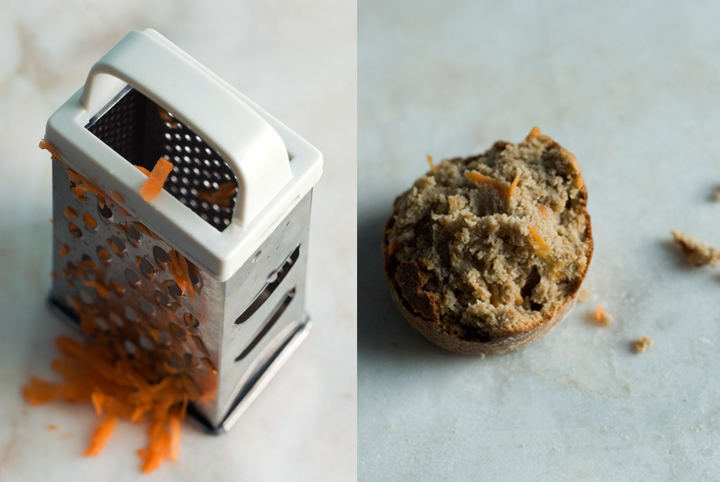
Carrot and Tahini Muffins
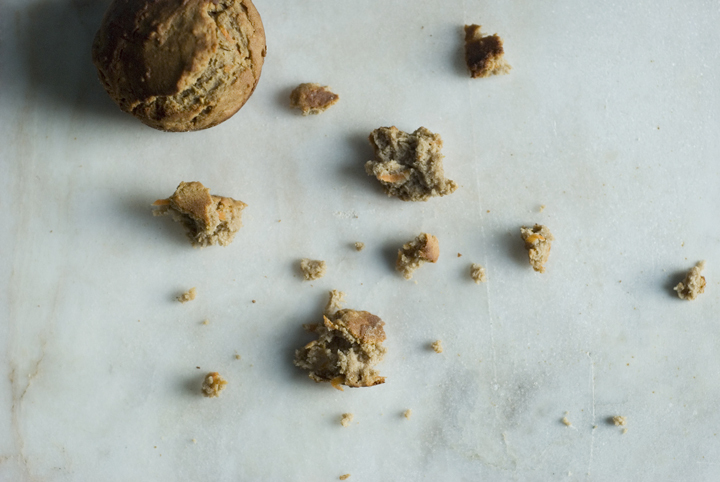
Some of my culinary experiments don’t turn out as well as I thought they would, either by lacking flavour and/or photographic charisma. Lately, there were at least three dishes I conceptualized, took notes of and photographed, but ended up not posting up here because, well, they weren’t good enough. A weird tasting celeriac and roasted garlic soup, a watery korma, some herb crusted tempeh that turned out too dry after being baked… I’m well familiar with failure and I’m not defeated by it, as I try to evaluate what went wrong, what could have I done better, and so on – the worst part is, I guess, to actually eat those not so well succeeded attempts.
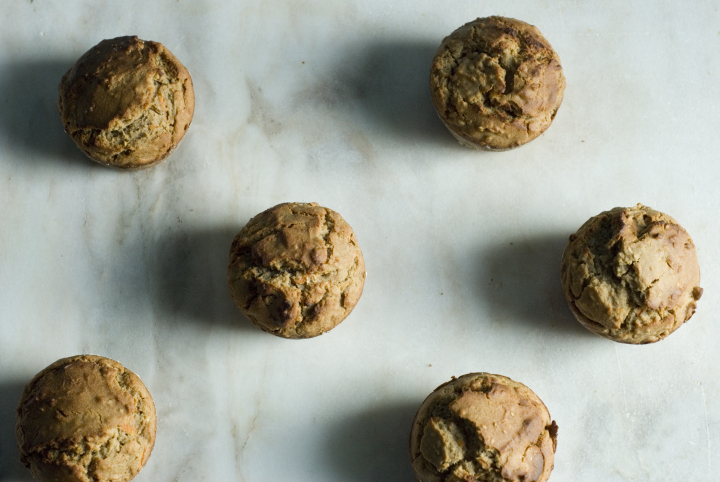
So, when things go wrong, I turn to what I know it’s good – and I’m here talking about these carrot and tahini muffins. I have a (healthy) obsession with tahini. I just love it. I always keep a jar of it in the fridge and another one in the pantry. I have the nasty habit of opening up the tahini jar, take a teaspoon of it, top it up with a few drops of agave nectar, and in it goes. These muffins are dense and nutty in flavour, punctuated by shreds of carrot and toasted sesame seeds. They’re the perfect accompaniment for a cup of tea in the mid-afternoon when, sometimes, that sugar cravings just start to pike up.
Carrot and Tahini Muffins
(for 8 muffins)
Dry mix:
1 cup / 140 g buckwheat flour
1 cup / 120 g brown rice flour
½ teaspoon baking powder
¼ teaspoon baking soda
¼ teaspoon salt
½ teaspoon cinnamon
4 tablespoons toasted sesame seeds
wet mix:
1 tablespoon flax seed meal mixed with 5 tablespoons water
1 cup / 250 ml unsweetened nut milk (I used almond milk)
½ cup / 135 g dark tahini
¾ cup / 185 ml agave nectar
1 cup / 108 g shredded carrots (about 1 large carrot)
melted coconut oil or sunflower oil to grease the muffin tins
1. Pre-heat the oven to 175º/350ºF. Grease with sunflower oil or melted coconut oil 8 muffin tins.
2. In a large bowl, sift the flours, baking powder, baking soda, salt and cinnamon. Add the sesame seeds and stir well to combine.
3. In another bowl, whisk together the flax seed mixture, nut milk, tahini and agave nectar, until well incorporated.
4. Add the wet mixture to the dry ingredients stirring well to combine. Finally, add the grated carrots.
5. Pour the mixture into the greased muffin tins. Bake in the oven for 20 to 25 minutes (mine took exactly 23 minutes). Let the muffins cool a bit in the tins before unmolding and transferring them to a cooling rack. Eat!
Polenta Fries

I’m so sorry for my absence around here but, lately, and for various reasons, my life has been a bit on the hectic side. Anyway, today I wanted to talk with you about polenta, something I recently found out I’m particularly good at making. There’s this friend of mine – Hi Ana M.! – who had had polenta twice and was quite disappointed at how bland it tasted. For a birthday party we were both invited to, I made thick pan-fried polenta slabs and not only did she enjoy, but also asked me for the recipe. I don’t follow a recipe for this particular dish, and usually add whatever herbs I have on hand and whatever quantity of polenta there’s left on the package but, this time around, in order to write down the recipe for her (and for you as well), I measured the ingredients. Also, on a recent get-together to which I brought polenta fries, everyone at the table realised they go extremely well with guacamole – the creaminess of this avocado-based spread contrast so nicely with the crunchy polenta. You probably don’t need a recipe for guacamole (who does?) but, anyway, I decided to include in the post the way I usually do it.

Polenta Fries
(makes enough for 4 to 6 people)
Ingredients:
for the polenta fries:
2 cups (350 g) polenta (I used an organic brand)
4 cups (1 liter) water
2 teaspoons salt
1 tablespoon fresh thyme, minced
2 teaspoons fresh rosemary, minced
olive oil
for the guacamole:
2 medium-sized avocados (150 g), peeled, cored, and mashed
1 tablespoon lemon juice
1/4 teaspoon minced garlic
pinch of salt
olive oil
red chilli, minced
1. In a pan over medium heat, combine the polenta with water. Add the salt and stir constantly for 10 to 15 minutes, or until it reaches a very thick consistency. At this point, add the herbs and stir once again to incorporate.
2. Spread the polenta in a baking tray of about 25×35 cm. Smooth the top with the help of a spatula. Let it cool for 10 to 15 minutes, and then put it in the refrigerator for 1 to 2 hours, or until chilled.
3. Adjust the oven rack to the upper third position and pre-heat the oven to 250ºC/480ºF.
4. Cut the polenta into thick “fries” (mine were about 2 cm wide).
5. Brush a large baking tray with olive oil. Add the polenta fries and brush each one of them with olive oil as well.
6. Bake the polenta fries in the upper third of the oven, for about 15-20 minutes or until golden brown.
7. Serve with the sauces of your choice. Goes particularly well with guacamole (recipe follows) and tomato-base sauces.
for the guacamole:
1. Add all the ingredients (except the olive oil and the minced red chilli) to the mashed avocados. Drizzle with olive oil and, finally, sprinkle with the minced red chilli and a bit more salt.
Bolo-Rei

One of the most typical cakes eaten in Portugal around this time of the year is Bolo-Rei (“bolo” stands for cake, “rei” for king). It’s one of those cakes I always enjoyed eating since I was kid (even though it isn’t a kids-friendly type of cake) and now, as a grown-up, I decided to try to bake it myself. I did it yesterday and, even though the cake is a bit of a project (it’s yeast-based, so it has to rise two times), the end result is way better than its store-bought counterpart.

Firstly, I decided to bake two cakes, basing them on different recipes (which only varied slightly in terms of method and rising times). Then, I thought, “why-not-to-go-a-little-bit-further-with-this” and substituted sugar for agave nectar, butter for olive oil, eggs for tofu, and also added spelt flour to one of the doughs (while the other one was made only with regular flour). I was really satisfied with how both cakes came out : they had a soft and bread-like inside, filled with lots of nuts and dried fruits. I finished things off by covering them with a tangerine glaze and toasted shredded coconut. The recipe I’m sharing with you is the one in which I used 100% regular flour: not because it tasted better or anything (the cakes had a similar taste), just that it was the one I actually ended up taking notes of (anyway, I’m pretty sure you could sub half of the amount of regular flour called in the recipe for spelt or any other whole grain variety). Also, this time around I ended up measuring everything in grams, for which I apologise, even though I prefer to do it that way, especially when baking.

Bolo-Rei
(for one large cake)
Ingredients:
4 tablespoons (60 ml) agave nectar
4 tablespoons (60 ml) olive oil
100 grams tofu, crumbled
6 tablespoons (90 ml) soy milk, plus a few extra tablespoons
15 grams fresh yeast
250 grams regular flour
80 grams raisins
80 grams almonds, coarsely chopped
40 grams walnuts, coarsely chopped
55 grams dates (7 units), pitted and chopped
For the tangerine glaze:
freshly squeezed juice of 4 medium-sized tangerines
2 tablespoons (30 ml) agave nectar
1 teaspoon cornstarch
–––
2 to 3 tablespoons of shredded coconut, toasted
1. In a blender combine the first 4 ingredients and mix until smooth. In the meantime, dissolve the yeast in a few tablespoons (3 to 4) of slightly warm soy milk. Add the yeast mixture to the tofu mixture, and run the blender once again, until everything is well incorporated.
2. Sift the flour into a large bowl. Make a well in the middle and, gradually, add the liquid mixture. You’ll end up with a soft, sticky dough, which you want to knead for about 5 minutes (resist the urge to add more flour to it).
3. Transfer the dough to a slightly oiled large bowl, cover it with a clean towel, and leave it to rise in a warm place for about 2 hours or until doubled in size.
4. Once the dough has doubled in size, it’s time to add the chopped nuts (almonds and walnuts) and dried fruits (raisins and dates) to it. Knead the dough in the bowl for 1 minute, or until all the nuts and dried fruits are well incorporated into it.
6. Now, shape the dough into a log, joining the two ends together in order to form a crown. Transfer the cake to a large baking tray lined with parchment paper, cover it again with a clean towel and leave it to rise for additional 45 minutes.
7. Pre-heat the oven to 180ºC (375ºF).
8. Bake the cake in the lower third of the oven for about 30 minutes, or until it slightly browned (see picture above) on top.
9. To make the tangerine glaze, add the tangerine juice, 2 tablespoons agave nectar and 1 teaspoon of cornstarch to a small pan over medium heat, until it reduces and thickens up (do not forget to constantly whisk the mixture).
10. Once the cake is done, cover it with the glaze (you might end up having more than what you actually need) and sprinkle it with the shredded coconut.
Recipe inspired by Ingrediente Secreto, by Henrique Sá-Pessoa, published by Casa das Letras in 2011.
Red Pepper and Spinach Calzones

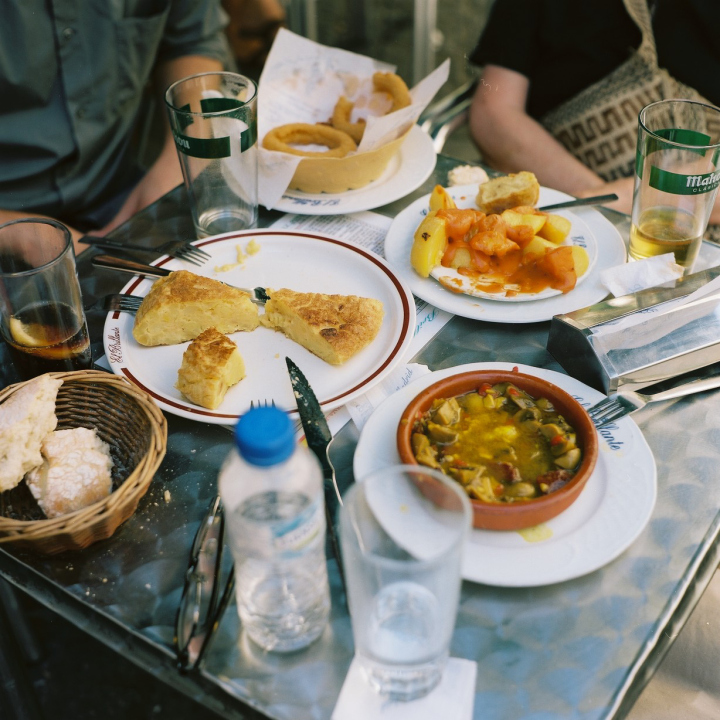
This year, I spent one week vacation in Spain, in a village - El Escorial - close to Madrid, with our friends Ana and Jaime. It was good and calm, as any proper vacation should be. I also happened to taste some typical spanish dishes such as Patatas Bravas and Gazpacho (this last one being prepared by Jaime, who’s spanish) or beverages like Horchata, which I’m now very fond of. I might also tell you that Spain (as well as Portugal) is not an easy country when it comes to eat vegan food, specially if you want to eat local. Anyway, Patatas Bravas, a traditional tapas made of crispy fried potatoes and a hot, firey sauce, is a favorite of mine and I had a great serving of it while having lunch in Madrid - I’ll post up a recipe for it in the meantime. Until then, we’ll have Calzones.


I recently came across a recipe for basic homemade bread in Happy Days with the Naked Chef - it can be found here - which was worked in many different ways by Jamie so that you could make banana and honey bread, onion baguettes, calzones, - just to name a few - using the very same base. Calzones were what I had decided to make this time around and they turned out amazing. The dough was fluffy and flavorful, as any bread dough should be; the filling, which I made in promptu in an attempt to clean up the fridge, didn’t disappoint as well. Anyway, feel free to make your own filling if you want to. I leave you with some ideas I might try in the next batches: sautéed butternut squash with sage, slow roasted tomatoes with crumbled tofu and basil, ratatouille-like stew with green olives. Also, as I’m writing this, I’m thinking that you could certainly spread a thin layer of tapenade in the base of each calzone before adding the filling - it’d be just delicious. I wish you a great and sunny summer, just as mine is being so far : )*
Red Pepper and Spinach Calzones
(makes 16)
for the bread dough:
1 kg strong bread flour
30 grams fresh yeast
625 ml slightly warm water
2 teaspoons fine grain salt
for the filling:
olive oil
1 small red chili pepper, minced
1 teaspoon dried oregano
1 teaspoon paprika
4 small red onions (about 65 grams each), sliced thin
2 garlic cloves, minced
1/2 cup (125 ml) red wine
200 grams (one package) spinach leaves, washed and well drained
1 cup (250 ml) canned tomato purée
1/2 cup (60 grams) black olives, pitted and coarsely chopped
1 cup (250 grams) roasted bell peppers (I roasted mine, but it’s ok to use canned ones), cut into strips
1 cup (140 grams) cooked Puy lentils
salt to taste
1. In a large bowl, dissolve the yeast in half of the water required (about 315 ml). In another bowl, combine the flour and salt. Add the yeast mixture, gradually, to the flour mixture, starting to work with a wooden spoon and ending up with your hands. You’re looking after a smooth, elastic and slightly sticky dough here: to achieve that, kneed the dough on a floured surface for 5 minutes, adding a little more flour or water if necessary.
2. Dust a little flour over the dough and place it in a large bowl. Cover the bowl with cling film and leave it to proof for 1 hour in a warm place (most of the times, I end up placing my the dough in the oven).
3. Pre-heat the oven at 200ºC.
4. Once the dough has proofed, knead it in the bowl for 30 seconds, to remove the air pockets that might have formed. Now, divide the dough into 8 equal portions and place them in a large baking dish dusted with flour. Again, leave the dough to proof, in a warm place, until almost doubled in size (this might take from 30 minutes to an hour).
5. In the meantime, make the filling: Heat a large pan over medium heat and add a generous glug of olive oil, the minced chili, sliced onions, garlic, oregano and paprika and fry for 8 to 10 minutes, or until the onion has softened. Add the red wine and cook for additional 3 minutes, or until it has been almost absorved and the onion looks caramelized. Add the spinach to the pan and cook, stirring often, until it’s soft and wilted. Now, add the tomato purée, followed by the olives, roasted peppers and Puy lentils, and cook for 10 minutes, or until the sauce has thickened and reduced a bit. Add the salt, have a taste, and adjust the seasonings. Leave the filling to cool down for a while; we’re going back to the dough.
6. Now that your dough has proofed a second time, let’s roll it out. But first, divide each ball of dough (you have 8 of them) in half, so that you end up with 16 pieces. Roll out each piece of dough into a disk in a floured surface: don’t roll them too thin (the ideal thickness is about 0,5 mm), has this dough is so flavorful you really want to feel and properly taste it while you bite into your calzones.
7. Place a good heaped tablespoon of the filling in the center of the disk; fold it in half and seal it by working the dough with your hands or using a fork. Brush the calzone with olive oil, make 3 diagonal cuts in the pastry, and transfer it to a oiled baking dish while you prepare the remaining calzones, by repeating this process.
8. Bake the calzones for 15 minutes in the pre-heated oven. They’re best eaten the day they’re made.
The basic bread recipe is adapted from this one, from Jamie Oliver. There’s also a Calzone recipe, using this very same bread dough, in Jamie’s book Happy Days with the Naked Chef, first published in September 2001
Roasted Shallots and Cherry Tomatoes Pie

This pie recipe I’m about to share with today was made upon my mother’s request for a savory pie. My mom is an undeniable sweet tooth and most of the things she asks me to cook are cookies and desserts, but this time around she was up - to my relief - to something different. I’ve been facing days in which my motivation/inspiration to cook has been reduced to a minimum (I think we all have experienced the feeling that, for some unknown reason, we cannot simply come up with new interesting ideas - not only in the culinary realm, but also in any other area) so I really took and followed her guidelines: she wanted a pie with roasted onions or shallots on it, and that was what I made. Actually, I’ve realized this is a good method to pike up your creativity: ask somebody what he/she wants you to cook for them, and you’ll probably come up not only with what they wanted, but also with your own interpretation of what they asked you make - and that’s what makes the new born recipe special and therefore unique in its own way. Another way to re-start feeling inspired to cook - at least for me - is to watch other people cooking: I went to a barbecue party this weekend, and by watching one of my friends making a delicious and dead easy flatbread recipe from scratch, I immediately knew I had to try it at home with my own tweaks and variations (I’ll post up the recipe here soon).
This particular recipe relies on the well-known technique used in non-dairy and eggless pies, which is to make a “tofu custard” (and season it with a few dried herbs and condiments), that will then set when cooked in the oven, similarly to any other savory custard made of eggs and cream.
These days, I’ve been also addicted to experiment with different types of flour, and this time around, while searching the cupboards for buckwheat and oat flours (which I was planning to use in here), I found chestnut flour and that was what I used to make the crust. Chestnut flour has a sweet and somehow dense flavor, and because it’s gluten-free, I think it’s easier to work with when it’s combined with wheat (either whole wheat or just regular) flours - if you don’t have chestnut flour at hand, feel free to make this pie crust using only the white whole-wheat type instead.
I owe my mother the inspiration for this pie recipe so, as a sort of tribute, the leading picture of this post shows myself - as a little child – and her back in the early 90’s. : )
Roasted Shallots and Cherry Tomatoes Pie
(makes one, 20-22 cm tart)
For the pie crust:
140 grams (1 cup) chestnut flour
130 grams (1 cup) white whole-wheat flour
80 ml (1/3 cup) olive oil
60 ml (1/4 cup) plus 2 to 3 tablespoons cold water
½ teaspoon salt
For the roasted vegetables:
250 grams (1 ½ cups) cherry tomatoes, cut in half crosswise
1 teaspoon muscovado sugar
250 grams (2 cups) small shallots, peeled and cut in half crosswise
4 large garlic cloves, left whole and unpeeled
1 tablespoon balsamic vinegar
a pinch of salt
olive oil
For the tofu custard:
500 grams (1/2 pound) firm tofu, patted dry and crumbled
2 tablespoons lemon juice
2 tablespoons tamari
1 tablespoon balsamic vinegar
2 tablespoons fresh lemon-thyme, minced
1. Pre-heat the oven to 200ºC. Lightly oil 2 baking dishes with olive oil. Mix the onions with 1 tablespoon balsamic vinegar and a pinch of salt. In one of the dishes, place the onions, cut side up, and the garlic cloves, and drizzle a little olive oil over them. Separately, mix the tomatoes with 1 teaspoon muscavado sugar and a little olive oil. Distribute them evenly on the other baking dish. Place the 2 baking dishes in the oven – preferably in the middle rack – and roast for 25 minutes, or until the vegetables are golden brown. When they’re done, take them out from the oven and let them cool a bit at room temperature.
2. In the meantime, prepare the crust: Mix the chesnut and wheat flours in a bowl. Add the salt. Now, slowly pour the olive oil and mix everything with a rubber spatula. Finally, add the water. Using your hands, mix the ingredients together in order to form a ball, being careful not to overmix the dough. If the dough seems too dry and doesn’t hold together, add 1 to 2 tablespoons more water.
3. Place the dough in the lightly oiled tart pan and press it with your fingers, so that the bottom and the sides of the pan are uniformly covered with dough. Now, trim any excess dough. Cover the pan with plastic wrap and refrigerate it while you proceed with the recipe.
4. For the tofu custard, place all the ingredients for the custard in a food processor, as well as half of the roasted cherry tomatoes (juices included) and the roasted garlic cloves (which you have to unpeel first), and process until totally smooth. Have a taste and adjust the seasonings – adding a bit more tamari and/or a bit more lemon juice – if needed.
5. Take tart pan out of the refrigerator, cover it with foil and place a few pie weights over it – I used dried beans. Blind bake the crust for 10 to 12 minutes, or until golden brown.
6. Place the onions in the bottom of the pre-baked tart shell. Fill the latter with the tofu custard and distribute the remaining roasted cherry tomatoes evenly on top. Bake for 25 to 30 minutes, at 180ºC, or until the custard is set and golden brown. Serve with a leafy salad.
Simple and (almost) Fat Free Apple Cake

I always love to watch people cooking, specially to see how their process is – not only in terms of what ingredients they choose to cook with, but also in terms of how they organize things and manage the time they spend preparing a meal. I’m not sure if I’ve told you this before, but I’m not (really) an organized cook. Firstly, I spend way too much time preparing things, and secondly, I tend to be messy. I know some people who are always cleaning up and arranging the ingredients they’re working with on the kitchen counter, and even though I try to be like them, it seems I can’t achieve such level of method. Pans, plates and bowls are left on the kitchen sink, waiting for the meal to be done to get washed; ingredients remain on the counter even though I might have already used them; t-shirts and sweaters get stained with tomato sauce, cake batter, and so on, because most of the time I forget to put the apron on. I don’t mean to scare you – in fact, if you’d come over for dinner, I’d do my best to hide the evidences of my messiness.
Things tend to get worse when I bake – flour all over the place, packages of sugar and margarine clearly out of their natural environment, dirty bowls and cups pilled up on the sink. You get the scenario. As I was thinking about this the other day, I thought it’d be great if I could come up with a cake recipe that would require minimal effort and the use of only a few kitchen utensils.

The recipe for the Apple Cake I’m sharing with you today, even though requiring the use of a food processor, can be pretty much considered a clean-up-friendly type of cake. It’s also gluten-free and (almost) fat free, meaning that a second or third slice won’t hurt. The fact that it’s a fat free cake doesn’t compromise its flavor, which is delicate, yet full of warmth, for which the addition of a generous amount of ground cinnamon definitely contributes.
And finally last, but definitely not the least: I’m really (really!) excited to be a contributor for Honest Cooking, a brand new online food magazine that has launched just yesterday. My very first article can be found here, but please do check out the website, it’s really well worth it!
Simple and (almost) Fat Free Apple Cake
(for one 20 cm - 8 inches - round pan)
1/2 cup (73 grams) buckwheat flour
½ cup (80 grams) brown rice flour
1/3 cup (35 grams) oat flour
1 teaspoon baking powder
½ teaspoon baking soda
a pinch of salt
1 teaspoon ground cinnamon
wet mixture:
6 tablespoons agave nectar
½ cup (65 grams) light muscavado sugar
½ cup (125 ml) apple juice
½ cup (125 ml) soy milk
100 grams (one medium sized) banana, peeled
topping:
250 grams (2 medium sized units) sweet apples (such as Starking or Red Delicious)
1 tablespoon light muscavado sugar
1 tablespoon cold vegan margarine, cut into very small pieces
a good pinch of ground cinnamon
1. Pre-heat the oven to 180º.
2. Grease a 20 cm (8 inches) round baking pan with melted vegan margarine and dust it lightly with flour.
3. In a large bowl, combine all the ingredients for the dry mixture. Set aside.
4. In a bowl of a food processor, combine the agave nectar with the muscavado sugar. Process, at medium speed, until creamy. Add the apple juice, soy milk and the banana and process for additional 2 minutes, or until totatlly smooth.
5. Slowly pour the wet mixture into the bowl with the dry ingredients, mixing everything with a spatula. Even though you shouldn’t overmix the batter, make sure it doesn’t have any lumps.
6. Transfer the cake batter to the prepared pan.
7. In the meantime, peel and core the apples and cut them into thin slices. Then, arrange the apple slices evenly on top of the cake. Sprinkle it with the remaining tablespoon of muscavado sugar and a pinch of ground cinnamon. To finish things off, evenly distribute the margarine pieces on top of the cake.
8. Bake the cake in the preheat oven for 30 to 35 minutes, or until the top is golden brown. Let it cool for 10 to 15 minutes in the pan, after which you should transfer it to a wire rack or large plate to cool down completely. To do this, carefully flip the cake onto a large plate (it will be upside down), and then use another plate to flip it again. Serve warm or at room temperature.

6 comments