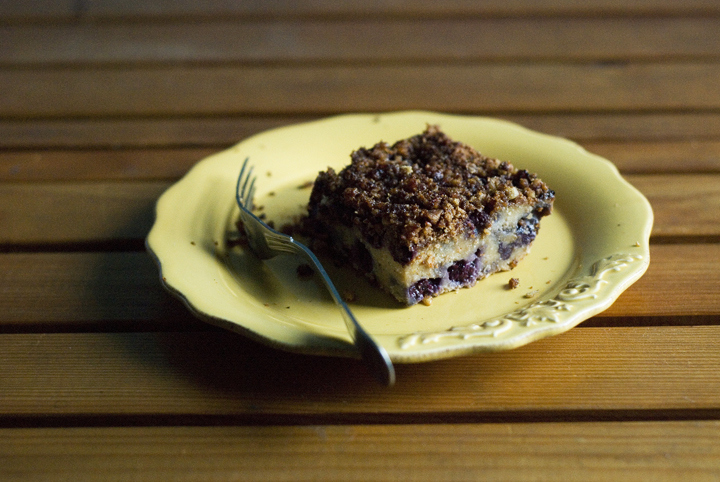
Blueberry Coconut Cake
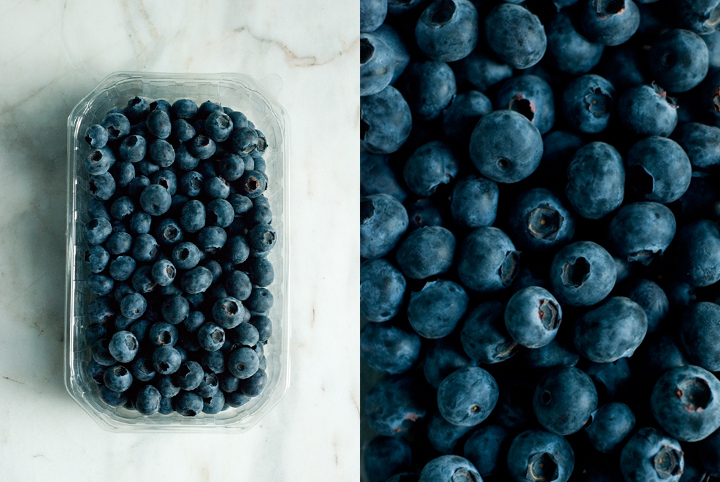
When God gives you blueberries…. you either a) eat them in one sitting on a particularly lazy Sunday night (as if they were popcorn), or b) drag yourself into the kitchen and, despite the hot temperature (the thermometer has been reaching – and even passing – 30º degrees these days) decide to bake a blueberry cake. After giving the issue some thought and, frankly, not without a few doubts, I went with the last option.
I haven’t baked anything with any sort of berries before, mostly because I can’t help myself from eating them in their natural state, as they taste so incredibly good when in season (as now). However, I most say, if you’re going to make this cake you’re into something. Because, that night, I didn’t bother to check up online recipes and ratios for this particular baked good, I approached it in the same way I work with savoury foods – tasting as I go, paying attention to the amount of liquid added in order to reach the right batter’s consistency…. that sort of intuitive thinking.
I know (as we all do) that berries love coconut, so that really was my starting point. The cake is full with blueberries (that you could easily substitute with raspberries or blackberries), not too sweet, and with that nutty-crunchy finish that gives it character and an extra boost of flavour. Now, you guys can definitely call me inconsistent – I deserve the title – because I’ve been saying way too many times that baking is not my cup of tea but, honestly, and what I’m about to say is quite a statement, this is probably the best and most accomplished sweet treat I have ever made and shared on this blog.
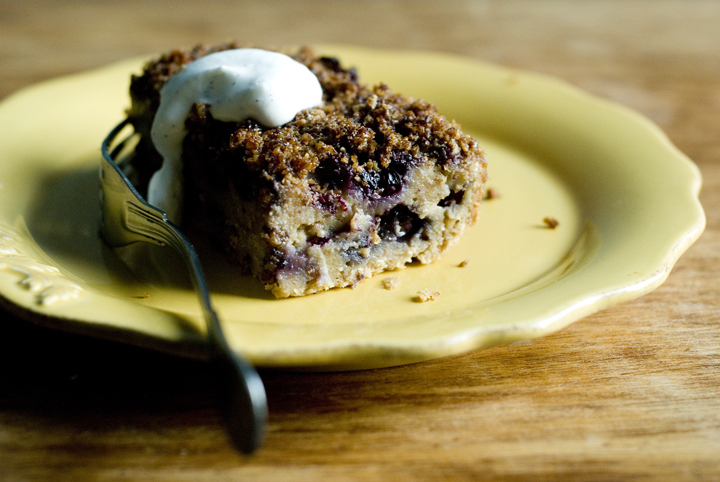
Just a little last note: you can definitely serve the cake with some coconut whipped cream on the side. I don’t have a particular recipe for it but this is how I generally do it: freeze, upside-down, a can of coconut milk for a few hours; open the can, pour the creamy part into a bowl (discard the liquid), add a sweetener (I usually go with agave) and maybe the seeds of half a vanilla bean, mix everything together, et voilà!
Enjoy the summer, do not forget the sun protection cream, and eat your berries (they’re full of antioxidants and other good things that google will be more than happy to tell you). ;)
Blueberry Coconut Cake
(makes 1 cake in a square 20 cm pan)
for the dry mixture:
1 ½ cups / 180g brown rice flour
½ cup / 40 g desiccated coconut
¾ cup / 80 g quinoa flour
1 tablespoon baking powder
¾ teaspoon salt
zest of one lemon
for the wet mixture:
¼ cup / 60 ml melted coconut oil
1/3 cup /55 g coconut sugar
¼ cup / 60 ml agave nectar
2 tablespoons flaxseed meal mixed, in a bowl, with ¼ cup / 60 ml water
1 ½ cups / 375 ml light coconut milk
for the topping:
½ cup / 52 g coarsely ground walnuts
½ cup / 40 g desiccated coconut
2 tablespoons coconut oil
4 tablespoons coconut sugar, divided
½ teaspoon cinnamon
¼ teaspoon salt
–––
2 cups / 290 g blueberries
extra coconut oil, for greasing the cake pan
Pre-heat the oven to 180ºc /350 F. Grease a square 20×20 cm pan with melted coconut oil. Set aside.
In a medium sized bowl, mix the topping’s ingredients, adding only two tablespoons of coconut sugar instead of the four written above (you’ll use the remaining two tablespoons later).
Sift the dry ingredients into a large bowl. In a separate bowl, whisk together the wet ingredients. Pour the wet mixture over the dry one and mix slowly until everything’s well incorporated and you end up with a slightly thick batter.
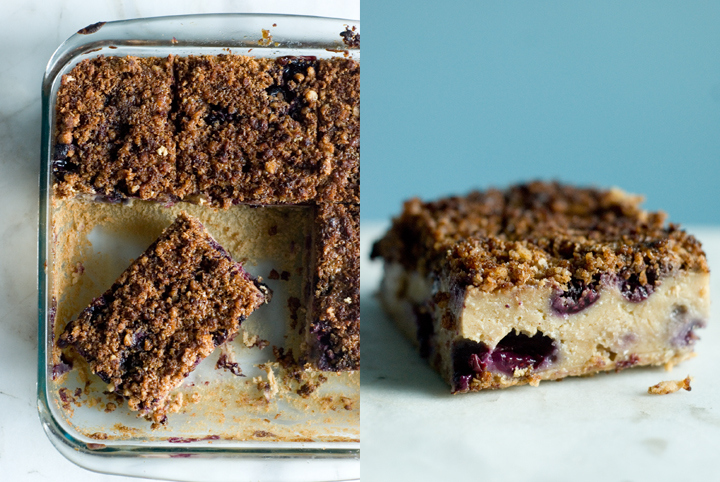
Pour half of the cake batter into the bottom of the pan. Add one cup of blueberries on top, making sure to distribute them evenly. Add the remaining half of cake batter, followed by the last layer of blueberries. To finish things off, cover the cake with the coconut-walnut topping.
Bake the cake, in the pre-heated oven, for 45 minutes. After that time, take the cake out of the oven and scatter the remaining two tablespoons of coconut sugar on top of it – make sure you cover all the cake’s surface with the sugar, so that you end up with a crisp and caramelised layer. Return the cake to the oven for an additional 5 minutes. Once done, let it cool to room temperature, cut into squares and serve. Even though I like to eat it plain, it goes particularly well with coconut whipped cream.
Bolo-Rei

One of the most typical cakes eaten in Portugal around this time of the year is Bolo-Rei (“bolo” stands for cake, “rei” for king). It’s one of those cakes I always enjoyed eating since I was kid (even though it isn’t a kids-friendly type of cake) and now, as a grown-up, I decided to try to bake it myself. I did it yesterday and, even though the cake is a bit of a project (it’s yeast-based, so it has to rise two times), the end result is way better than its store-bought counterpart.

Firstly, I decided to bake two cakes, basing them on different recipes (which only varied slightly in terms of method and rising times). Then, I thought, “why-not-to-go-a-little-bit-further-with-this” and substituted sugar for agave nectar, butter for olive oil, eggs for tofu, and also added spelt flour to one of the doughs (while the other one was made only with regular flour). I was really satisfied with how both cakes came out : they had a soft and bread-like inside, filled with lots of nuts and dried fruits. I finished things off by covering them with a tangerine glaze and toasted shredded coconut. The recipe I’m sharing with you is the one in which I used 100% regular flour: not because it tasted better or anything (the cakes had a similar taste), just that it was the one I actually ended up taking notes of (anyway, I’m pretty sure you could sub half of the amount of regular flour called in the recipe for spelt or any other whole grain variety). Also, this time around I ended up measuring everything in grams, for which I apologise, even though I prefer to do it that way, especially when baking.

Bolo-Rei
(for one large cake)
Ingredients:
4 tablespoons (60 ml) agave nectar
4 tablespoons (60 ml) olive oil
100 grams tofu, crumbled
6 tablespoons (90 ml) soy milk, plus a few extra tablespoons
15 grams fresh yeast
250 grams regular flour
80 grams raisins
80 grams almonds, coarsely chopped
40 grams walnuts, coarsely chopped
55 grams dates (7 units), pitted and chopped
For the tangerine glaze:
freshly squeezed juice of 4 medium-sized tangerines
2 tablespoons (30 ml) agave nectar
1 teaspoon cornstarch
–––
2 to 3 tablespoons of shredded coconut, toasted
1. In a blender combine the first 4 ingredients and mix until smooth. In the meantime, dissolve the yeast in a few tablespoons (3 to 4) of slightly warm soy milk. Add the yeast mixture to the tofu mixture, and run the blender once again, until everything is well incorporated.
2. Sift the flour into a large bowl. Make a well in the middle and, gradually, add the liquid mixture. You’ll end up with a soft, sticky dough, which you want to knead for about 5 minutes (resist the urge to add more flour to it).
3. Transfer the dough to a slightly oiled large bowl, cover it with a clean towel, and leave it to rise in a warm place for about 2 hours or until doubled in size.
4. Once the dough has doubled in size, it’s time to add the chopped nuts (almonds and walnuts) and dried fruits (raisins and dates) to it. Knead the dough in the bowl for 1 minute, or until all the nuts and dried fruits are well incorporated into it.
6. Now, shape the dough into a log, joining the two ends together in order to form a crown. Transfer the cake to a large baking tray lined with parchment paper, cover it again with a clean towel and leave it to rise for additional 45 minutes.
7. Pre-heat the oven to 180ºC (375ºF).
8. Bake the cake in the lower third of the oven for about 30 minutes, or until it slightly browned (see picture above) on top.
9. To make the tangerine glaze, add the tangerine juice, 2 tablespoons agave nectar and 1 teaspoon of cornstarch to a small pan over medium heat, until it reduces and thickens up (do not forget to constantly whisk the mixture).
10. Once the cake is done, cover it with the glaze (you might end up having more than what you actually need) and sprinkle it with the shredded coconut.
Recipe inspired by Ingrediente Secreto, by Henrique Sá-Pessoa, published by Casa das Letras in 2011.
Simple and (almost) Fat Free Apple Cake

I always love to watch people cooking, specially to see how their process is – not only in terms of what ingredients they choose to cook with, but also in terms of how they organize things and manage the time they spend preparing a meal. I’m not sure if I’ve told you this before, but I’m not (really) an organized cook. Firstly, I spend way too much time preparing things, and secondly, I tend to be messy. I know some people who are always cleaning up and arranging the ingredients they’re working with on the kitchen counter, and even though I try to be like them, it seems I can’t achieve such level of method. Pans, plates and bowls are left on the kitchen sink, waiting for the meal to be done to get washed; ingredients remain on the counter even though I might have already used them; t-shirts and sweaters get stained with tomato sauce, cake batter, and so on, because most of the time I forget to put the apron on. I don’t mean to scare you – in fact, if you’d come over for dinner, I’d do my best to hide the evidences of my messiness.
Things tend to get worse when I bake – flour all over the place, packages of sugar and margarine clearly out of their natural environment, dirty bowls and cups pilled up on the sink. You get the scenario. As I was thinking about this the other day, I thought it’d be great if I could come up with a cake recipe that would require minimal effort and the use of only a few kitchen utensils.

The recipe for the Apple Cake I’m sharing with you today, even though requiring the use of a food processor, can be pretty much considered a clean-up-friendly type of cake. It’s also gluten-free and (almost) fat free, meaning that a second or third slice won’t hurt. The fact that it’s a fat free cake doesn’t compromise its flavor, which is delicate, yet full of warmth, for which the addition of a generous amount of ground cinnamon definitely contributes.
And finally last, but definitely not the least: I’m really (really!) excited to be a contributor for Honest Cooking, a brand new online food magazine that has launched just yesterday. My very first article can be found here, but please do check out the website, it’s really well worth it!
Simple and (almost) Fat Free Apple Cake
(for one 20 cm - 8 inches - round pan)
1/2 cup (73 grams) buckwheat flour
½ cup (80 grams) brown rice flour
1/3 cup (35 grams) oat flour
1 teaspoon baking powder
½ teaspoon baking soda
a pinch of salt
1 teaspoon ground cinnamon
wet mixture:
6 tablespoons agave nectar
½ cup (65 grams) light muscavado sugar
½ cup (125 ml) apple juice
½ cup (125 ml) soy milk
100 grams (one medium sized) banana, peeled
topping:
250 grams (2 medium sized units) sweet apples (such as Starking or Red Delicious)
1 tablespoon light muscavado sugar
1 tablespoon cold vegan margarine, cut into very small pieces
a good pinch of ground cinnamon
1. Pre-heat the oven to 180º.
2. Grease a 20 cm (8 inches) round baking pan with melted vegan margarine and dust it lightly with flour.
3. In a large bowl, combine all the ingredients for the dry mixture. Set aside.
4. In a bowl of a food processor, combine the agave nectar with the muscavado sugar. Process, at medium speed, until creamy. Add the apple juice, soy milk and the banana and process for additional 2 minutes, or until totatlly smooth.
5. Slowly pour the wet mixture into the bowl with the dry ingredients, mixing everything with a spatula. Even though you shouldn’t overmix the batter, make sure it doesn’t have any lumps.
6. Transfer the cake batter to the prepared pan.
7. In the meantime, peel and core the apples and cut them into thin slices. Then, arrange the apple slices evenly on top of the cake. Sprinkle it with the remaining tablespoon of muscavado sugar and a pinch of ground cinnamon. To finish things off, evenly distribute the margarine pieces on top of the cake.
8. Bake the cake in the preheat oven for 30 to 35 minutes, or until the top is golden brown. Let it cool for 10 to 15 minutes in the pan, after which you should transfer it to a wire rack or large plate to cool down completely. To do this, carefully flip the cake onto a large plate (it will be upside down), and then use another plate to flip it again. Serve warm or at room temperature.
Grandma’s Orange Birthday Cake

I’ve left a pot of lentils cooking on the stove, while I sit on the couch with my laptop to write you about a cake I’ve baked this weekend. So, my grandmother’s birthday was on Saturday, and the cake I’ve made for us to enjoy was, in her words, the best I’ve baked so far. I was quite happy with a such a great compliment, and here I am sharing the said cake recipe with you. I tell you straight way: it has a long list of ingredients and requires the use of a couple bowls and pans, putting it under the “time consuming recipe“ label. But, on the other hand, I’d say it makes a great appearence at parties and will definitely impress your guests. As far as the taste goes, despite being quite orangy, it’s not overbearing orangy – you call actually perceive the delicate taste given by the combination of oat and rice flours in the batter, as well as the cream’s nutty scented flavor. An advise to all the sweet tooth out there: I tend to use very little sugar in baked goods in comparison to other recipes, because I’m not a fan of too sweet desserts, but, if you aren’t like me, I suggest you to increase the amount of sugar used in here by a couple tablespoons (four or five). I’ve told you before I’m not that much of a baker, and fussy and time consuming sweet baked goods aren’t really my thing. That’s mainly because the recipes I’ve tried so far tend to give priority to the final aestethical aspects rather than reflecting concerns on healthy baking. With this cake, I’ve done my best to combine both factors, working on a recipe that – I think – looks quite good, and even though calling for the use of wholegrain and wheat-free flours, that doesn’t compromise its flavor.

Grandma’s Orange Birthday Cake
(makes one 20 cm diameter cake, 6 to 8 slices)
For the cake:
100 grams oat flour
60 grams white rice flour
60 grams brown rice flour
1 and ½ teaspoons baking powder
½ teaspoon baking soda
¼ teaspoon salt
1 large ripe banana (about 200 grams), mashed
125 ml (½ cup) non dairy milk
200 grams soy yoghurt
125 ml (½ cup) orange juice
2 tablespoons orange zest
140 grams non-dairy margarine
120 grams muscavado sugar
For the Syrup:
200 grams orange marmalade
2 tablespoons regular sugar
80 ml (1/4 cup) orange juice
For the cream:
70 grams unsalted cashew nuts
250 grams silken tofu
60 grams icing sugar
grated dark chocolate or silvered almonds, for topping
special equipment: food processor and electric beater
1. Pre-heat the oven to 180ºC, racks in the lower and upper thirds of the oven. Butter two 20 cm (8-inch) round pans, and lightly dust them with flour.
2. Put all the ingredients for the cream in a food processor and pulse for 1 to 2 minutes or until totally smooth and similiar, in consistency, to that of heavy cream. If too thick, add one or two tablespoons of water to make the cream just a little more runny. Refrigerate it while you proceed with the recipe.
3. Mix the mashed banana with 125 ml non-dairy milk in a food processor, and blend until smooth.
4. In a large bowl, and using and electric beater, cream the vegan margarine with the sugar. Then, and still with the beater running, slowly pour the banana mixture, as well as the orange juice, soy yoghurt and orange zest.
5. In another large bowl, combine the flours, baking soda, baking powder, and salt.
6. Combine the wet mixture with the dry mixture, just until incorporated – be careful not to overmix.
7. Divide the batter among the two pans and bake, in the pre-heated oven, for 20 to 25 minutes, rotating the pans halfway through. Transfer the cakes to a wire rack to cool and, using a skewer, prick their tops with several holes.
8. In the meantime, prepare the syrup: Heat the ingredients for the syrup in a small saucepan, over medium-high heat, for 2 to 3 minutes, or until the marmalade is runny.
9. To assemble: generously brush the top of one of the cakes with half of the syrup, and then spread about one third of the cream over it. Plaee the other cake over the first one, and brush it with the remaining syrup, finishing off with the remaining cream. Top the cake with grated dark chocolate or silvered almonds, and serve.
I believe - even though I’m not sure - this recipe is remotely inspired by Epicurious
Upside-down Pear Cake

When I first started this blog I promised myself I’d be posting a recipe at least once a week. Back then, I was so excited about this whole blogging thing that I found myselft posting two, three, recipes a week. But school work has been leaving me with very little time to cook these days, and that’s the main reason why I can’t keep with my former promise all the time. Anyway, today, after an almost 12 hour sleep (yes, that’s possible), I cured my tiredness from the very busy week I had, and sit in front of the computer after lunch - this time, not to work on the projects I have on hand, but to write you the recipe for a delicious upside-down pear cake.

As I’ve told you in the previous post, I’ve been working with gluten-free flours recently and the results couldn’t be better. So, this cake not only is gluten-free but delicious on its own. Chickpea flour is here used in place of eggs and the pairing of buckwheat with fall fruits such as pears, seems to work extremely well. As we’re approaching Christmas, and I’m experimenting with a couple ingredients typicall for this time of the year, it’s more likely that the following recipes will be desserts, cakes, and hearty savory dishes - we’ll then have plenty of time in January to get back on track. ; )
Upside down Pear Cake
(one 23 cm cake, 6 to 8 slices)
for the fruit layer:
3 medium-sized pears, ripe but firm, cored and sliced
3 tablespoons muscavado sugar
3 tablespoons vegan margarine
a pinch of cinnamoon
for the cake layer:
140 grams (1 cup) buckwheat flour
130 grams (1 cup) white rice flour
1 teaspoon powdered ginger
1 teaspoon ground cinnamon
¼ teaspoon salt
2 teaspoons baking powder
5 tablespoons melted vegan margarine
100 grams unsweetened soy youghurt
45 grams gram flour
60 ml (¼ cup) plus 3 tablespoons water
160 ml (2/3 cups) soy milk
120 grams muscavado sugar
80 ml (1/3 cup) agave nectar
1. Pre-heat the oven to 180ºC. Oil a 23 cm round baking pan.
2. Heat a large skilllet over medium heat. Add 3 tablespoons of vegan margarine, pears, sugar, and cinnamon, and cook, covered, for 5 to 10 minutes, or until the pears are tender and slightly caramelized. Let the cooked pears cool to room temperature. Transfer the pears and their syrup to the prepared pan, spreading evenly.
3. In a large bowl, combine the buckwheat and white rice flours, powdered ginger, ground cinnamon, salt and baking powder.
4. In another large bowl, whisk the melted vegan margarine and sugar. Add the yoghurt, soy milk, and agave nectar to the mixture, stirring to combine.
5. In a medium-sized bowl, add the gram flour and water, whisking everything until you get a smooth consistency. Slowly pour this mixture over the wet mixture and combine well.
6. Using a rubber spatula, fold the wet mixture into the dry mixture, being careful not to overmix.
7. Pour the batter into the prepared pan – over the pears - and bake for 40 to 45 minutes, or until a toothpick inserted in the center of the cake comes out clean.
8. Cool the cake in the pan for 20 minutes before inverting onto a large plate.
Carrot Orange Cake with Cinnamon Sauce

When I was a kid, the cake I enjoyed the most was an apple cake my grandmother used to make. It was a rustic, unassuming cake, and even when so many years have passed since the last time I ate it, I can still feel its taste and smell with my eyes closed. Actually, my grandmother’s cakes used to be my favorites: the apple cake was the one I’d prefer over any other, although I’d be quite content with a few slices of the orange or the cinnamon cakes too.
As far as carrot cakes go, I don’t exactly remember the last time (before last Saturday) I ate one. I’m almost sure my grandmother has baked it some time in the past, but I can’t exactly recall when or even how good it was (I’m sure it was good anyway). The other day I came over to her place for a visit, and she told me about a carrot cupcake she used to eat in a bakery downtown. I feel that “cupcake” isn’t a fair translation for the kind of sweet treat she was talking about… it’s like a cake made with very little flour, moist, rich, and with an intense carrot flavor. As you can imagine, that left me with a big craving for something similar. I was digging on the internet trying to find recipes for the actual cake my grandmother described (as a kid, I used to eat it very often too), but the ones I’ve found mainly relied on eggs for structure. It’s not that I gave up on trying to find a vegan version for this particular kind of cake, but in the meantime, and in order to satisfy my cravings, I baked a simple, sort of traditional, carrot cake instead. And shared it with my grandmother.

The cake, we thought, was very good, but I tell you straight away: if carrots aren’t your thing, this cake is not for you. The carrot flavor is quite present, and the addition of orange zest and juice gives this baked good a fresh, citrus tang. As far as the preparation goes, it is really easy to make - with all the ingredients on hand, the batter will only take you a few minutes to prepare -, and the cinnamon sauce is a great complement to the whole thing, although I think the cake could also be enjoyed plain. And as a last note: do let the cake sit for a while (preferably overnight) before enjoying it, as it really makes a difference (the flavors will mature and be way more pronounced).
Carrot Orange Cake
(makes 8-10 slices)
dry mixture:
1 cup (125 grams) bleached all-purpose flour
1 cup (125 grams) rye flour
1 teaspoon baking soda
¾ teaspoon baking powder
¼ teaspoon nutmeg
1 teaspoon ground cinnamon
1 teaspoon ground ginger
2 teaspoons orange zest
wet mixture:
1 and ½ cups (255 grams) cooked carrots (from about 5 carrots)
1 cup (125 grams) finely grated carrots (from about 1 large carrot)
1 cup (250 ml) agave nectar
½ cup (125 ml) olive oil
1/3 cup (80 ml) freshly squeezed orange juice
1 heaped tablespoon flax seed
¼ cup (60 ml) warm water
for the cinnamon sauce:
1 and ½ cups (375 ml) soy milk
2 heaped teaspoons cornstarch
3 tablespoons muscavado sugar
2 cinnamon sticks
1 teaspoon ground cinnamon
1. Preheat the oven to 180ºC. Lightly oil a 20 cm round baking pan. Coat the pan with flour, shaking out the excess.
2. In a bowl, sift together the flours, baking soda, baking powder, the ground spices and the orange zest.
3. In the bowl of a food processor, add the flax seed and the water. Process until smooth. Now, add the cooked and raw carrots, as well as the agave nectar, olive oil, and orange juice. Process until totally smoth. Transfer the mixture to a large bowl.
4. Using a spatula, gradually add the dry mixture to the wet mixture, blending well.
5. Pour the batter into the prepared pan. Bake for 1 to 1 and ¼ hours, or until a toothpick inserted in the center of the cake comes out clean.
6. In the meantime, prepare the cinnamon sauce: in a saucepan over medium heat, add the soy milk, cornstarch, sugar, cinnamon sticks, and ground cinnamon, and bring to a boil, whisking constantly. Once boiling, immediately reduce the heat to low and simmer for 10 to 15 minutes (don’t stop whisking), or until the sauce has thickened. Serve over each slice of the cake.
Chocolate Cake
It took me a while to write this post. Actually, it took me a while to think of a nice and reasonable way to put into words my mixed feelings towards chocolate. It’s a back and forth relationship, the one I have with this ingredient: sometimes I love it, other times I can’t stand it. I have friends who die for chocolate, not being able of spending an entire day without putting their teeth into a chocolate bar or some kind of chocolaty treat. I, on the opposite, can spend quite some time, with no sacrifice at all, without eating it. I’ve learned to enjoy chocolate throughout the years, as it was something I never got enthuasiastic about, but still I tend to prefer sweets made out of other ingredients. My childhood food memories are filled with cinnamoon, orange and banana cakes, apple pies and roulades, goods that I’d help my grandmother preparing, as I’ve spent a great amount of time, as a kid, at her place. Time has passed, but those remain the sweet baked goods I still like the most. Simple cakes with honest flavors. No chocolate involved.
Actually, I had never baked a chocolate cake until yesterday. So, you may wonder, what on earth suddendly has happened to me to bake a chocolate cake? Honestly, I don’t know. I think it was more of a conscious and logical issue. I mean, I’ve cooked and baked so many things so far, and it feels strange not having a chocolate cake recipe in my repertoire. So, to fill this gap, I’ve decided to pick up a good chocolate cake recipe, one that I could easily make egg and dairy-free (if it wasn’t already like that), and bake it. It was not without surprise that, while searching, I found out that Deb, at Smitten Kitchen , posted a recipe for an everyday chocolate cake . The recipe was dead easy to put together (it took me only 10 minutes to measure the required ingredients, mix them into a batter, and put the batter on the prepared loaf pan), and it called for only one egg, which I easily replaced by some puréed tofu.
The cake was that good. It was dense, rich, and not overly sweet, as I don’t like my baked goods to be too sweet. Also, thanks to the addition of muscovado sugar, it developed a nice crust. We enjoyed the cake today right after lunch, and my grandparents, who usually come over for a visit on sundays, even took home some good slices of it with them, to enjoy later on today or tomorrow with a cup of tea.
Chocolate Cake
(for one cake, baked on a loaf pan of 22 x 7 cm)
110 grams (1/2 cup) vegan margarine
190 grams (1 cup) light muscovado sugar
90 grams (1/2 cup) granulated sugar
40 grams (1/4 cup) tofu, crumbled
3 tablespoons water
250 ml (1 cup) soy milk mixed with 1 tablespoon plus 1 teaspoon of lemon juice (this makes a good substitute for buttermilk)
75 grams (3/4 cup) dutch processed cocoa powder (I used Green & Black’s)
190 grams (1 1/2 cups) regular flour
¼ teaspoon baking soda
½ teaspoon baking powder
¼ teaspoon table salt
1. Preheat the oven to 170º.
2. Grease a loaf pan (22 x 7 cm) and line with non-stick parchment paper.
3. In a food processor, combine the tofu with the water and process until creamy. Add the vegan margarine and soy “buttermilk” and process until smooth.
4. In a large bowl, combine the dry ingredients.
5. Add the tofu, margarine and “buttermilk” mixture to the bowl with the dry ingredients, and stir with a spoon until well combined, being carefull not to overmix. You can also do it (as I did) with an electric mixer, as it blends the ingredients more easily.
6. Pour the batter into the prepared loaf pan. Bake for 50 to 60 minutes, or until a toothpick inserted in the center of the cake comes out clean.
7. Let the cake cool on the pan for 10 to 15 minutes, at which point you can transfer it to a wire rack, to cool down completely. It keeps for up to 2 days, wrapped tightly in plastic.
adapted from a recipe posted on the food blog Smitten Kitchen

7 comments