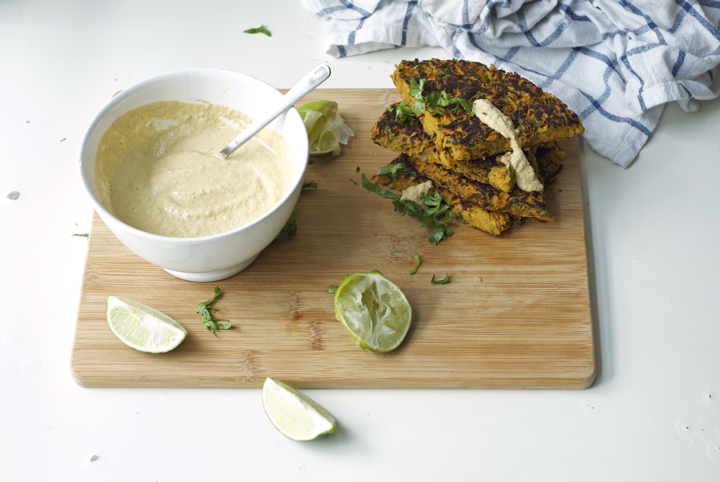
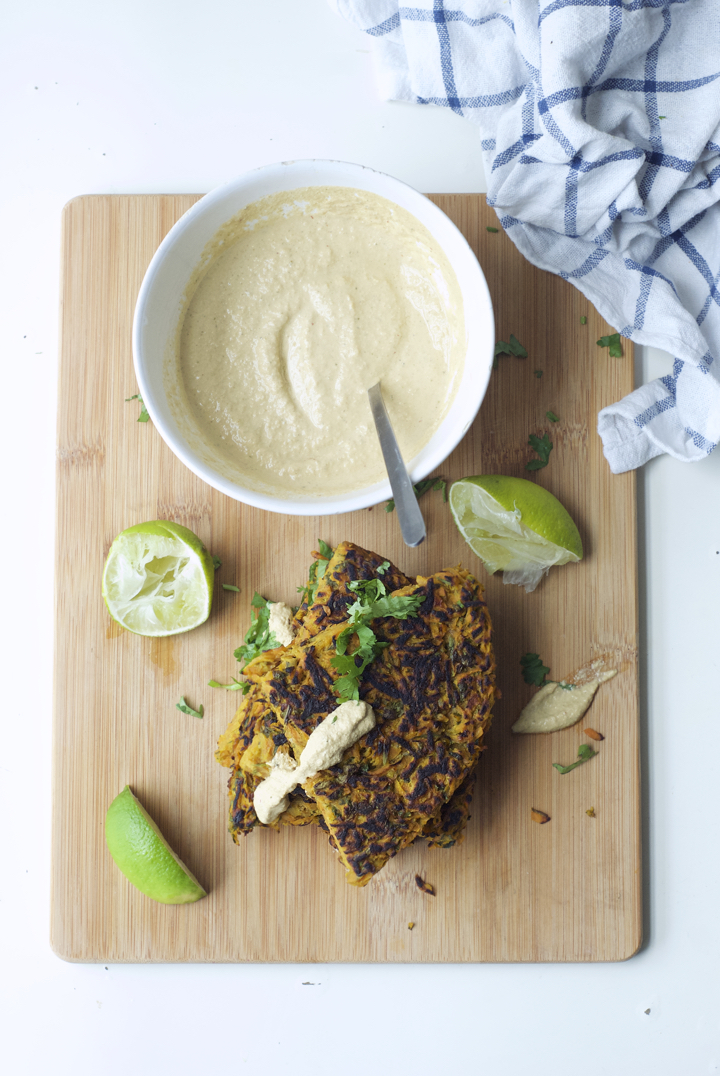
Carrot Fritter with Sunflower, Pumpkin Seed & Harissa Sauce
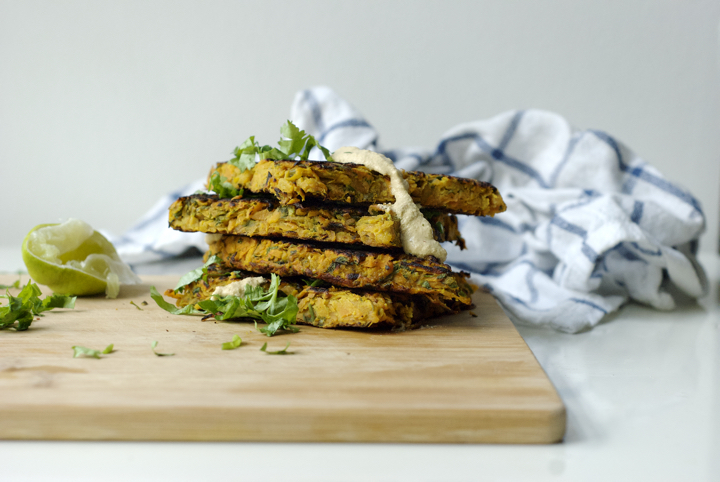
One of my grandmother’s signature dishes is carrot fritters. They’re all small and irregular in shape, and are pan-fried until golden brown, sometimes on the verge of burnt around the edges. She usually serves them with broccoli rice on the side, which is actually just rice cooked with broccoli florets on top, but tastes delicious nonetheless. The simple meals I have at her place are some of the best I’ve ever had (her lentil rissoles are insane, as it’s her sautéed cabbage with peas and mint), proving that vegan food doesn’t have to be complicated to be tasty or rely heavily on expensive, hard to find ingredients.
The other day I had a sudden urge to eat the carrot fritters and made my own version of her classic, only slightly changing the shape and making one big fritter instead of various small ones. I also added chickpea flour instead of wheat flour to bump up the protein content of my fritter. This one isn’t a particularly inventive recipe, but I’m amazed at how good it tastes, especially when served with the sunflower and pumpkin sauce. I don’t generally like to brag about recipes, but this is one really is a hell of a sauce. It’s very easy to put together and doubles as a pasta and salad sauce too. Plus, it’s full of healthy fatty acids, which is good for you and your skin.
Now, into more specifics: the fritter’s “dough” might seem like it doesn’t hold together very well, but I can assure you it won’t fall apart while cooking. Using a non-stick frying pan (look for non-teflon options, like these), or seasoning your regular pan with a generous glug of olive oil is key here, since you don’t want all that crispy bits to get stuck.
Hope you like the fritter as much as I do. I’m already thinking about how I’ll style and shoot the next recipe (which happens to be today’s dinner), so see you soon!
Carrot Fritter with Sunflower, Pumpkin Seed and Harissa Sauce
Serves 2, as a main
For the Carrot Fritter
2 Tablespoons melted coconut oil or olive oil, divided
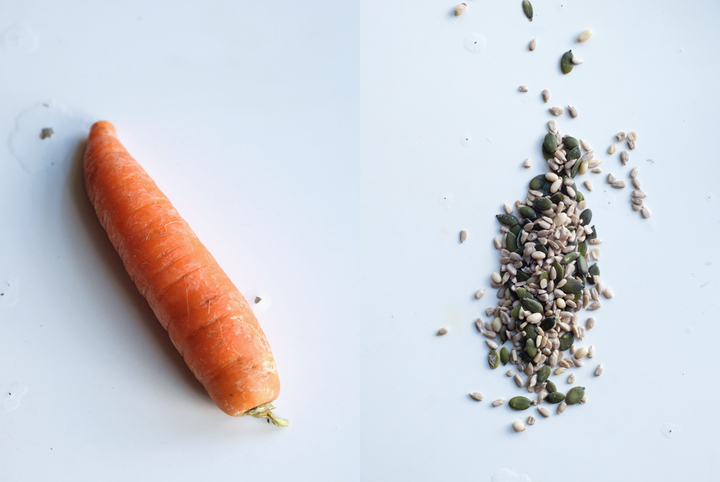
3 large carrots, grated
½ teaspoon sea salt
freshly ground pepper, to taste
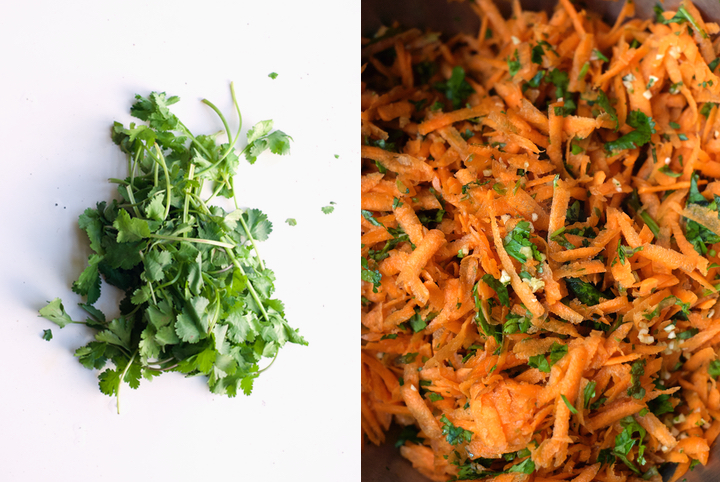
1 handful fresh coriander, finely chopped
1 large garlic clove, minced
3 heaped Tablespoons chickpea flour
For the Sunflower, Pumpkin Seed & Harissa Sauce
2 ½ Tablespoons Sunflower seeds
2 ½ Tablespoons Pumpkin seeds
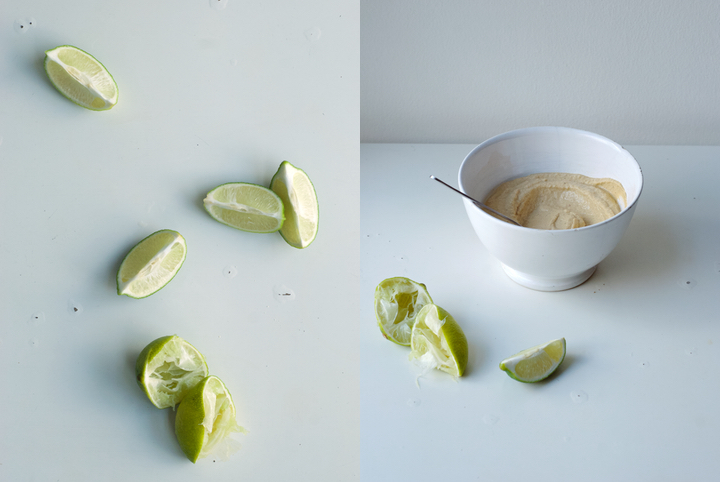
juice of one lime
7 Tablespoons water
1 Tablespoon olive oil
1 /2 teaspoons harissa
¼ teaspoon sea salt
freshly ground black pepper
Combine the sunflower and pumpkin seeds in a medium sized bowl. Pour one cup of boiling water over them, cover with a lid and let the seeds soak for at least 1 hour. After that time, drain and add them, along with the other ingredients for the sauce, to a blender. Blitz until you get a creamy, smooth mixture. If it seems too thick, add a little more water (1 or 2 Tablespoons should do). Adjust the seasoning before serving.
Combine all the ingredients for the fritter in a large bowl. Add 1 Tablespoon of coconut or olive oil to a small, 18 cm in diameter non stick frying pan over medium heat. When the oil is hot, but not smoking, add the carrot mixture. Using a spatula, spread the carrot mixture over the pan, smoothing the surface by gently pressing it down. Cook for 4-5 minutes. After that time, place a plate over the top of the frying pan and gently flip the fritter over. Add the remaining tablespoon of coconut or olive oil to the pan, return it to the heat and, once hot, add the fritter back in, golden side up. Fry for additional 5 minutes. Serve with the sauce.
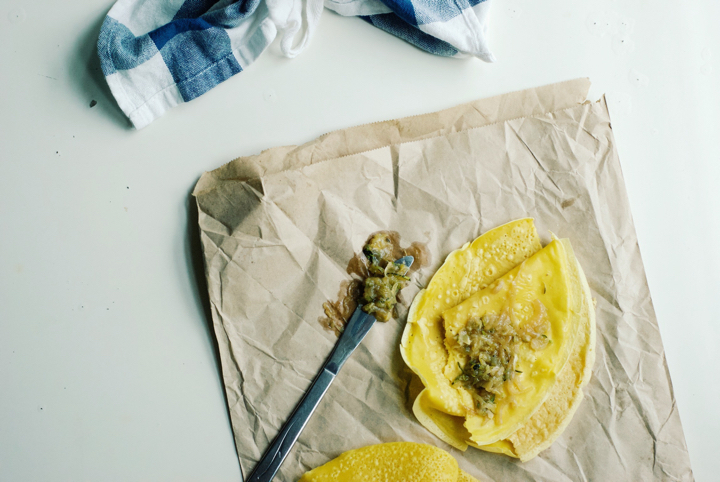
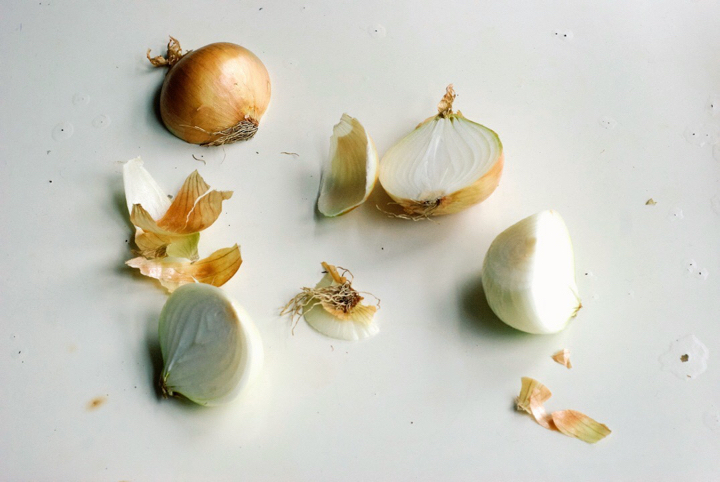
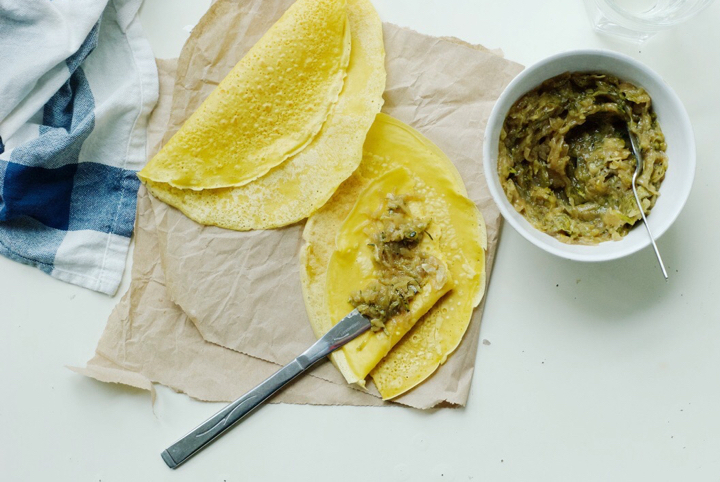
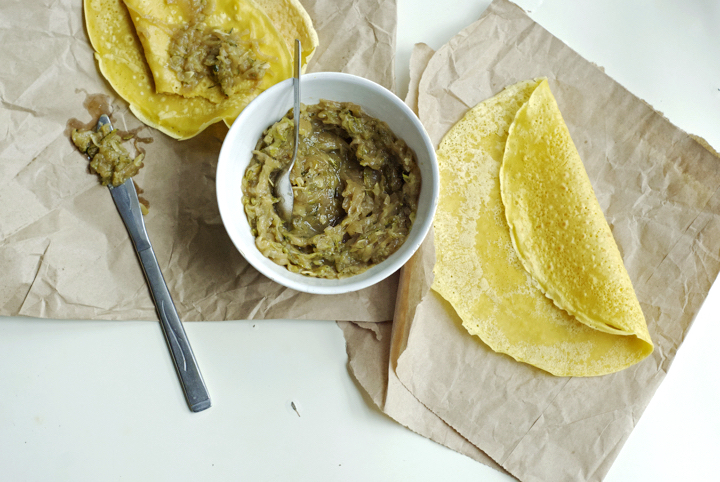
Caramelized Onion & Marrow Spread
I’ve been making an effort to live with less clutter. Like most people, I’m sure I own more things – clothes, documents, random objects – than I need. Coming to Glasgow with probably less than half the stuff I have back home, made me realize that there are only a few objects I can’t live without. I’ve also been trying to keep things simple in the kitchen, even though this is a big challenge for me because I’m not the kind of cook who intuitively works with only a few ingredients per recipe. I love layering flavours and textures on top of each other, and that’s how I naturally cook most of the time. That probably also explains why I’ve always been more drawn to middle-eastern and southeast asian cuisines (lots of things going on, flavour and texture-wise) than mediterranean (simple – but killer – ingredient combinations).
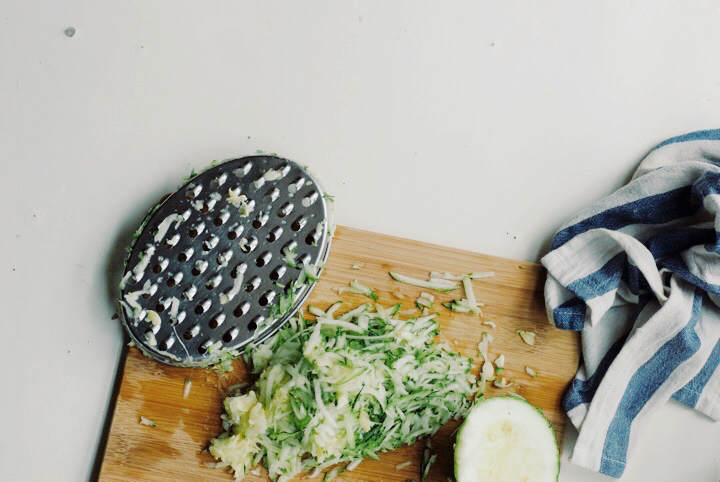
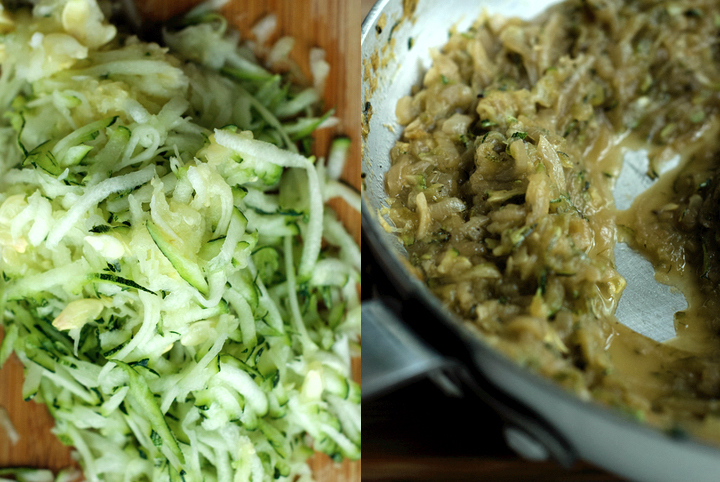
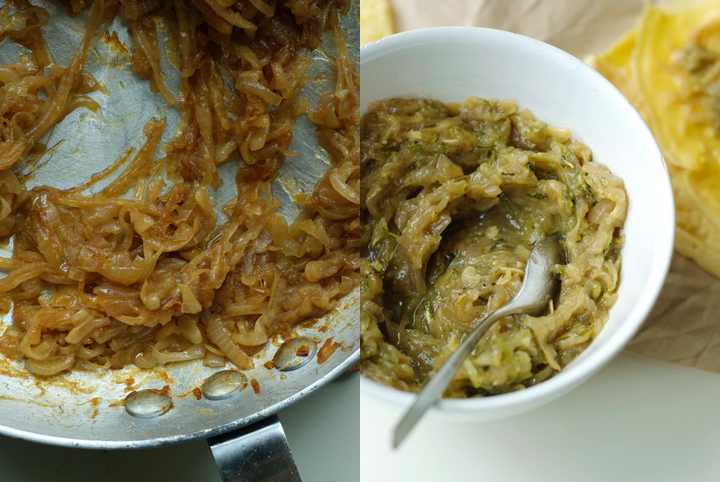
The recipe I’m sharing with you today, although only requiring a few ingredients, has an amazing complex flavour that results from the long cooking time. Just like in this recipe, the onion and marrow flavours and textures are pushed to the limit, and the outcome couldn’t be better. I know that some of you will probably be put off by the idea of peeling and chopping several onions, grating and squeezing the marrow, and waiting more than one hour for the dish to be ready. And since we’re at it, I must advise you there really are no shortcuts here – the vegetables have to brown and caramelize slowly, or there won’t be the same kind of flavour development. But if you think about it thoroughly, most of the cooking time is inactive and, in the end, you’ll end up with an amazing vegetable “jam” that is versatile and tasty enough to be used as a pasta sauce, served on top of cooked lentils, spread on toast and, my personal favourite, used as a filling for chickpea crêpes.
Caramelized Onion and Marrow Spread
(serves 6, as a starter)
Note: As an effort to eat less salt, I’ve been using Lo Salt lately. You can definitely use sea salt in this recipe, but adjust the amount (you’ll probably only need ½ or ¾ teaspoon of it).
Recipe inspired by food52
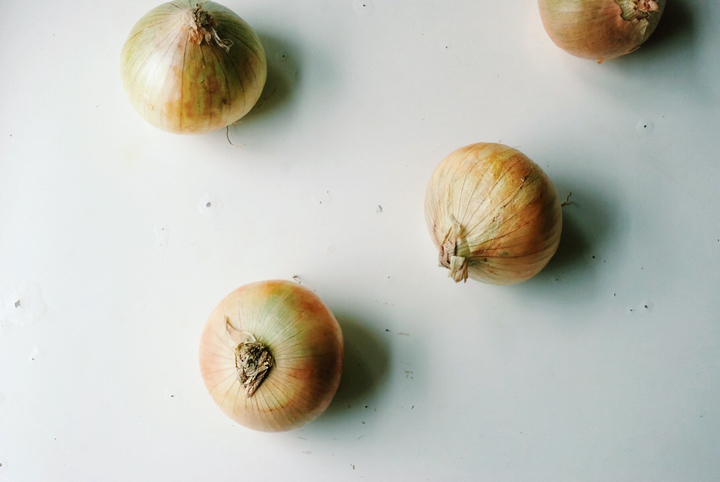
4 large onions, peeled, cut into half-moons and thinly sliced
6 Tablespoons olive oil, divided
2 Tablespoons water
1 large marrow
1 ½ teaspoons lo salt (see note above)
½ teaspoon freshly cracked black pepper
Heat 4 tablespoons of oil in a large pan over medium heat. When the oil is hot, but not smoking, add the sliced onions. Give the mixture a good stir, so that the onion slices are evenly coated with the oil. Leave undisturbed for 10-15 minutes, so that the onion slices in the bottom of the pan crisp up and brown slightly. After that time, stir the mixture again and reduce the heat to low. Cook for additional 45 minutes. Stir every 20 minutes and add 1 tablespoon of water each time (2 in total), to release some caramelized bits that might have stuck to the bottom of the pan.
In the meantime, grate the marrow into a large bowl. Transfer the grated marrow to a colander and squeeze it with the back of a spoon (or using your hands) to release as much water as possible. Set aside until the onions are cooked.
As soon as the onions have caramelized, add the marrow, low salt, pepper and additional 2 tablespoons of olive oil to the pan. Cook, stirring often, for additional 30 to 40 minutes, or until the marrow has reduced significantly and the mixture has a jam-y kind of texture. The spread can be kept, stored in a airtight container in the fridge, for up to 1 week.
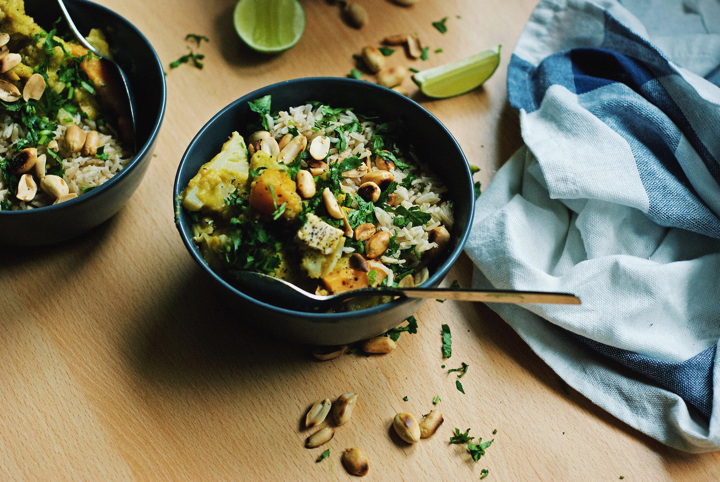
My Favourite Thai-inspired Vegetable Curry
Since I last posted a lot of things have happened in my life. The first and most important one was my recent move from Porto to Glasgow. Between preparing and planning all the stuff that involves moving into a different country, I barely had time to cook, let alone blog. However, and now that I’ve been here for a month and got (almost) everything sorted out (housing, burocracy and the likes), I´m happy to resume blogging and do the very best I can to bring you my favourite vegan recipes.
I’ve been thinking a lot about how things will naturally change around here (in terms of photography and recipe content as well) since I’m not in my own kitchen and do not have all the kitchen tools I’m used to. This will naturally affect the kind of recipes I’ll be posting from now on – they will be simpler, and since I do not own a food scale, lack the accuracy I’d like them to have. However, I do prefer to face this as a challenge (and one that I’m happy to take) rather than a limitation. I came to Glasgow with a 20 kg suitcase. I brought mostly clothes, one book, my laptop and my camera. I left in Porto all my cookbooks and the boards, plates and cutlery that have helped me build this blog’s photography identity over time. I’m already missing my bedroom’s blue wall, the wall that was the background of most of the food pictures I posted here for the last 5 years. But I’m also a firm believer that things happen for a reason. I was probably getting too comfortable with my own style of doing things, and this an opportunity to question that and try new and fresh approaches.
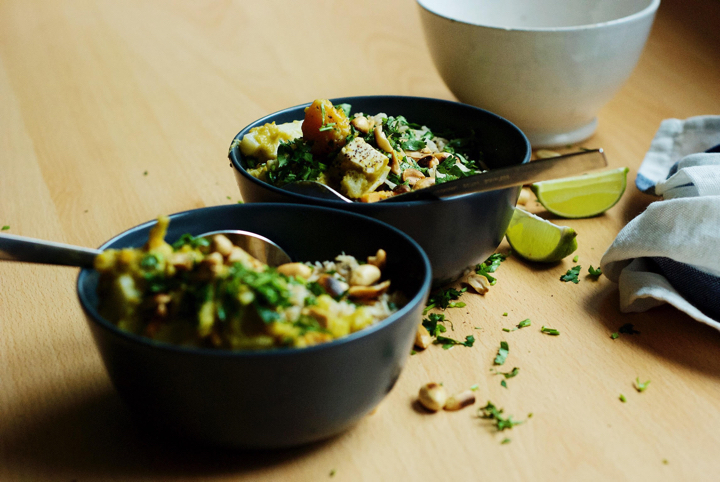

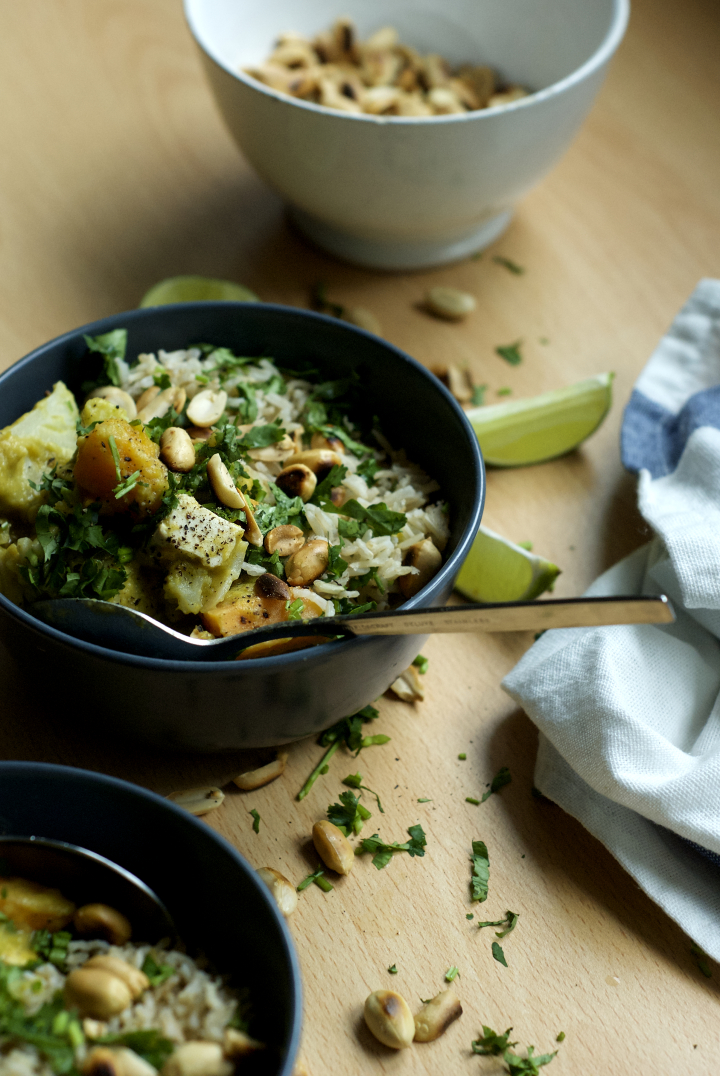
So, let’s talk curry today. I didn’t bring any of my cookbooks with me, but if I could only bring one, I’d definitely go with The Millenium Cookbook. Most of the recipes I cooked from this book were outstanding, and a great number of them have become part of my cooking repertoire. That’s the case with this curry. The original recipe is more labour intensive, and in order to make it simpler and faster I omitted some steps, trying not to compromise too much on the flavour. The recipe might still seem a bit of a project though, but I can guarantee you it’s worth making your own curry “base” from scratch, blending the sauce, and so on. In the end, you’ll have a fantastic curry that feeds a crowd and is definitely a crowd pleaser too. If you can’t come across butternut squash this time of the year, use carrots instead (4 or 5 large ones will do) – I’ve done it before and it works just as well. Also feel free to play around with the vegetables – in the past I’ve tried green beans, broccoli and asparagus and all of them have worked nicely. Hope you enjoy the curry and I’ll be back soon! In the meantime, check my instagram feed for food-related pictures and some suburb memorabilia from Glasgow.
My favourite Thai-inspired Vegetable Curry
Recipe inspired by The Millenium Cookbook
(serves 6, as a main)
*note: I usually use two green chillies with seeds, but I can handle quite a lot of heat. If you’re less tolerable than me, use only one.
For the curry sauce:
2 medium sized onions, chopped
5 large garlic cloves, chopped
1 piece of ginger the size of your thumb, peeled and grated
1 small bunch of coriander
1 teaspoon coriander powder
½ teaspoon turmeric powder
1 teaspoon cumin powder
1 teaspoon sea salt
zest of 2 limes
juice of 2 ½ limes
2 green chillies, finely chopped* (see note above)
1 medium sized butternut squash, peeled, seeded and chopped into cubes
1 can / 400 ml full fat coconut milk
For the curry:
1 Tablespoon coconut oil, melted
1 large sweet potato, peeled and chopped into cubes
1 large carrot, peepled and chopped into cubes
1 small head of cauliflower, cut into medium-sized florets
1 small head of cabbage, thinly sliced
1 lemongrass stalk, tough outer layer removed, bruised in a mortar and pestle (optional)
1 cup / 250 ml water
250 g / 1 package smoked tofu, cubed
For serving:
3-4 spring onions, finely chopped
1 handful of peanuts, toasted
extra coriander, finely chopped
1-2 limes, cut into quarters
For the curry sauce: In a double boiler, steam about ¾ of the butternut squash for 5 to 8 minutes, or until thoroughly cooked. In a high speed blender combine the chopped onions, garlic, ginger, fresh coriander, spices (coriander, cumin and turmeric powders), salt, lime zest and juice, chilies and the coconut milk and blitz until you have a smooth sauce. Working in batches, add the cooked butternut squash to the mixture and blitz until creamy.
For the curry: In a large pot over medium heat, add the coconut oil, the carrot, sweet potato and the remaining ¼ of butternut squash. Sautée for a few minutes or until the vegetables are golden brown. Add the curry sauce followed by the bruised lemongrass stalk (if using) and 1 cup / 250 ml of water and bring to a boil. Once boiling, decrease the heat to low-medium and simmer for 10 minutes. After that time, add the cauliflower, cabbage and smoked tofu and simmer for 5 minutes longer. If the sauce seems too thick, add a bit more water to thin it out to the consistency you like (I like mine to resemble a smooth blended soup). Season with extra salt and serve with the chopped peanuts, scallions, coriander and a good squeeze of lime juice.
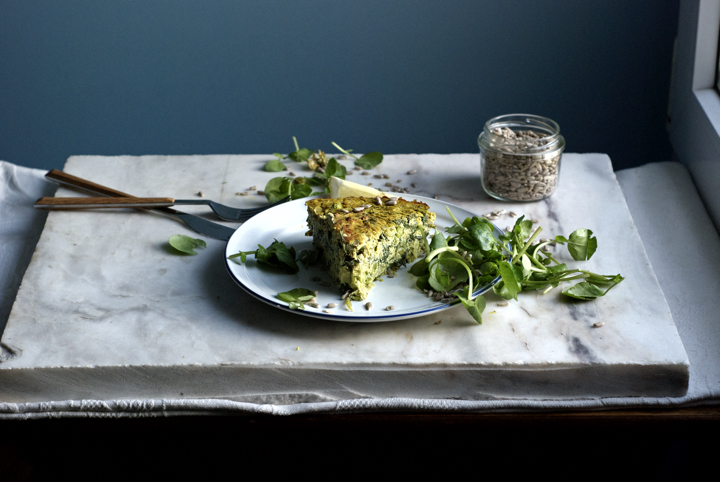
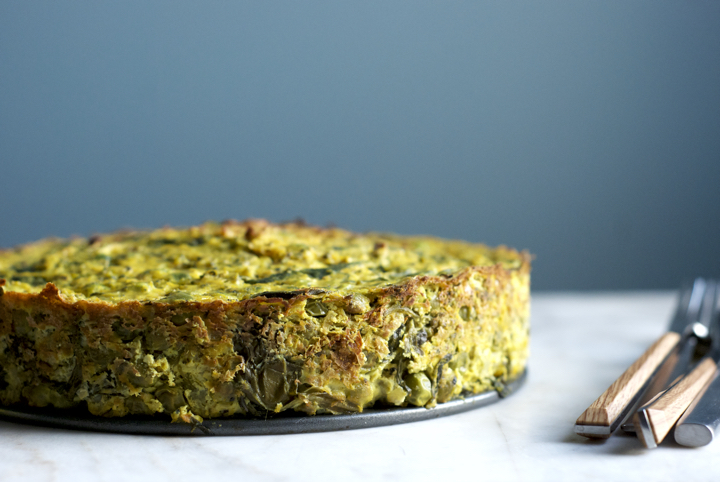
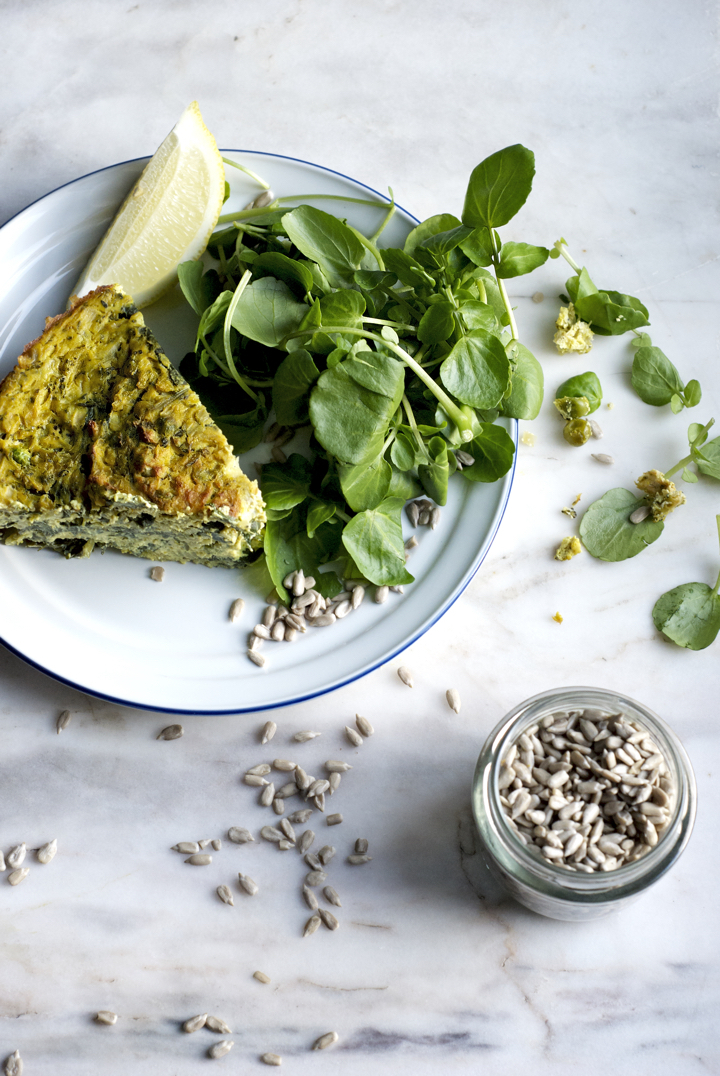
Springtime Vegan Frittata
As much as I love my morning bowl of oatmeal, it feels good to have something different for breakfast every now and then. Lately, I’ve been trying different breakfast foods – from salads, to socca, and steamed vegetables with panfried tofu – and while I enjoyed them all, the recipe I’m sharing with today is one of my favourite experiments.
 Before I committed to making my version of a vegan frittata, I’ve searched the web for inspiration. Most of the recipes I saw called for the use of cornstarch or arrowroot to thicken the tofu “custard” and make it firmer. I have nothing against those ingredients, but since I had neither of them at home by the time I was making the frittata, I made it without them and it turned out just fine. However, if you want to be able to cut a perfect slice out of it you have to be patient and wait at least half an hour after it comes out of the oven.
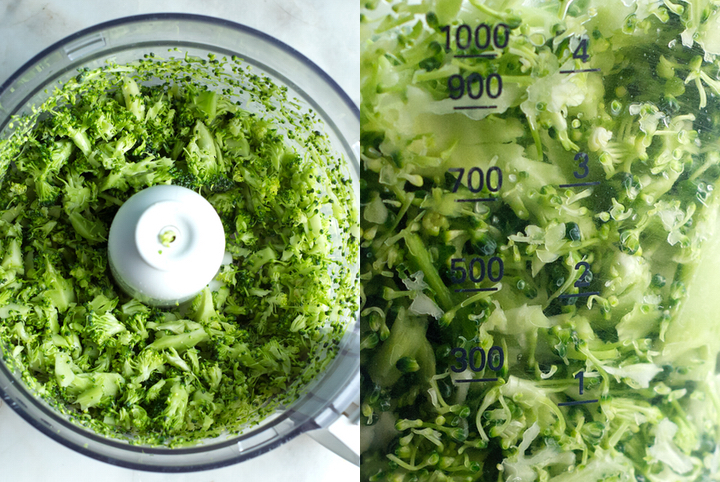
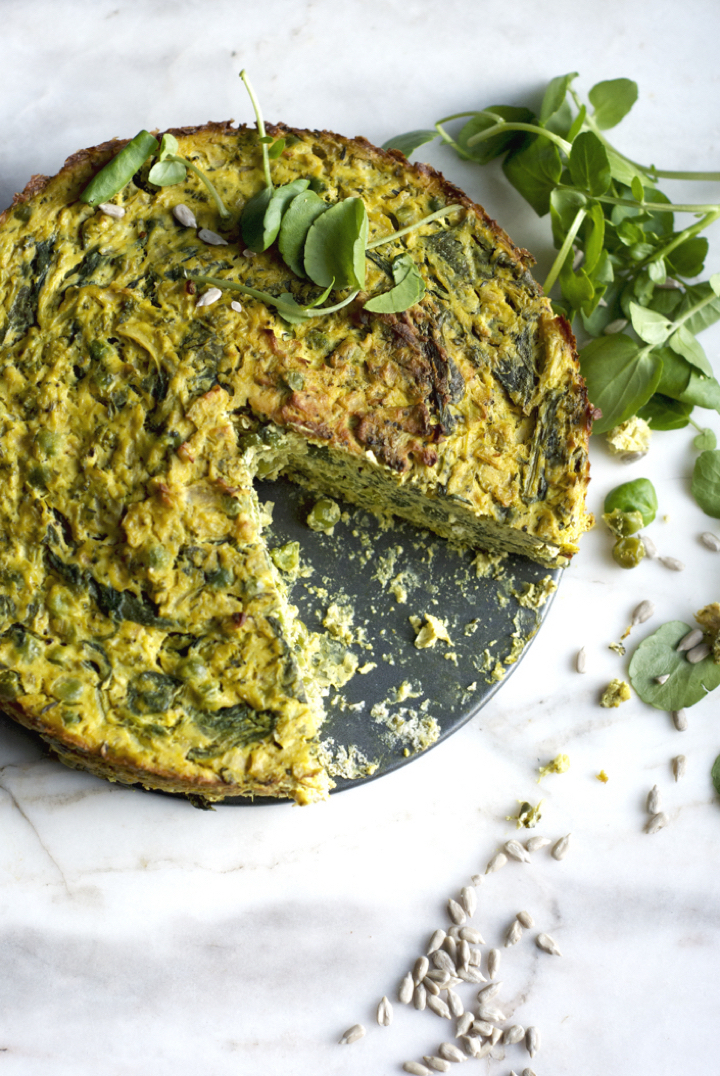
The frittata also becomes firmer the longer it stays in the fridge, and I might say I actually like it better the day after it’s baked – it’s incredible how the flavours improve and become more pronounced overnight. You don’t really need to use the vegetables I used here, and I’m sure that red peppers and/or leeks would be great additions or substitutions.
Springtime Vegan Frittata
serves 6 to 8
Ingredients
250 g / 1 large onion, finely cubed
4 garlic cloves, minced
2 Tablespoons olive oil
1 teaspoon dried thyme
2 teaspoons sea salt, divided
690 g fresh firm tofu, cubed
1 teaspoon ground turmeric
2 Tablespoons brewer’s yeast (optional)
grated zest of one lemon
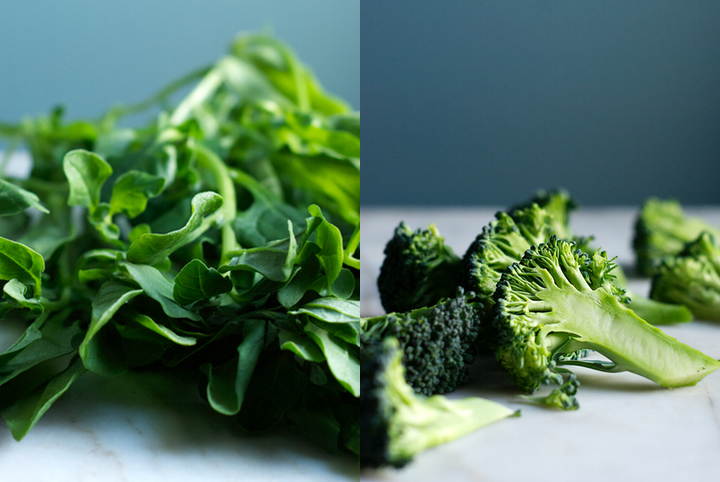
220 g / 1 small broccoli head, cut into medium sized florets
295 g / 1 large bunch spinach
240 g boiled peas (frozen is fine)
freshly ground black pepper to taste
Pre-heat the oven to 180C. Grease a springform pan with oil and set aside.
In a large skillet over medium-high heat, add the onion, garlic, olive oil and dried thyme. Cook, stirring often, for 5-8 minutes, or until the onion has softened and browned just a bit.
Add the broccoli florets to the bowl of a food processor and pulse 3 to 4 times, or until the florets are just broken down (you don’t want to fully blitz the broccoli).
Add the broccoli to the skillet with the onion and garlic mixture and cook for 3 minutes, stirring often. Next, add the spinach and 1 teaspoon of salt and cook until the spinach is wilted – no longer than 2 minutes.
Add the tofu to the bowl of the food processor, along with 1 teaspoon of salt, the turmeric, brewer’s yeast (if using) and lemon zest, and blitz until smooth.
Add the spinach and broccoli mixture to a large bowl, followed by the puréed tofu and the cooked peas. Gently mix the ingredients until everything is well incorporated. Season with freshly ground black pepper and an extra pinch of salt, if necessary.
Add the frittata mixture to the prepared springform pan. Smooth the top with the back of a spoon and bake in the oven for 40-45 minutes or until golden brown. Let it cool in the pan before unmolding and serving.
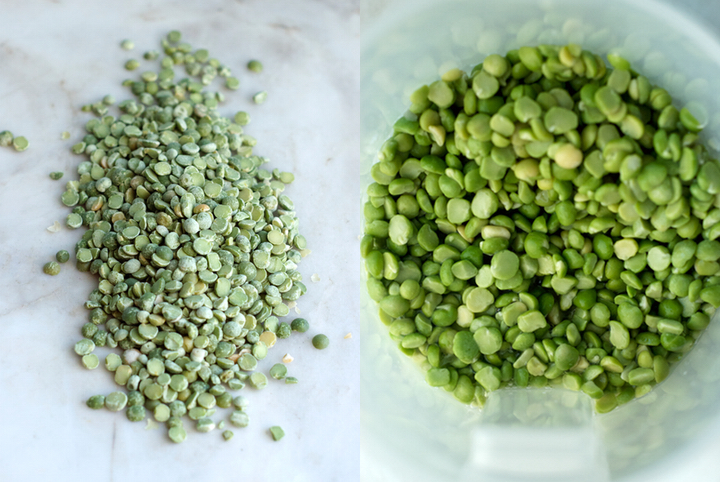
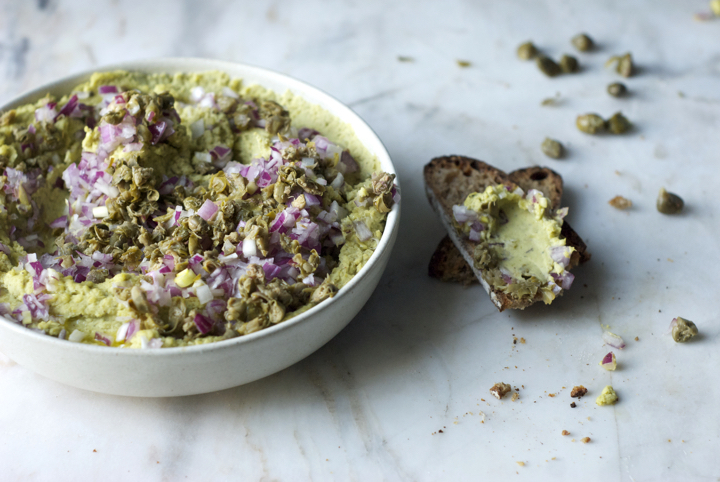
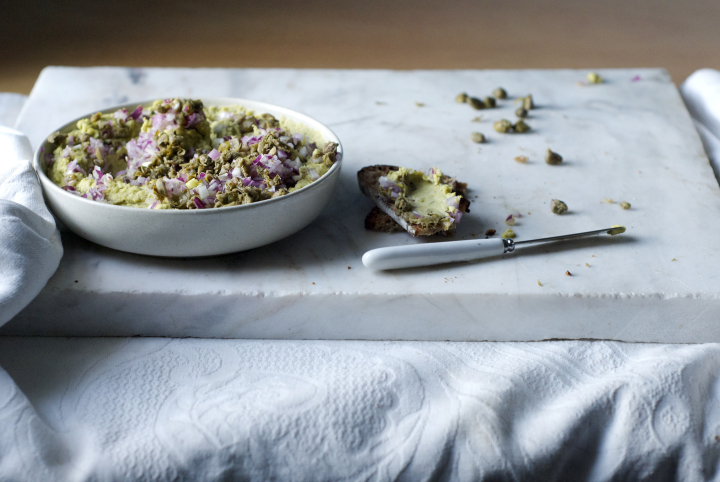
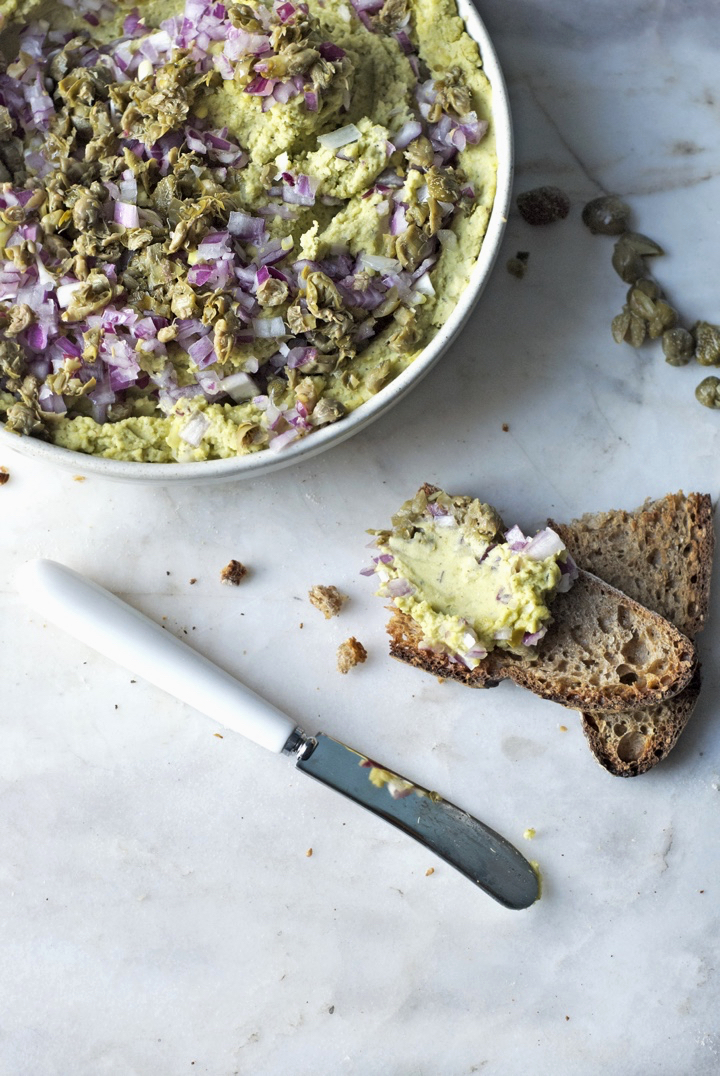
Split Pea Hummus with Capers & Red Onion
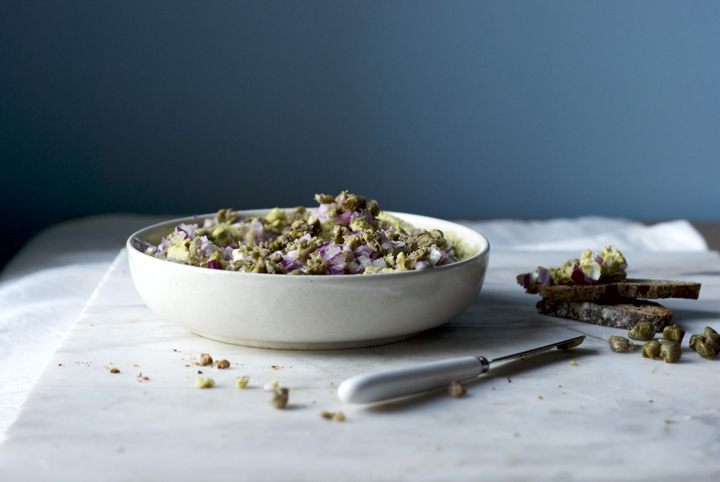
Every time I have guests for dinner, I typically serve some sort of homemade hummus or vegetable spread as an entrée. Most of the time I end up making the good old chickpea hummus because it’s one of favourite spreads and everyone loves it. But if I’m pressed for time (because yes, I’m in that tiny group of crazy people who actually thinks that removing the chickpeas’ skins is the secret to making the perfect hummus), I use split peas instead.
This is an incredibly easy, yet really tasty bean spread that’s perfect served on top of toasted bread or used as a dip for raw vegetables. I love to dip carrots and turnips into this hummus, but peppers (cut into strips), raw broccoli florets and/or parsnips are also excellent options.
I always have this thing going on with the blog where I try to balance more complex recipes with everyday, casual ones. That balance is hard to strive because people who aren’t familiar with vegan cooking tend to prefer simple and straightforward recipes, whereas long time vegans and/or foodies appreciate bold and unusual combination of ingredients and techniques.
At the end of the day, I always try to stay true to myself and my cooking “style”. However, I hope that recipes like this one – that do not involve a long list of ingredients but deliver on flavour – inspire people to venture into cooking more vegan food and, most importantly, help break the misconception that eating vegan is all about pricy superfoods and green smoothies (nothing against both, it just totally annoys me when I hear people saying that – and I do, all the time).
Split Pea Hummus with Capers & Red Onion
serves a crowd
195 g / 1 cup green split peas, soaked overnight, drained and rinsed
¾ teaspoon sea salt
¼ teaspoon freshly ground black pepper
1 teaspoon za’atar
1 garlic clove, minced
2 Tablespoons extra-virgin olive oil, plus a little more for serving
3 Tablespoons lemon juice
2 Tablespoon warm water
65 g / half a medium sized red onion, finely chopped
27 g / 2 Tablespoons brined capers, rinsed, dried and chopped
Add the split peas to a large pot over medium-high heat. Add enough water to cover the peas by 2 cm (0.8 inches). Bring to a boil and, once boiling, reduce the heat to low-medium and cook for 20 minutes or until soft. Some foam might naturally form on top of the cooking liquid – in that case, just take it out with a slotted spoon.
Drain the peas once they are cooked and cooled. Add them to the bowl of a food processor along with the sea salt, black pepper, za’atar, garlic clove, olive oil, lemon juice and water. Run the machine until you get a very smooth hummus. If the mixture seems too dry, add 1 or 2 additional tablespoons of water.
Put the split pea hummus in a medium sized deep plate. Add the red onion and capers on top and finish with a generous drizzle of olive oil.
Ginger & Orange Oat Cookies

My first idea was to share with you a chocolate dessert today, but unfortunately the dish I envisioned – a beautiful chocolate and toasted oatmeal mousse – didn’t really work out. Instead of a mousse, I ended up making a ganache, and a ganache is just a dessert component, not a dessert in itself. For that reason, I threw it into the freezer and decided to go on a totally different direction. In the end, I made something I was actually craving for quite a while – thin and crisp oat cookies.

Ginger and orange are ingredients that I almost always have in my fridge, and I knew beforehand how well they go together (they’re the base of a Moroccan inspired marinade I make quite often to flavour tofu). The only thing I had to do in the process of making this recipe was to taste the cookie dough a few times and adjust the amounts of both ingredients to make sure the flavours were discernible.
I’m very pleased with how the cookies turned out, they’re wonderfully spicy thanks to the ginger but also fresh and citrus-y because of the orange. Just a little note: after you take them out of the oven they’ll be soft to the touch, but after 5 minutes or so they’ll crisp up and be ready to eat. :)


Ginger & Orange Oat Cookies
Makes about 35 cookies
Dry mixture
138 g / 1 ¼ cups old fashioned rolled oats
110 g / 1 cup oat flour
50 g / ½ cup desiccated coconut
3 teaspoons ground ginger
1 teaspoon baking soda
½ teaspoon sea salt
Wet mixture
1 Tablespoon fresh ginger, minced
1 ½ Tablespoons orange zest (from about 2 ½ medium sized oranges)
80 ml / 1/3 cup olive oil
185 ml / ¾ cup brown rice syrup
2 Tablespoons flaxseed meal
60 ml / ¼ cup water
In a small bowl, combine the flaxseed meal and water together. Whisk well, cover, and let it rest for about 5 minutes or until it thickens.
Mix the dry ingredients in a medium sized bowl. In another bowl, whisk together the remaining wet ingredients and the flaxseed mixture.
Pour the wet mixture over the dry and mix with a wooden spoon until everything is well combined. Refrigerate the cookie dough for at least 1 hour before using. In the meantime, pre-heat the oven to 180 C and line a large tray with baking paper.
After the dough is chilled, scoop out 1 tablespoon of it at a time. Wet your hands and flatten each piece of dough between your hands, until you get a cookie that is about 2 mm thick. Arrange each cookie at least 4 cm (1.6 inches) apart from each other in the prepared baking tray. They’ll spread out quite a bit.
Bake the cookies for 10-12 minutes or until golden brown around the edges. Let them cool on a rack before eating and store them in an airtight container.
Mushroom & Quinoa Soup
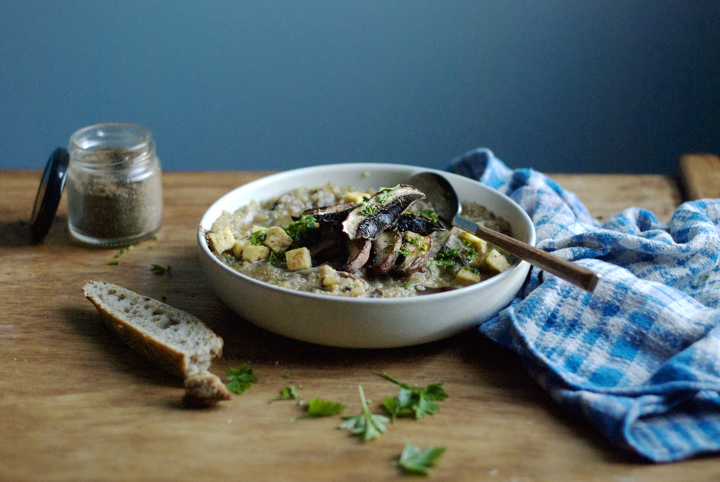
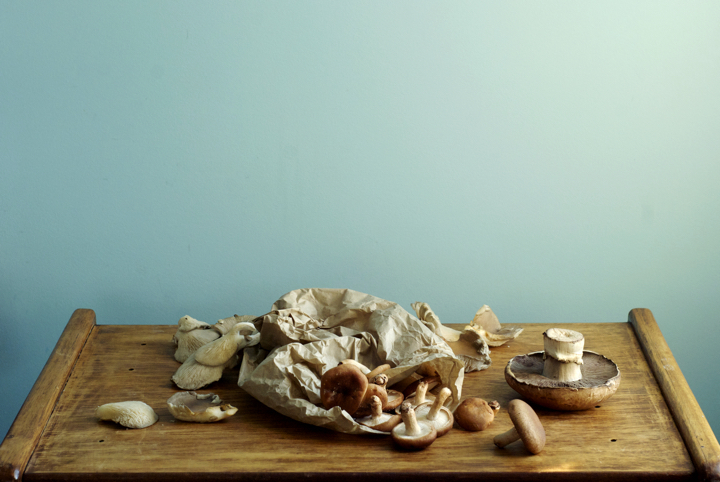
As I’ve said before, I don’t plan in advance the recipes I’m going to post here on the blog. I like to be inspired by the seasonal ingredients I buy every week and just create something with them. This week I’ve brought home lots of mushrooms and nettles, so the idea was to post a recipe here that highlighted one of these ingredients (I’m not quite sure if mushrooms and nettles go well together, hence why I didn’t attempt to put both in the same dish – probably a wise decision).
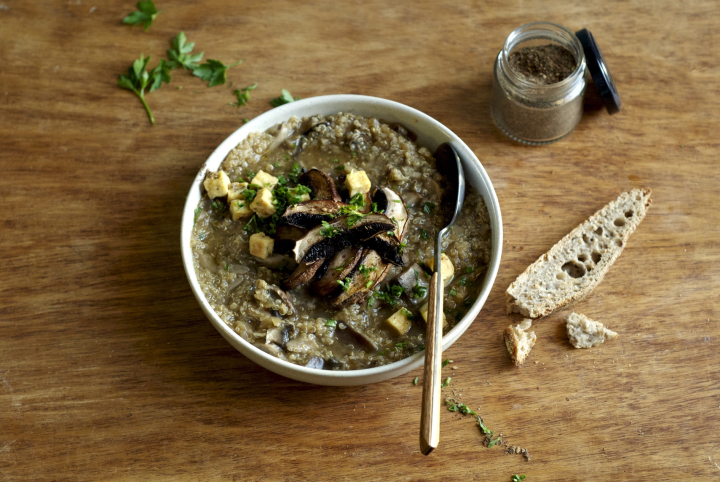
When I cook with mushrooms I like to keep things very simple. I usually just panfry them with lots of garlic and that’s it. However, I kept thinking about a delicious mushroom soup that I’ve made once, following this recipe, and because it’s still incredibly cold around here, I was craving something similar.
My original plan was to use millet in the soup, but I’ve found in the pantry a bag of quinoa 2 days past expiration date (ups) and used it instead. I was lucky enough to find the mushrooms I’ve used in this soup for a very good price, but I don’t want you to spend a fortune on these guys, so feel free to substitute the shiitake and pleurotus for creminis if you like. Also, you can definitely use millet in place of the quinoa, or even brown rice (you’ll just have to adjust the cooking times and probably add a bit more stock than the amount suggested bellow).
Last but not the least: I still have those nettles in the fridge and I’m not sure what to do with them. Have any of you cooked with nettles before? What should I do with them? Suggestion board is open. Thanks in advance! : )
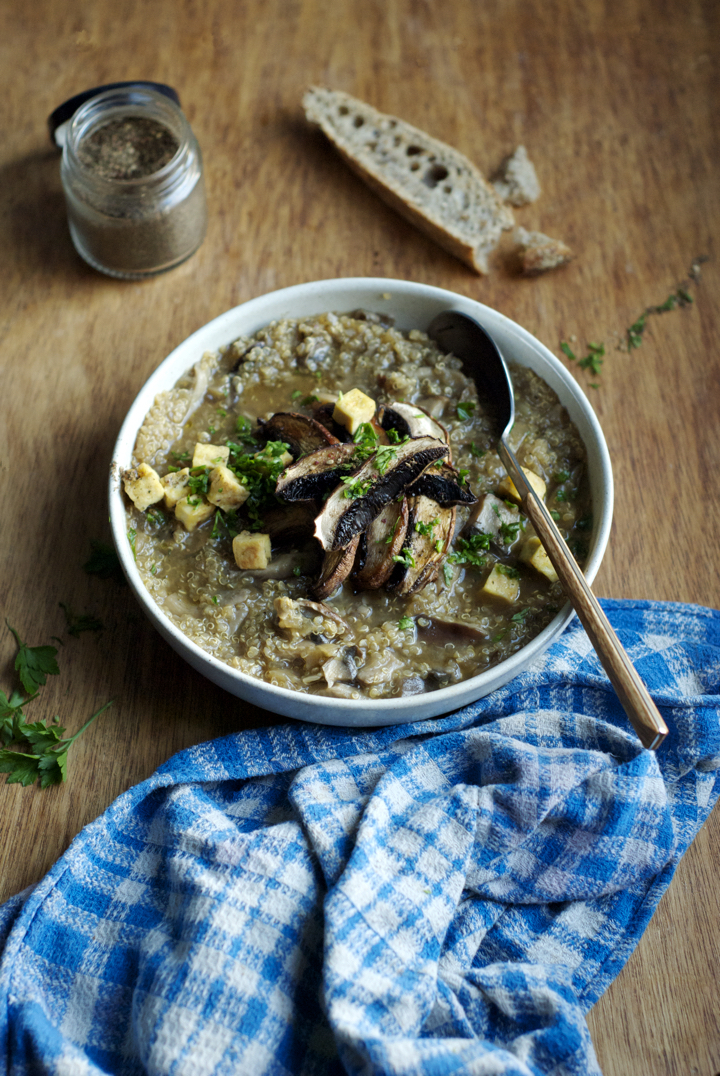
Mushroom & Quinoa Soup
serves 4
250 g / 1 large onion, finely chopped
3 garlic cloves, minced
1 Tablespoon olive oil
25-30 g / 1 big chunk fresh ginger, peeled and minced
6 grams dried porcini mushrooms, soaked in 1 cup hot water (do not discard the water)
140 g / 1 large portobello mushroom, chopped into medium sized chunks
105 g shiitake mushrooms, coarsely chopped
200 g pleurotus mushrooms, coarsely chopped
150 g / ¾ cup quinoa
4 cups low sodium vegetable stock
3 Tablespoons tamari sauce
2 Tablespoons lemon juice
salt and freshly ground black pepper to taste
In a large pan over medium heat, add the oil, onion, garlic and ginger. Cook for 3-4 minutes, or until the onion has softened.
In the meantime, heat a dry skillet over medium-high heat and, once hot, add the quinoa. Toast the quinoa, stirring often, for 3 minutes or until it’s fragrant and only slightly brown in color.
Add the rehydrated porcini followed by the portobello, shiitake and pleurotus mushrooms. Give the mixture a good stir and add the quinoa, followed by 1 cup of the porcini soaking water and 4 cups vegetable stock.
Bring the liquid to a boil and, once boiling, decrease the heat to low-medium and simmer for 15-20 minutes, or until the quinoa is cooked. Add the tamari sauce, stir, and have a taste. If it’s not salty enough to your liking, add salt (I had about ½ teaspoon).
Right before serving, add the lemon juice and freshly ground black pepper. Serve immediately garnished with chopped parsley and panfried tofu, if desired.
Citrus Salad with Basil-Coconut Sauce
I always do my food shopping on Saturdays. I go to the farmers market in the early afternoon and buy fresh fruit and vegetables for the week. Unless I have friends coming over for dinner, I almost never plan what I’m going to bring home – I just buy seasonal and fresh produce. Last Saturday, the market stalls were filled with tons of oranges, grapefruit, tangerines and lemons. Being a citrus lover, I couldn’t help but buying some, and on the way back home I even manage to peel and eat a giant orange while at the same time carrying all the bags packed full of fresh produce.

Back at home, I fantasized about baking an old fashioned orange cake with a beautiful orange glaze, but then I just thought that the fruit was so delicious and fresh that throwing it into a cake wasn’t the best way to make it justice.
I remembered years ago seeing Jamie Oliver on a show making a savoury basil sauce to go with a raw tomato salad, and that idea kind of got stuck in my head and ended up being the inspiration for this dish. The combination of flavours might seem unusual but it works incredibly well. I ate the salad as an afternoon snack but it could easily be served as a light dessert. Needless to say, there’s room for adaptations here: you can omit the grapefruit if you want to (subbing it for more orange and tangerine), or you can take a different route, by using pineapple instead of all the citrus (I bet it’s equally delicious).
Citrus Salad with Basil-Coconut Sauce
Serves 2
Note: all the fruit was weighted after being peeled.
For the salad:
185 g / 1 large grape fruit
166 g / 1 large orange
75 g / 2 small tangerines
2 Tablespoons dried coconut
a small handful of goji berries
for the basil-coconut sauce:
18 g / 1 medium bunch basil leaves
4 Tablespoons coconut milk
2 Tablespoons brown rice syrup
In a small skillet over medium-high heat, toast the coconut until it’s fragrant and just beginning to brown.
Cut the orange and grapefruit into 0,5 cm round slices. Split the tangerines into segments and remove the pits (if they have any).
In a blender, combine all the ingredients for the sauce and process until smooth. If it’s too thick, add an extra tablespoon of coconut milk.
Put the sliced fruit in a serving plate and sprinkle with the toasted coconut and goji berries. Drizzle with the sauce and serve immediately.
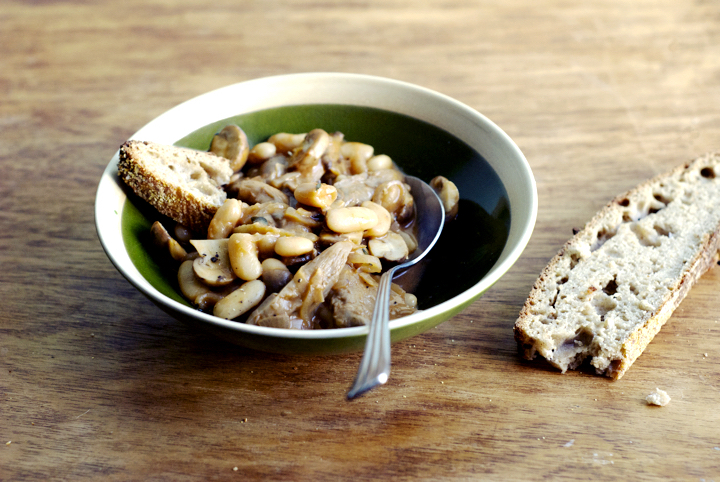
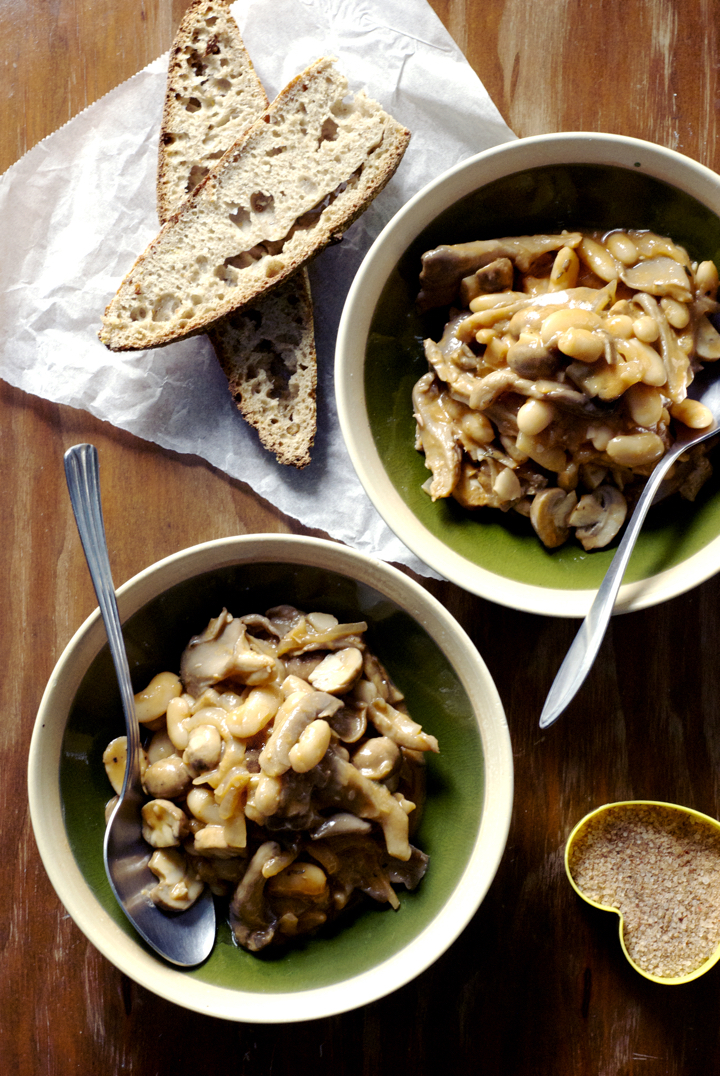
White Bean & Mushroom Stew with Thyme
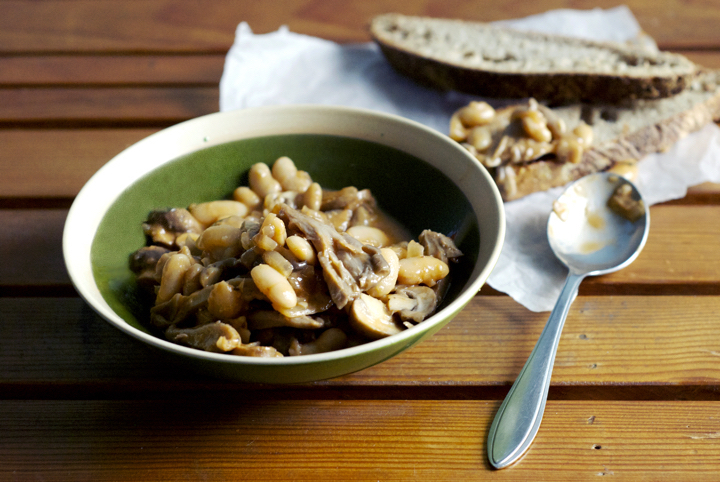
People often ask me how long it takes me to make a blog post. The short answer is: it depends. Some dishes take longer to prepare than others. Some foods look naturally good (like fruits and vegetables), while others need a little help (and time) to look appetizing (such as beans or tempeh, for instance). Sometimes, I know straight away what I want to do when it comes to photograph the dishes I prepare – I kind of have the pictures I want to take in mind –; other times, I have no clue of what I’m going to do.
Having said all this, I think stews such as the one I’m sharing with you today are the hardest meals to photograph. I love this kind of food, but stews in general look like an indiscernible (but incredibly tasty) mess of ingredients and are usually brown-ish in colour. This particular one demanded a lot of work. I cooked and shoot the recipe in the morning, but then, in the early afternoon, I looked at the images and wasn’t pleased. I ended up starting all over again, only to get images that I’m just relatively happy with.
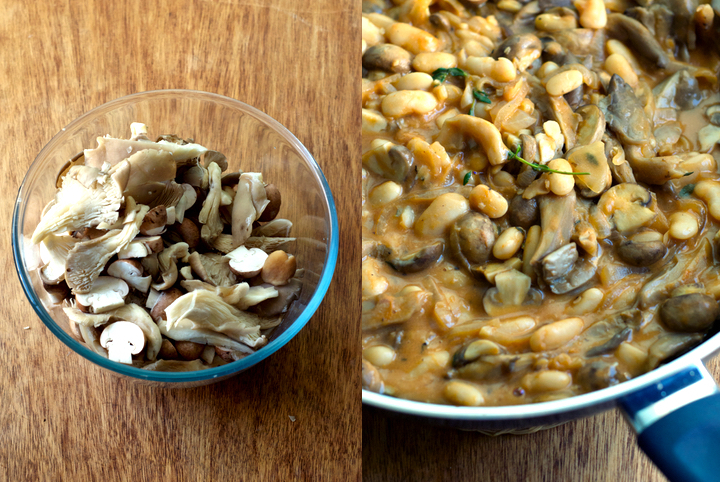
But when it comes to how the dish tastes though, that’s a whole different story. I actually make this kind of mushroom and bean stew very often because of how easy, quick and tasty it is. The addition of brewer’s yeast (you could use nutritional yeast instead) gives it complexity and complements the mushrooms’ earthy flavour beautifully. You don’t have to stick to the varieties I used here – shiitakes or the regular white button mushrooms work well too.
White Bean & Mushroom Stew with Thyme
serves 3, as a main
1 Tablespoon olive oil
1 large / 180 g onion, thinly sliced
4 garlic cloves, minced
300 g baby Portobello mushrooms, sliced
285 g pleurothus mushrooms, roughly chopped
6 thyme sprigs
255 g / 1 ½ cups cooked white beans
310 ml / 1 ¼ cups water
2 Tablespoons brewer’s yeast
2 Tablespoons lemon juice
3 Tablespoons tomato puree
½ teaspoon salt
2 teaspoons cassava starch (or corn starch)
Heat the oil in a large skillet over medium heat. Add the onion and garlic and cook until the onion is soft (about 5 minutes). Add the mushrooms and thyme sprigs and cook, stirring often, for additional 10 minutes, or until the mushrooms shrink considerably.
In a medium sized bowl, combine the water, brewer’s yeast, lemon juice and tomato puree. In another bowl, gradually mix the cassava starch with ¼ cup of the brewer’s yeast and tomato sauce. Add the cassava mixture back to the bowl with the sauce and whisk until thoroughly combined.
Add the beans and the sauce to the skillet with the mushrooms and let it boil for 5 minutes or until the sauce thickens and reduces a bit. Remove the thyme sprigs and serve immediately with crusty bread on the side.
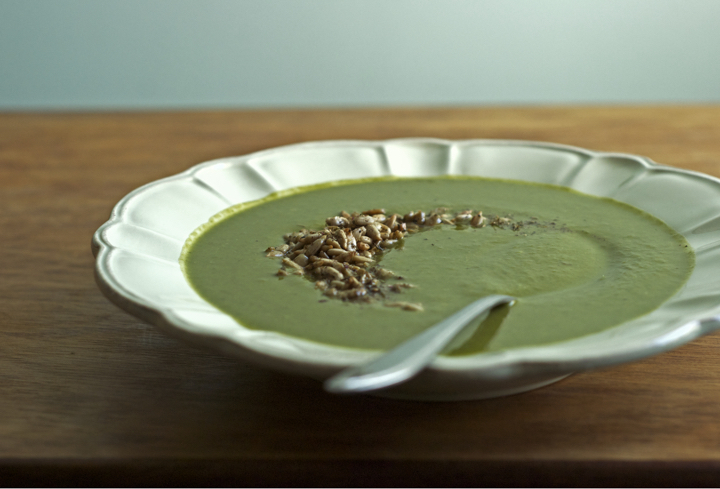
Green Monster Soup with Za’atar Toasted Sunflower Seeds
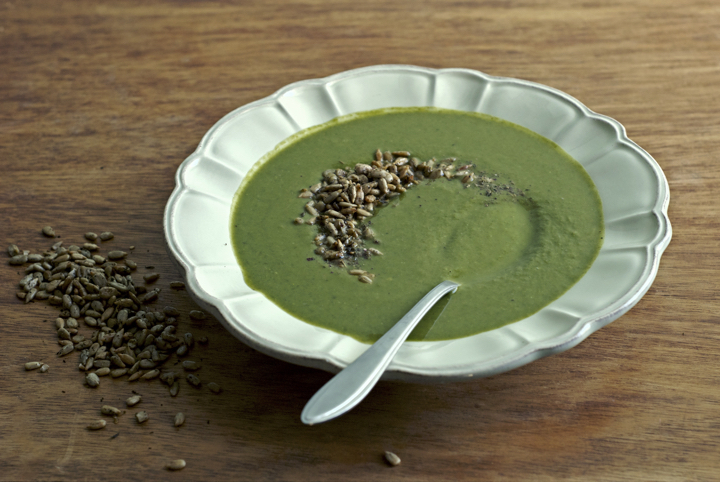
I love a good bowl of soup anytime of the year, but I tend to eat a lot more soup during the cold winter months. Usually people tend to think of soup as the kind of dish where they can throw in as many vegetables as they have lying around in the fridge. I tend to think the opposite actually, and like to take a “less is more” approach when it comes to soup making.
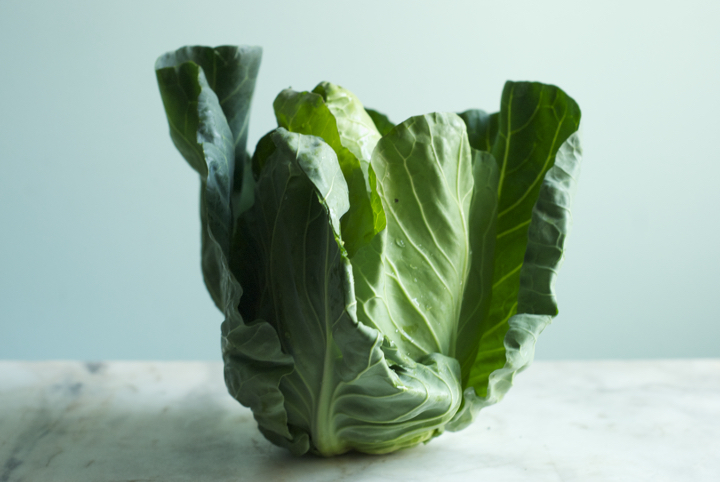
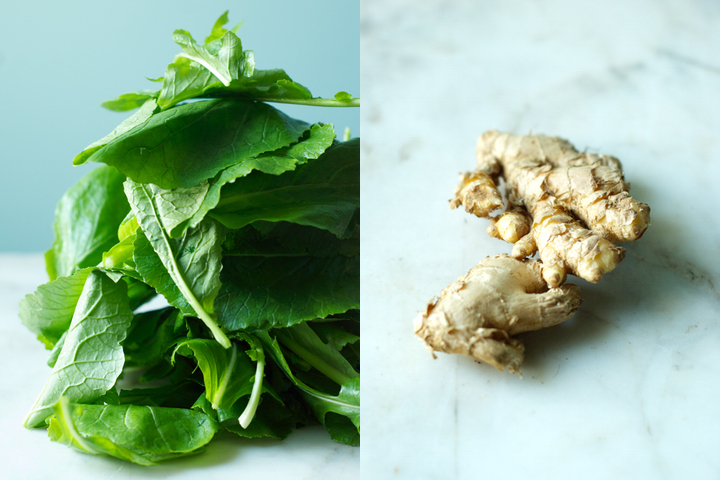
This soup in particular is made with three different greens (spinach, cabbage and turnip tops) and has sweet potatoes and a little amount of rolled oats in it to make it creamier and balance the greens’ natural bitterness. There’s also ginger for some heat, and a crunchy seed topping to keep things exciting. I usually make this soup using solely cabbage and chard, but I couldn’t find the latter this week on the market, so I just replaced it with spinach and turnip greens.
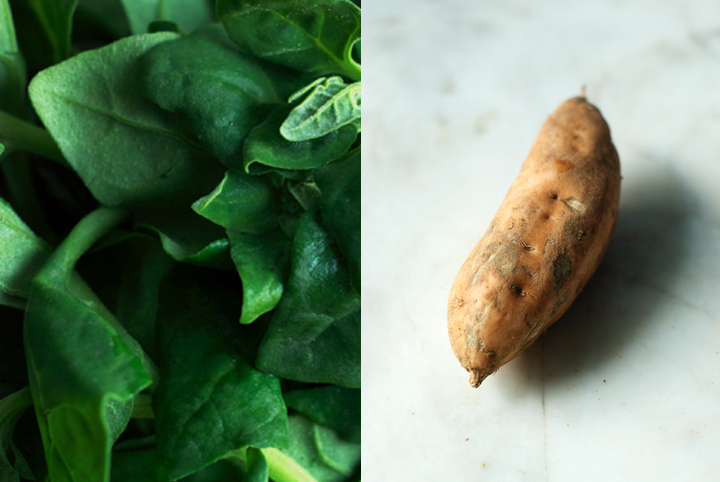
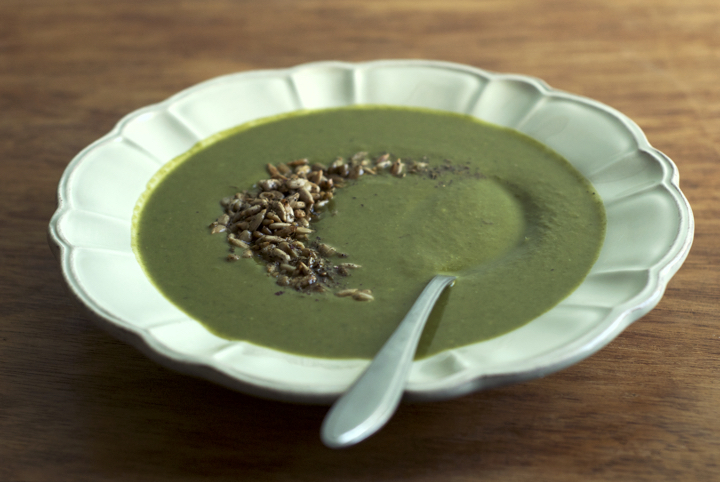
Turnip greens are very easy to find in Portugal, but my (little) travel experience tells me it’s not an ingredient that’s easily available in other parts of Europe. If you can’t find them, use chard instead. I’d just advise you against making this an all spinach soup – maybe it’s just me, but I find spinach a little bitter (specially the new Zealand variety, which is the one I’ve used here) and that’s why I like to pair it with another green partner. I want to thank all of you who visit this blog regularly and wish you a wonderful new year. I’ll be back soon. In the meantime, eat your soup! :)
Green Monster Soup with Za’atar Toasted Sunflower Seeds
serves 4
For the soup:
2 Tablespoons olive oil
230 g / 1 large thinly sliced onion
5 garlic cloves, minced
23 g fresh ginger, peeled and grated
240 g / 2 medium sweet potatoes, diced
225 g / half a medium sized cabbage, thinly sliced
25 g / ¼ cup rolled oats
5 cups water
225 grams spinach leaves
180 g turnip greens
¾ teaspoon salt
½ teaspoon freshly ground nutmeg
For the za’atar toasted sunflower seeds
55 g /1/3 cup sunflower seeds
1 teaspoon olive oil
1 teaspoon za’atar
extra olive oil, lemon juice and za’atar for serving
For the za’atar toasted sunflower seeds: In a small bowl, combine the sunflower seeds with the oil and za’atar. Transfer the seeds to a skillet over medium-high heat and toast until they’re golden and fragrant (about 5 minutes). Reserve.
For the soup: In a large pot over medium heat, add the oil, onion, garlic and ginger and cook for 10 minutes, or until the onion has softened. If the vegetables dry out during this time, add a few tablespoons of water to loosen things up.
Next add the diced sweet potatoes, cabbage, rolled oats and 5 cups of water. Bring the soup to a boil and, once boiling, decrease the heat to medium. Cover and cook for 10 minutes or until the vegetables are cooked through.
Finally add the spinach and turnip greens as well as the salt and freshly ground nutmeg. Cook for additional 5 minutes, or until the spinach and turnip greens have shrunk considerably.
Transfer the soup to the bowl of a food processor. Working in batches, puree the soup until it’s creamy and smooth. Serve with plenty of za’atar sunflower seeds on top, an extra dizzle of olive oil and a squeeze of lemon juice.

leave a comment