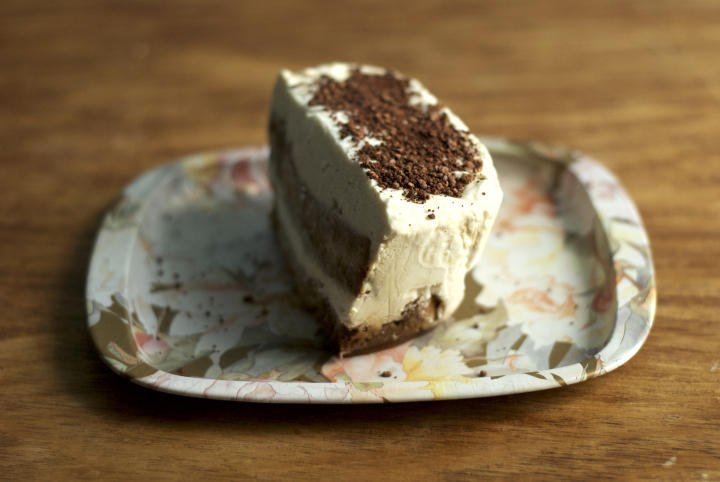
Vegan Tiramisu
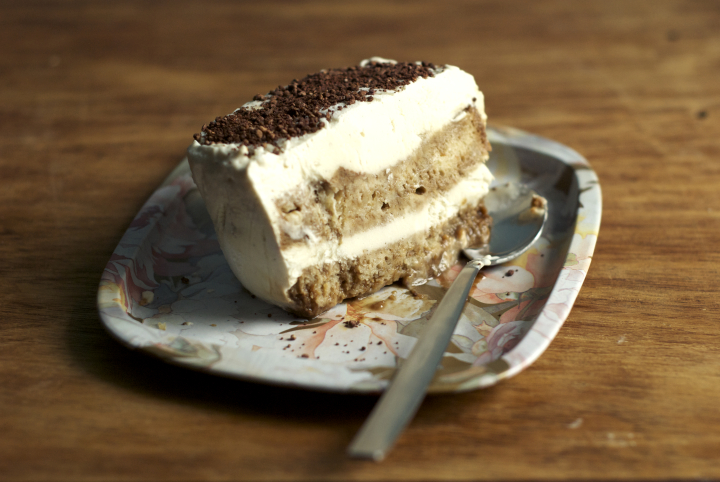
For a long time I wanted to make a vegan version of Tiramisu, the classic Italian dessert. However, though, that required some planning as I had to make the cake or cookie base from scratch, and because I’m usually not so go at planning recipes ahead of time, I kept postponing and almost forgot about it. Almost.
The other day I was reminded of my Tiramisu mission while having dinner with my dutch friend Anne-Marie, who came to visit me here in Porto. We went to an Italian restaurant I particularly like and she ordered Tiramisu for dessert. We brainstormed a bit about what would be the best approach to veganize it (Anne-Marie is the ultimate Tiramisu connoisseur), and came to the conclusion that, instead of trying to mimic the regular version, by using whipped soy cream and the likes instead of the dairy cream, the focus should be on the core flavours and textures of Tiramisu: coffee, Amaretto and biscuits.
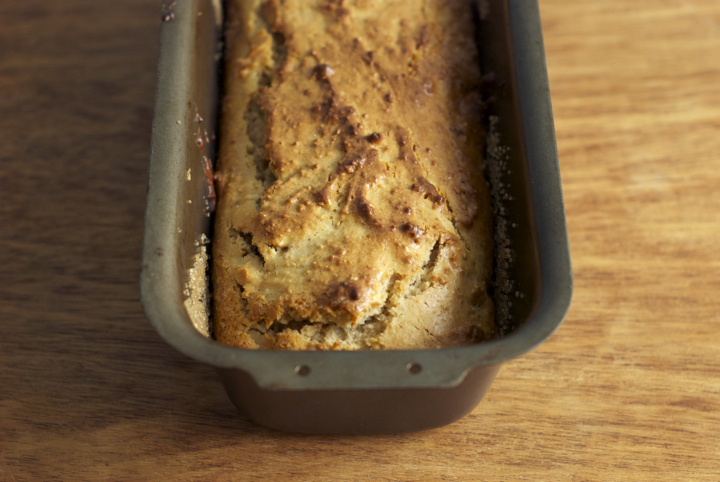
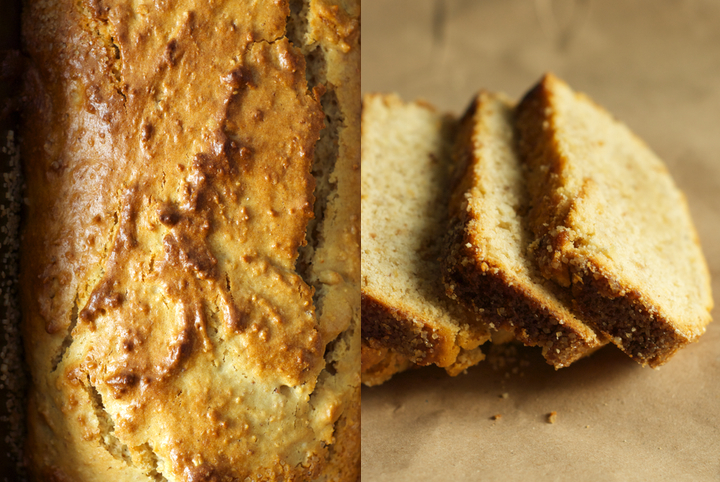
The creamy component of this dish is made by combining silken tofu and coconut cream, and I can guarantee you it’s quite a subtle combo, where you won’t either taste the tofu or be overwhelmed by the coconut flavour. As far as the biscuit part goes, I made a simple almond and amaretto cake that is then cut into thick slices and soaked with coffee. The final result is quite pleasant, not overly sweet and light in texture. Unfortunately, by the time I was making this dessert Anne-Marie have already returned home, but I’m positive she would give her approval. Guess I’ll make it next time we meet, we always happen to come up with creative food ideas when cooking together ;)
Vegan Tiramisu
(serves 6-8)
For the Almond Amaretto Cake:
Dry ingredients:
175 g / 1 ½ cups almond meal, slightly toasted in a dry skillet
270 g / 2 cups white spelt flour
¼ teaspoon fleur du sel
2 Tbs. flaxseed meal
1 ½ tsp. baking powder
Wet ingredients:
½ cup + 2 Tbs. brown rice syrup
125 ml / ½ cup soya or almond milk
2 Tbs. Amaretto
1 tsp. lemon juice
60 ml / ¼ cup olive oil
granulated brown sugar (1 to 2 Tbs.) and extra oil for coating the pan
For the Coffee Sauce:
185 ml / 3/4 cup boiling water
2 Tbs. coffee granules
2 Tbs. brown rice syrup
For the Coconut and Tofu Cream:
2 cans /400 ml full fat coconut milk, turned upside down and refrigerated overnight
1 package / 300 g silken tofu
1 vanilla bean, split lengthwise, seeds scraped and added to the bowl of a food processor
5 Tbs. brown rice syrup
1 Tbs. Amaretto
cocoa powder for coating
Pre-heat the oven to 180ºC.
To make the cake: In a large bowl, combine all the dry ingredients for the cake except the flaxseed meal. In another bowl, whisk together the wet ingredients along with the flaxseed meal. Put the wet mixture over the dry one and mix everything until a thick batter comes together.
Grease a rectangular baking dish with olive oil and coat it with the granulated brown sugar. Add the cake batter, smooth the top with the back of a spoon, and bake in the pre-heated oven for 35 to 40 minutes. Let the cake cool in the pan for at least 1 hour before unmolding and slicing.
To make the coffee sauce: In a heat resistant bowl, whisk the boiling water with the coffee granules and brown rice syrup until thoroughly combined.
To make the coconut and tofu cream: Open the coconut cans and discard the water (you only want the creamy part). Simply put all the ingredients in the bowl of a food processor and run the machine until the mixture is smooth and creamy.
To assemble: Cut the cake into 14-15 slices (they will be about 1cm thick). Add 5 of the cake slices to the bottom of a rectangular pan and cover them with half of the coffee sauce. Add half of the cream mixture on top of that, followed by 5 more cake slices and the remaining coffee sauce. Finally, cover with the remaining cream mixture.
Refrigerate the tiramisu for at least 24 hours. I like mine well chilled, almost frozen, so I cover the pan with cling film and put it in the freezer for 1-2 hours before serving (but only after it has chilled in the refrigerator). Dust the tiramisu with cocoa powder and serve.
Luísa’s Flatbread

I’m glad to have friends who like to cook. More than that, I’m glad to have friends who can actually cook quite well. There are some who have an undeniable sweet tooth; others who are their best when cooking savoury dishes; some others who are experts on the art of ultimate clean-up-the-fridge meals; those who don’t actually cook at all, and even those rare species who don’t actually cook at all but always value a great, high-quality meal.
Having said this, I’m not quite sure if Luísa matches any of these patterns. I’d rather say she just enjoys cooking, and specially fascinates (as I do) with the social phenomenons which revolve around the act of preparing and eating food such as, for instance: people cooking together, exchanging ideas, methods and recipes; sitting at the table and sharing a good, homemade meal, with closest friends and family. We’ve been talking lately about making a sort of cooking meeting, where we (amongst other people) would cook and share our specialities and enjoy a great meal together in the end – I’m so looking forward to that to happen.

We didn’t know we had common visions towards food until a few months ago, when we got to know each other better at that barbecue party thrown in order to celebrate the end of the semester. She was preparing flatbreads and, as a bread lover you already know I am, that immediately caught my attention. Her method (I won’t call it a recipe, as she was actually following her intuition in order to achieve the desired results) couldn’t be easier: flour, salt, olive oil and water, all mixed together in order to produce a lovely soft dough which is afterwards rolled out and cooked in the oven until crisp. Since then, I’ve used her “method” a lot of times always with successful and delicious outcomes, so today I thought writing down a proper recipe for you. This time around, I have made the flatbreads in the grilling pan and actually enjoyed them more that way (by grilling them, you can control the cooking time more easily, avoiding over-cooking). Luísa had, in her version, only used regular flour ,so I thought combining it with spelt flour for a dough with a more distinct flavour – if you don’t have it at hand, regular (preferably high grade) flour will do it. You can certainly play a lot with this recipe too: adding spices, fresh or dried herbs to the dough is always a good idea. So far, I’ve tried a batch with dried thyme and oregano and another one with crushed cumin seeds – both were that good. Thank you Luísa! ; )
Luísa’s flatbread
(makes 5 to 6 portions)
Ingredients:
108 grams (3/4 cups) high grade flour
65 grams (1/2 cup) spelt flour
½ teaspoon fleur de sel
¼ cup olive oil, plus extra, for drizzling
1/3 cup (80 ml) warm water
1. In a large bowl, combine the dry ingredients.
2. Add the olive oil to the bowl, stir with a spatula or a wooden spoon, and then slowly pour in the water, stirring as you go. Now, you can start working the dough with your hands.
3. Transfer the dough to a floured surface and kneed it for 5 minutes, or until it’s elastic. Add a bit more flour to the dough if it feels sticky (I didn’t have to add any, but I suspect it always depends on the temperature and/or humidity of the place you are in).
4. Divide the dough into 5 equal portions. Roll out each portion so that it’s about 32 cm (about 12.5 inches) long. Let it rest, covered with parchment paper, for 5 minutes at room temperature.
5. In the meantime, heat a large grilling pan over medium-high heat and lightly coat with olive oil. When hot, but not smoking, add the flatbreads (I added one at the time since my pan wasn’t large enough to accommodate more than one unit) and grill them for 1 to 2 minutes on each side or until golden brown.
6. Serve right after cooking, drizzled with a little more olive oil and with an extra pinch of salt.
Tahini Cookies

These tahini cookies might be one of my favorite cookies right now. As I’ve told in a previous post, I like my cookies with not too much added fat and sugar, and I guess these ones fit the bill just right. They have tahini in there, which is their main source of fat, but at least it’s that of a good and healthy type. The taste of these cookies is quite nutty and dense, and the fact that they are coated in muscavado sugar and sesame seeds, adds crunchiness and extra flavor to them. I encourage you to use organic, dark tahini in here, as it is the variety that packs more flavor - the white one is usually a bit mild and bitter. An extra bonus: the cookies are also gluten free.


Tahini Cookies
(makes about 18)
1 and ¼ cups (125 grams) spelt flour
½ teaspoon baking soda
¼ teaspoon salt
½ cup (60 grams) plus 1/3 cup light muscavado sugar
1/3 cup sesame seeds
½ cup (115 grams) dark organic tahini
1/3 cup (75 grams) apple purée
2 tablespoons sesame oil
1. In a large bowl, and with the help of an electric mixer, combine the tahini, apple purée, ½ cup of muscavado sugar and the sesame oil, until you have a smooth batter.
2. Sift the flour into another large bowl. Add the baking soda and salt and mix well.
3. Slowly pour the wet mixture over the dry mixture, mixing everything with a spatula as you go, until you have a soft dough. Shape the dough into a ball, wrap it tightly in plastic, and refrigerate it for at least 1 hour.
4. Preheat the oven to 180ºC – racks in the top and bottom third of the oven. Line two baking sheets with parchment paper.
5. In a bowl, mix the sesame seeds with the remaining 1/3 cup of sugar.
6. Cut two rectangles of parchment paper. Place one of the sheets of paper on a clean surface and evenly spread half of the sesame seeds and sugar mixture over it.
7. Unwrap the dough and place it in the center of the sheet of parchement paper in which you’ve spread out the sesame seeds and sugar. Now, you want to use the other sheet of parchment paper, and roll out the dough between the two sheets, to a rough circle 24 centimeters in diameter.
8. Spread the remaining sesame seeds and sugar over the circle of dough, and gently press it down with your hands to make them stick to the dough.
9. With a cookie cutter, stamp out rounds of dough and place them in the prepared baking sheets. The cookies won’t spread out that much while baking, so you can put them close together.
10. Bake the cookies for 10 to 11 minutes. Don’t overbake them, or they’ll get dry.
11. Let them cool for 10 minutes on the baking sheets, then transfer to a rack to cool completely. The cookies will keep, stored in an airtight container, for up to 5 days.
Poppy Seed Buns

I’ve always had unsuccessful atempts at bread baking. Part of the unsuccess was because I didn’t understand my oven right and did not control its temperature the proper way. In my humble opinion (I’m here relying in my experience so far) the temperature at which the bread is cooked, as well as the baking time, are really important to the success of homemade bread. It seems this time around I hopefully got both of them right, and here I am sharing these lovely Poppy Seed Buns with you.
This recipe was actually a hit around here. I pratically ate two of these buns a few minutes after taking them out of the oven, and another one later on the same day, accompanied by a cold glass of almond milk. As you can see by the picture above, some of my buns have these weirdo and not perfect round shapes. I actually did it on purpose, because I really love to tear off those pieces of crusty dough while I’m eating them. It’s funny that I did this for the sake of my particular taste and totally forgot about the aesthetical part… But, if you aren’t like me, just shape them into rounds and they’ll look way more professional (aesthetically speaking) than mine. They’re delicious eaten still warm from the oven, with a knob of vegan margarine and a little something of salt. ; )


Poppy Seed Buns
(makes 8 buns)
2 and ½ teaspoons active instant dry yeast
1 and ¼ teaspoons table salt
2 teaspoons sugar
1/3 cup poppy seeds
1 and ¼ cups (310 ml) warm water
2 cups (260 grams) bread flour
1 cup (130 grams) spelt flour
3 tablespoons olive oil
1. In a large bowl, combine the flours, salt, sugar, poppy seeds and yeast.
2. Add the olive oil and water to the dry mixture. Mix the ingredients with a wooden spoon to moisten the flours. Then, use your hands to help the dough come together and shape it into a ball.
3. On a lightly floured surface, knead the dough for 10 minutes. It should be soft and elastic. Add up to ¼ cup more flour if it seems too sticky.
4. Lightly coat the dough with olive oil, return it to the large bowl, cover with a kitchen towel and leave it to rise, in a warm place, for one hour or until doubled in size.
5. Preheat the oven to 200ºc.
6. Knead the dough in the bowl for 1 additional minute.
7. Divide the dough into 8 equal parts and shape each part of dough into a round of approximately 7 cm in diameter.
8. Place the pieces of dough in a large baking tray lined with parchment paper, making sure they’re at least 5 cm apart from each other.
9. Cover the tray with a kitchen towel and leave the dough to rise, in a warm place, for 30 minutes.
10. Place the baking tray in the preheated oven and cook for 18 to 20 minutes, or until golden brown. Mine were done after 18 minutes.
10. Let the buns cool in the tray for 30 minutes before eating. They’re best the day they’re made, preferably within a few hours right after baking.

4 comments