Buckwheat and Hazelnut Pancakes
I think I just found out the reason why I don’t normally post breakfast recipes in here. I love breakfast and, in fact, mornings are the time of the day when I feel the most hungry. However, shooting breakfast foods is, for me, a bit painful because that means I have to hold back my hunger and only eat after I’ve taken pictures of said foods (which can take a while).
After waking up and drinking a few glasses of water, I go into the kitchen and, usually, cook myself a big bowl of porridge. When I’m feeling lazy, granola with almond milk will do. I like routine and I’m pretty good at sticking to it, so my breakfast doesn’t vary much. Actually, and that might come as shock to some of you, I only tasted pancakes a few years ago, when this book came out and I tried its recipe (which I highly recommend) for the well known breakfast treat. This time around, though, I decided to create a pancake recipe following my own instinct. I’m not quite sure that was a good idea: my early attempts didn’t come out well, so I kept trying through the whole last week and ended up eating pancakes for breakfast for the most part of it.
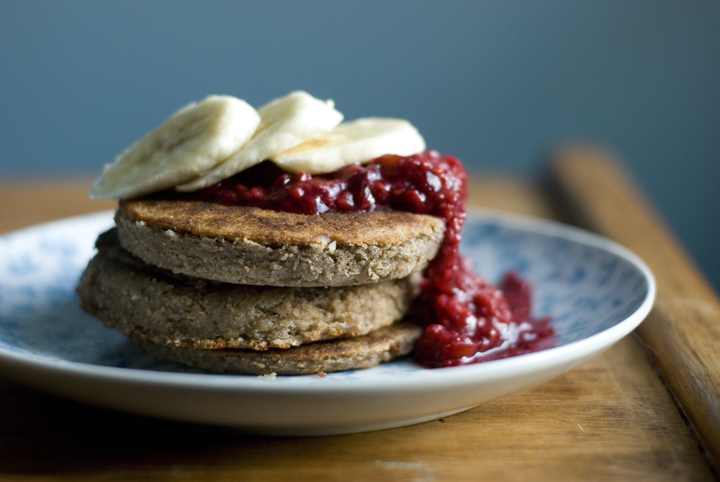
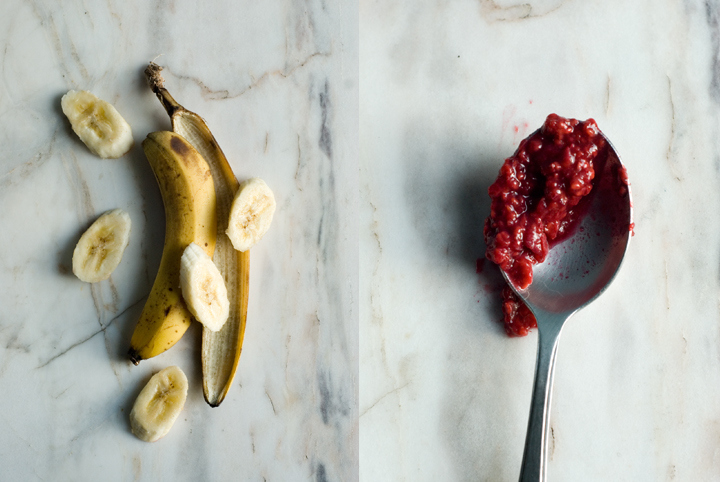
There’s no actual science behind making pancakes and you can definitely adjust the process a bit to your own liking. There are people who prefer theirs fairly thick, while others might like them more on the thinner side. I fit into the former category. For this recipe, and in order for the pancakes to have a good height, I used a metal ring so that the batter didn’t spread to the sides. This is, of course, an optional extra step. For serving, I topped mine with a raspberry-date compote I’ve made early last week, but they do taste heavenly with just a good drizzle of maple syrup on top.
Buckwheat and Hazelnut Pancakes
(makes 4 to 8 pancakes, depending on their size)
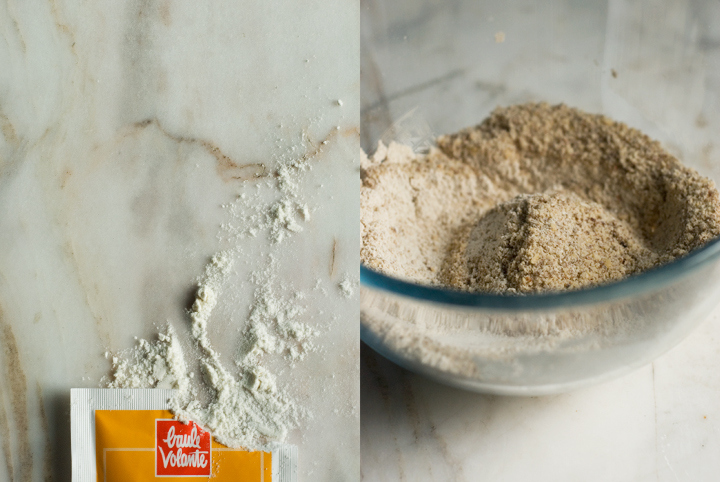
50 g / 1/2 cup hazelnut meal
120 g / 3/4 cup buckwheat flour
2 teaspoons baking powder
1/4 teaspoon salt
1 tablespoon coconut sugar
310 ml / 1 1/4 cups oat milk (or any other dairy-free milk)
melted coconut oil for greasing the skillet
Add all the ingredients (except the oat milk) to a bowl and mix well. Slowly pour in the oat milk and whisk to combine. You’ll get a fairly thick batter, which is what you’re looking for.
Using a pastry brush, grease a large non-stick skillet with the melted coconut oil. Turn the heat to medium and, when the pan is hot, drop for each pancake 3 to 4 tablespoons of the batter. Cook the pancake for 2 to 3 minutes or until its top has just started to set. With a spatula, turn it over and cook for one additional minute.
Repeat the process with the remaining batter. Make sure you grease the pan with additional coconut oil each time you drop the batter into the skillet. Serve the pancakes with agave nectar or maple syrup or, as shown above, with a raspberry-date compote and banana slices.
(eggless and dairy-free) Crème Brûlée

I’ll start this post by sharing with you some of the kitchen disasters that have happened around here lately. The first one happened a couple days ago, when I attempted to make some hazelnut cookies: some minutes after I’ve put them in the oven, we heard some noises coming from the oven, and in the end it turned out one of the oven glasses has broken. Surprisingly, the cookies weren’t affected and were still edible.
The second disaster happened a few days later: I was working on this crème brûlée recipe and used the food processor to blend all the ingredients I was going to use; suddendly, when trying to pull out the blender jar, all the liquid spilled away on the floor – perhaps I didn’t attach the jar properly to its base? After cleaning the kitchen floor, table and counter, I was determined to start over again – I wanted crème brûlée and, whatever happened next, I’d have my serving of it that night.
This créme brulée fever has triggered thanks to the MasterChef Australia (a TV show I’m completely addicted to, by the way) as in one of the shows I watched recently, the contestants were taught, in a masterclass, how to perfectly make the said dessert. I never cared too much for crème brûlée, but the moment I saw and heard on the show that burnt sugar surface crackling with the hit of the spoon, I was determined to make my own version of the french classic. The MasterChef recipe, even though looking (and certainly tasting) incredible, relied on eggs to get that pudding like texture – soft, smooth, but somehow solid. My purpose, when attempting at making an eggless version, was to achieve a similar consistency as it is nearly all crème brûlée is about. Arrowroot flour and agar agar flakes were then used in order to give creaminess and structure to this vanilla flavored custard; to finish things off, a good layer of golden and sort of smokey-tasting sugar was added, for extra sweetness and yumminess.

(eggless and dairy-free) Crème Brûlée
(for 5 sevings)
ingredients:
4 cups (1 liter) non-dairy milk (I used soy milk, but almond milk would work as well)
1/3 cup (65 grams) muscovado sugar (plus extra, for the topping)
4 ½ tablespoons arrowroot flour
1 3/4 teaspoons agar agar flakes
1 ½ teaspoons vanilla extract
1 cinnamon stick
Notes: I’ve used agar agar flakes in here, and even though I’ve blended all the ingredients in the food processor before actually start cooking (as it’s suggested below), I could still feel some little pieces of agar which haven’t been blended properly. They were so few I actually didn’t mind, but if you want to avoid this, use powdered agar instead – you have to use less, I’d say ¾ to 1 teaspoon (I haven’t tested, so this is merely referential). On the other hand, feel free to use a vanilla bean (split in half, lengthwise, seeds scrapped straight into the pot) instead of vanilla extract.
1. Put all the ingredients in a food processor or vitamix and mix, at medium-high speed, for 30 seconds, or until everything is well blended.
2. In a large pot over medium heat, pour the mixture and stir with a spoon, until it barely starts boiling. It might happen that some scum forms on the surface – you can skim it off easily with a metal spoon. As soon as the liquid is boiling, decrease the heat to low and continue to whisk vigourously for 10 to 12 minutes longer. The mixture should thicken up substancially and you’ll know it’s ready when, while stirring, the spoon leaves trail marks, showing off the bottom of the pot.
3. Divide the créme brulée among 5 ramekins, and let them cool at room temperature. Once cooled, refrigerate for at least 30 minutes.
4. To make the “burnt” topping, add 1 tablespoon of sugar on top of each serving and, using a kitchen torch, caramelize the sugar, working in circular moves. Add up to 1 more tablespoon of sugar to each rameking, if you want a slightly more thick topping.
5. Let it set for 5 minutes before serving. Bon appetit!

12 comments